Icon Diploma Student

Learning to see with the eye of the heart

Posts tagged ‘Aidan HArt Icons’

Archangel Michael part 3

First thin layers of highlights applied to define the main forms of the face.

Hello again!

It’s time to add some face highlights. I’ve been looking through my old class notes (from 2014) and found some really helpful reminders. Aidan (Hart) recommends that we should aim to apply 3 (but no more than 4) layers of highlights – easier said than done!

First layer of face highlights:
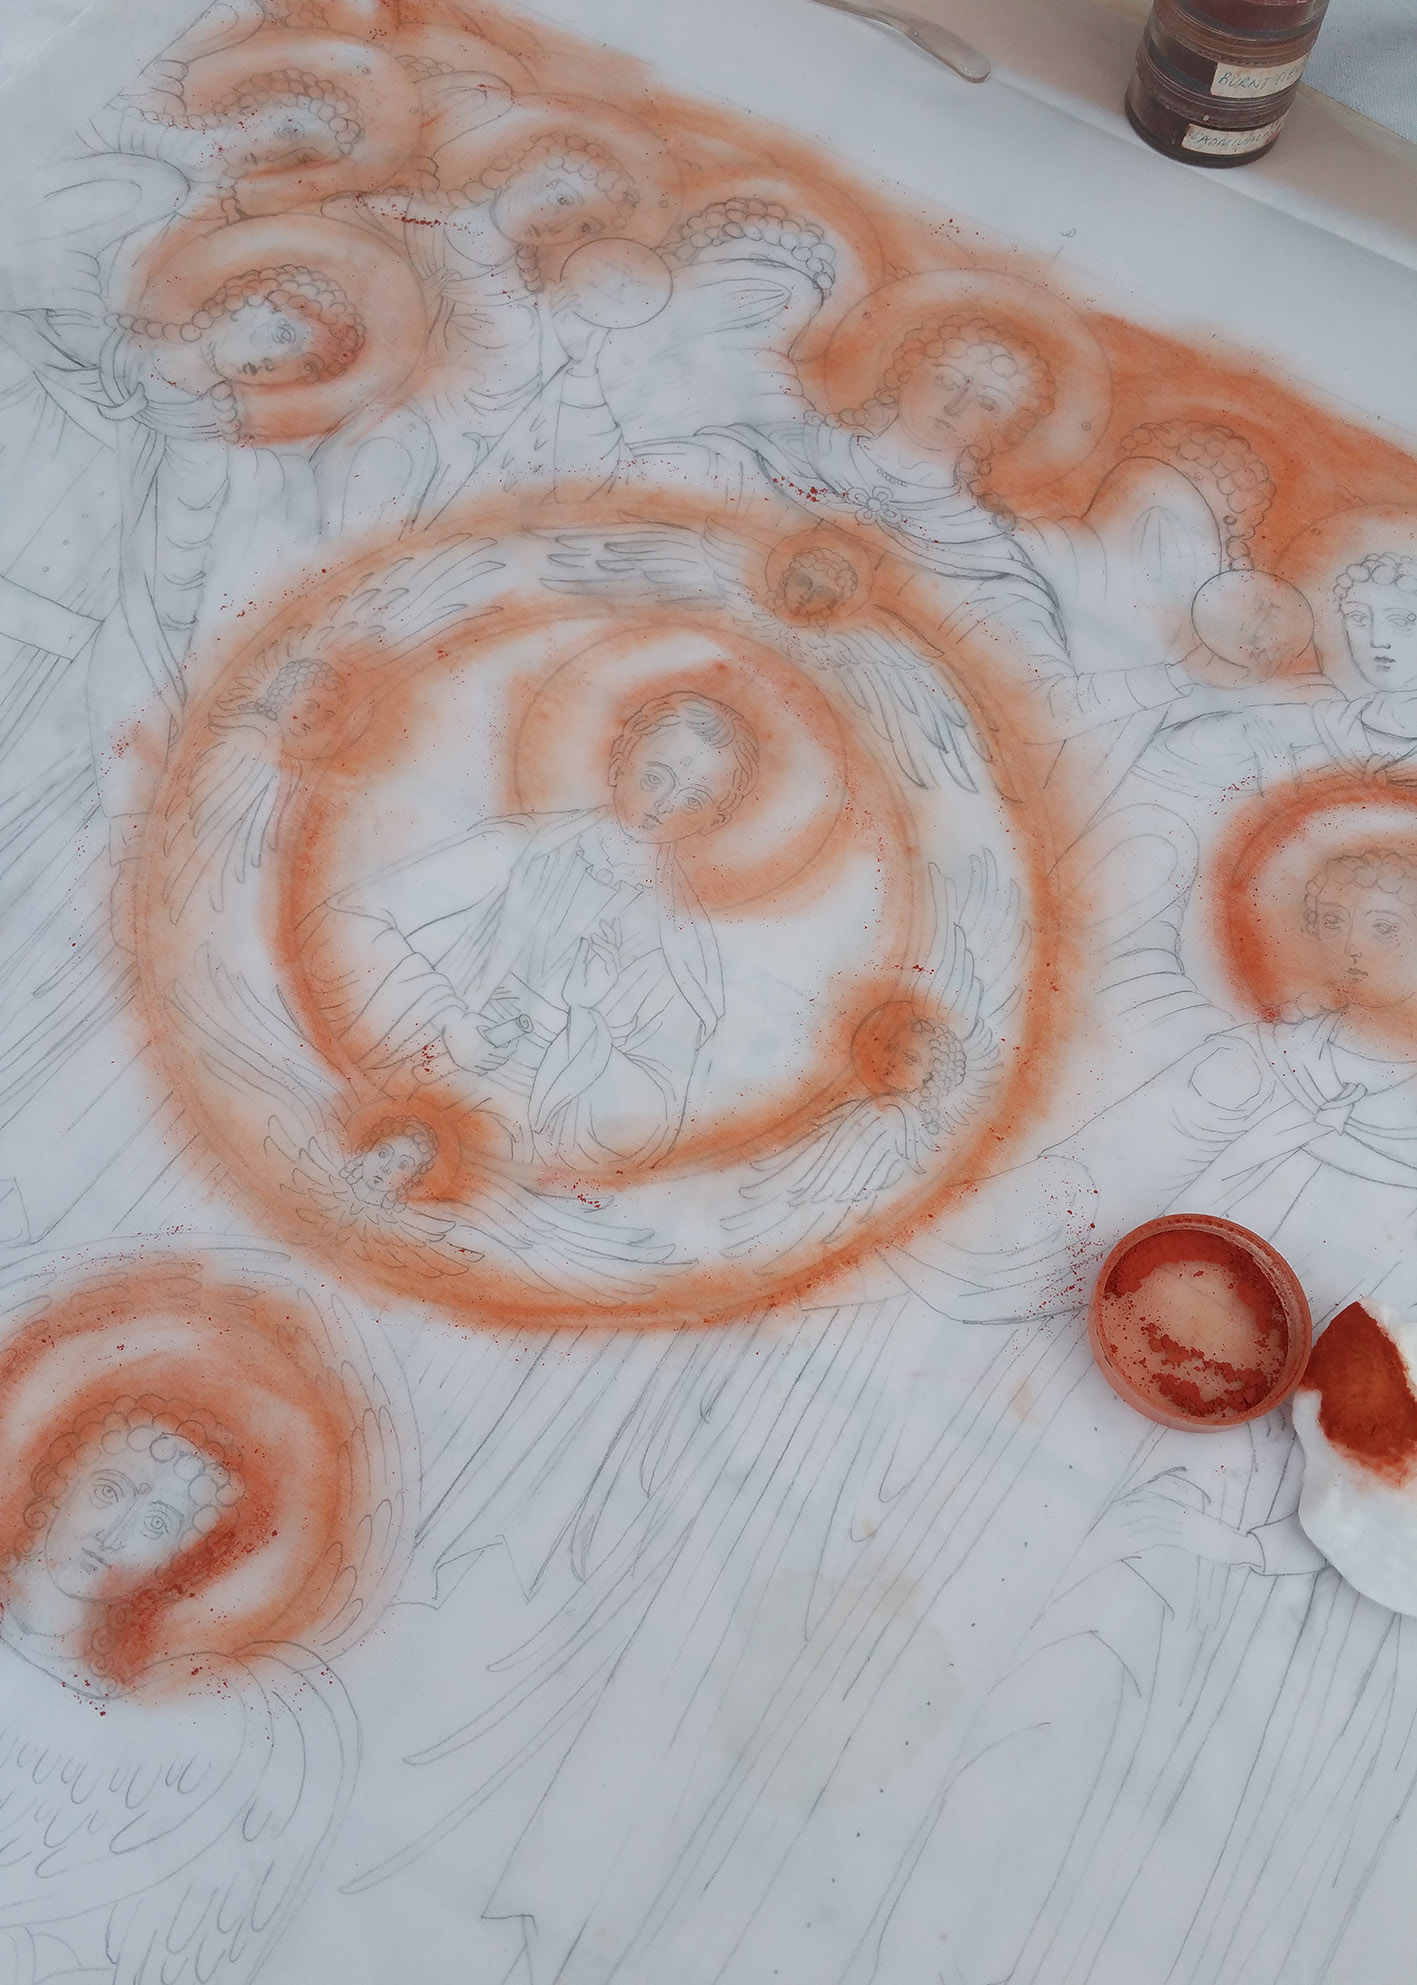
Start by mixing plenty of the golden yellow (you don’t want to run out as it is very hard to remix the same shade). Use a light yellow which brightens gradually by approx. 20% with each layer. Mix yellow ochre light (Maimeri) and a touch of Titanium White. Paint sample swatches to see the contrasts as you want to avoid a big change such as 50%. The photo below shows me trying to find the 20% difference – I will keep trying! It might also help to use a palette with bigger dimples but this was for a different smaller icon.

Mix the white separately before adding to the yellow in very small quantities.

Include a brush of highlight over the lower lip.

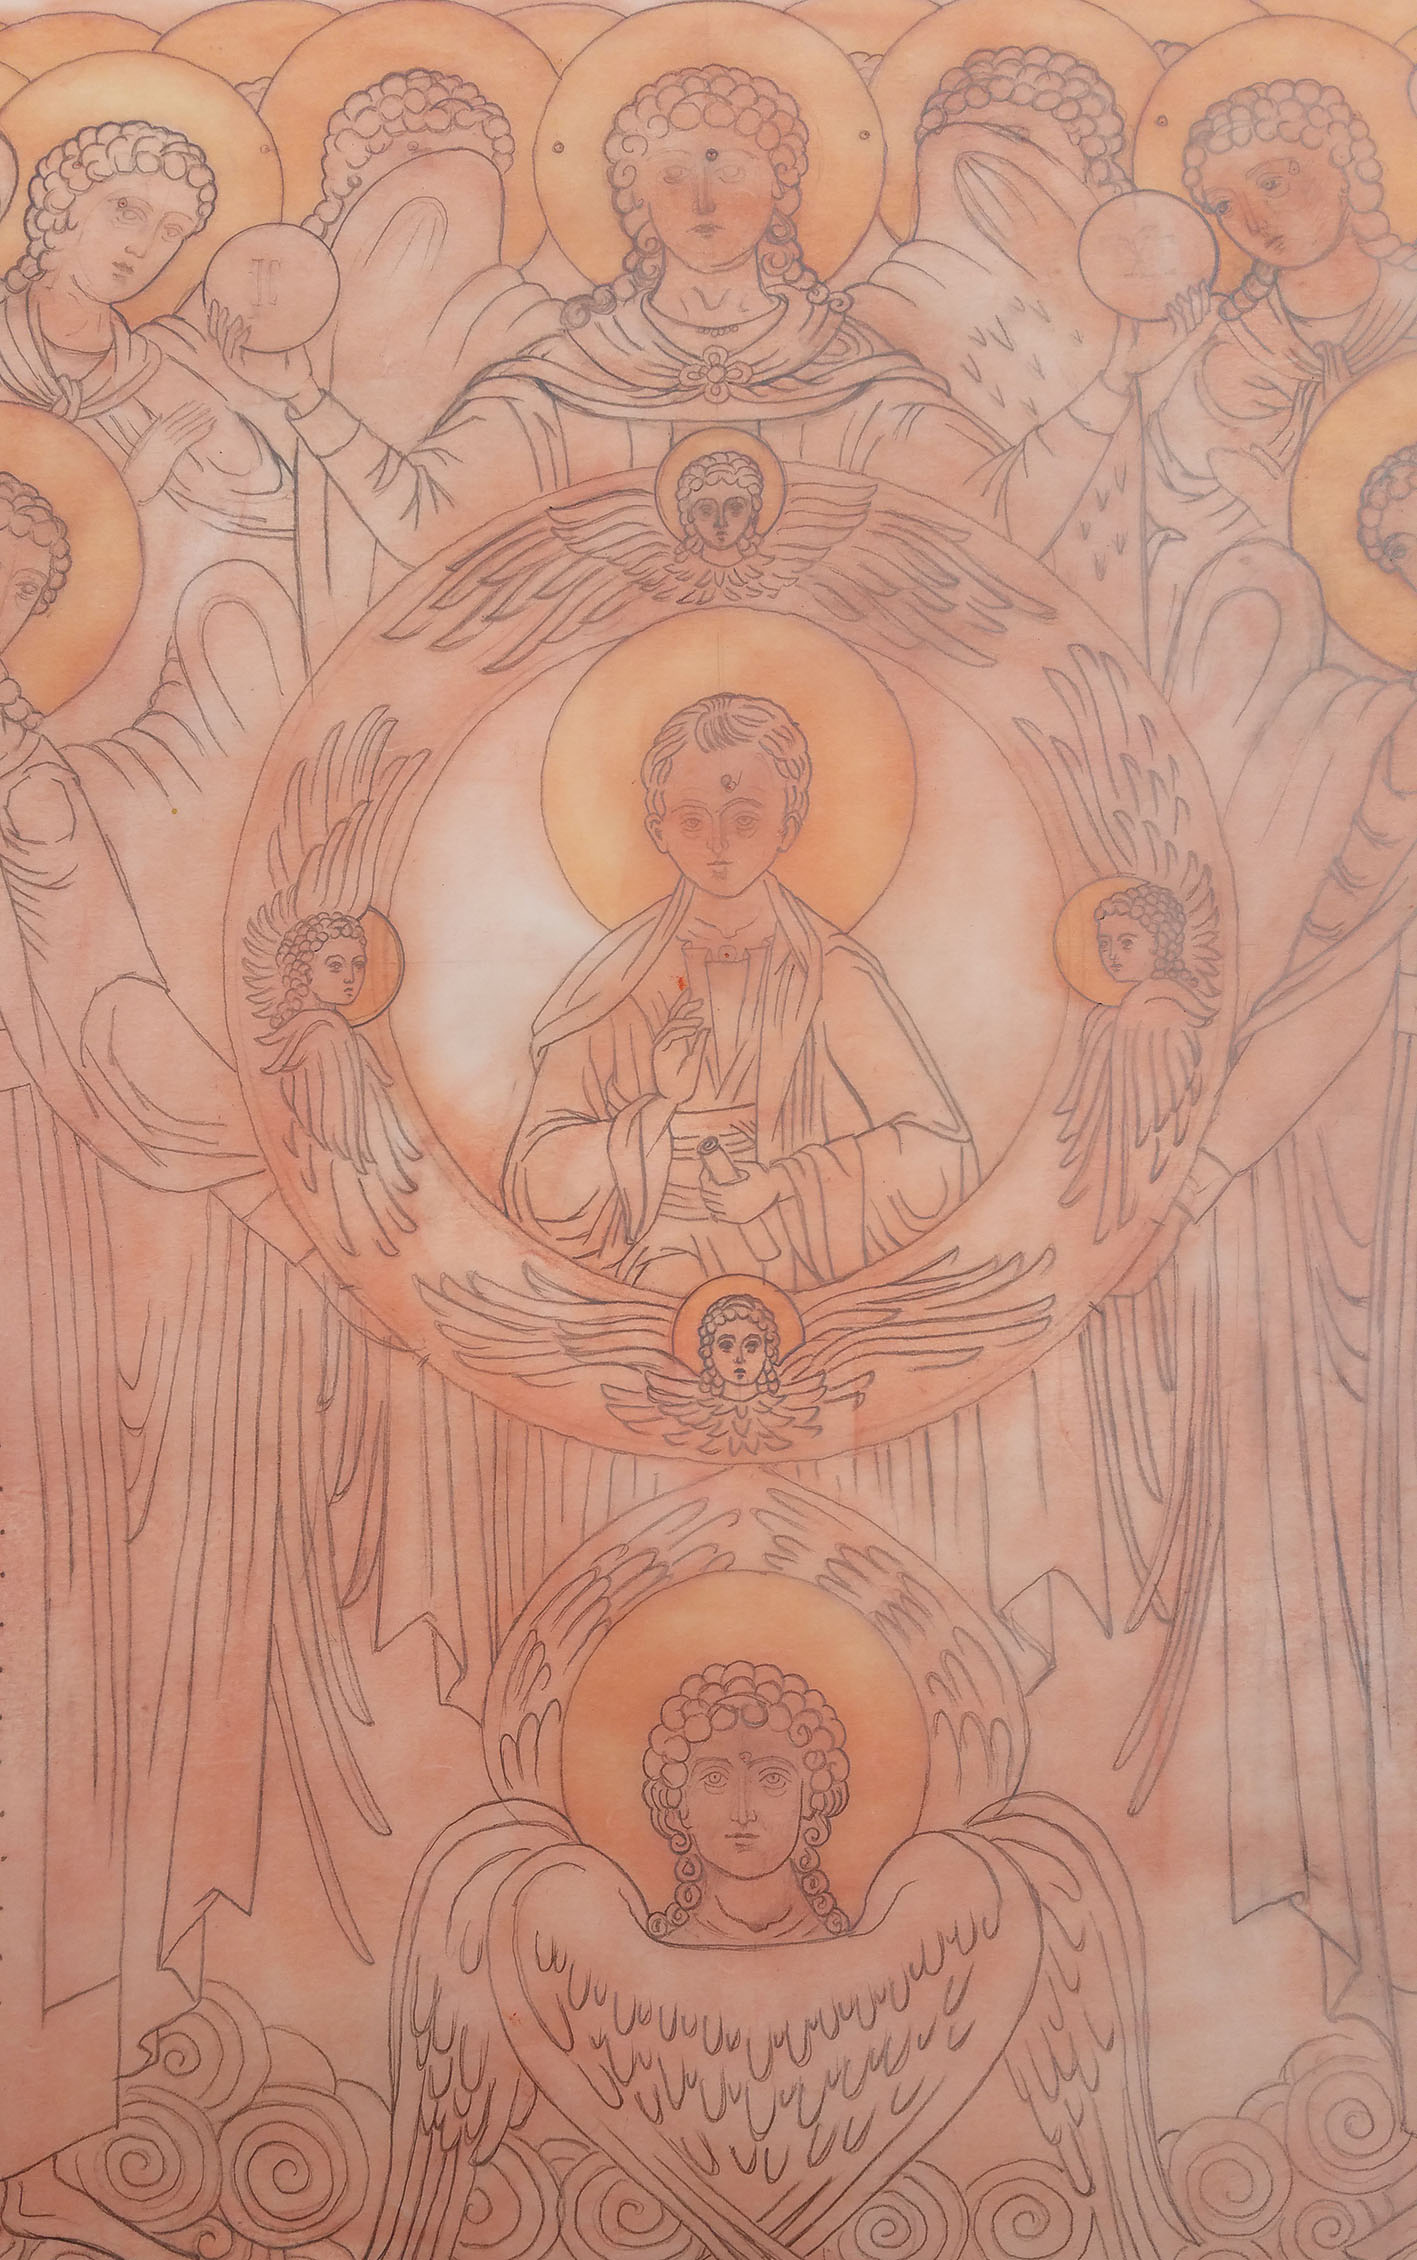
You can’t tell if it is the right colour until you have applied a thin layer and let it dry. Start very lightly on the ear. Wait till it dries before you proceed with the colour. You are aiming for 20% lighter than the membrane layer.

Paint with accuracy. Look carefully 2 or 3 times before you begin. Use this opportunity to correct your underpainting.

With a size 3 brush, (maybe size 2), apply the paint thinly over the higher parts of the face, and feather out with dry brush technique. Use a watered down mix of your colour to feather out edges, but brush out most of the paint on your testing paper first. Build up layers thinly and watch out for puddling!

At this stage the layers have got quite patchy – a wash of ochre havanna will blend this.

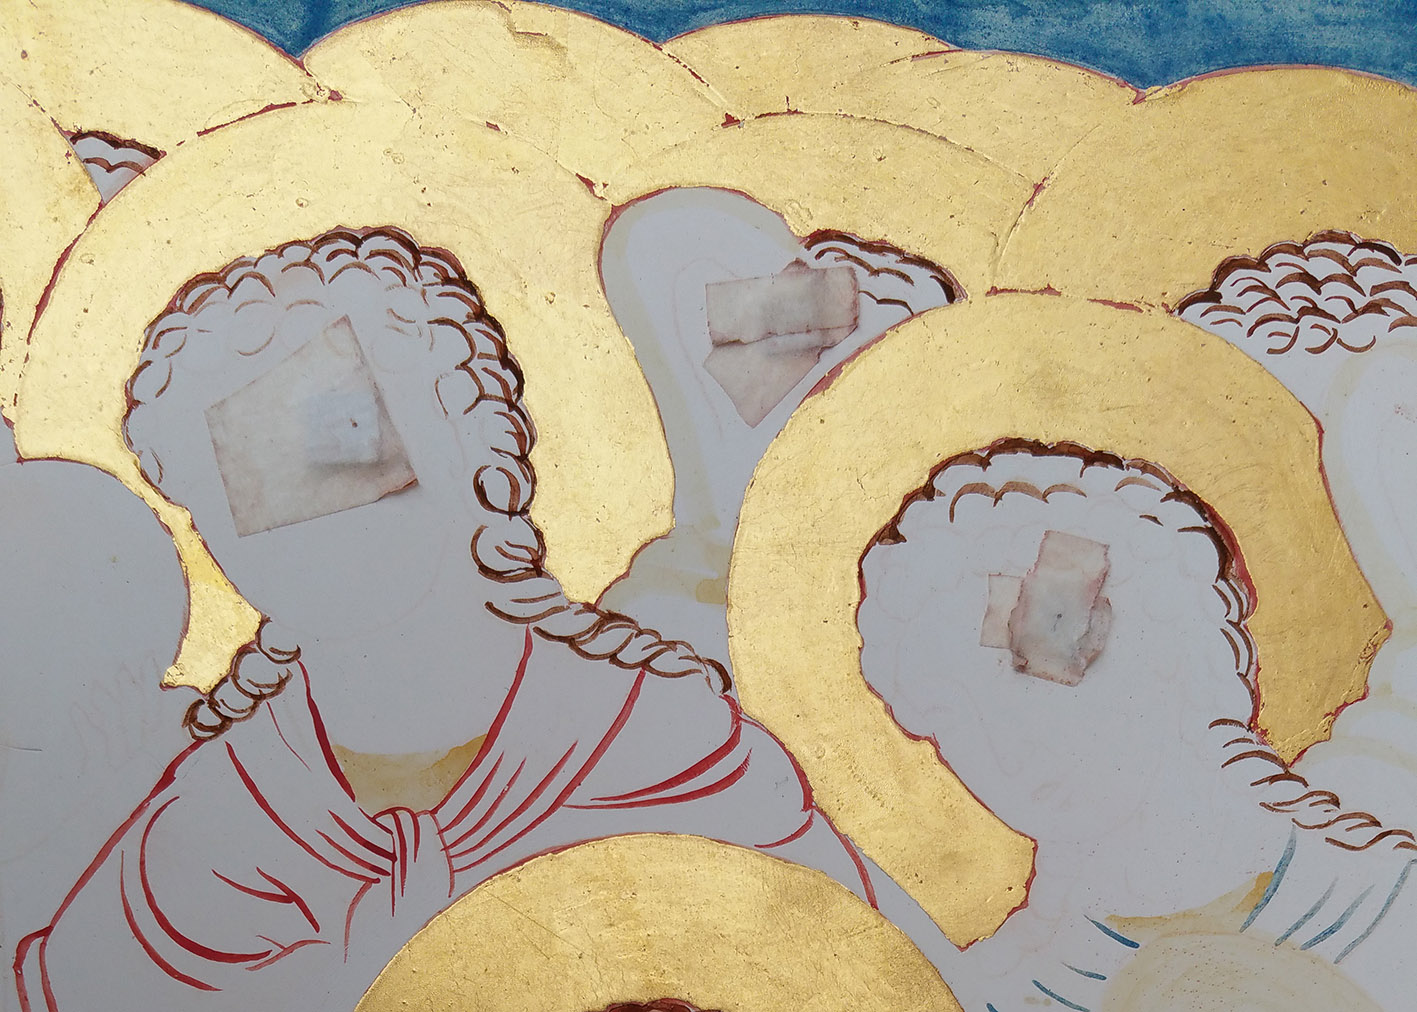
Leave the eyes till a later stage, but include the flesh around them.

Tip: Look for curves and equally, don’t round up sharp corners.

Leave space around the highlights so the mid tone underpainting remains. Wait till it dries then apply another layer of the same mix as it will dry close to the colour of the membrane. Don’t cover all of the membrane.

Make sure the brow bone is deep. Keep the angles of the brow. Mind the direction of your brush strokes and spread the brush to feather out.

Second layer:
Make sure first layer has properly dried. Look closely at the original and identify the high points of the eyebrows, forehead, nose, cheeks, chin, ears. Note the direction of the face. Make sure you highlight the upper cheekbone to keep the width of the cheekbone next to the eye.

Add a little more white to your mix and test.

Tip: if you go too light too soon, add a thin warm glaze of Italian Warm ochre (French Havanna is very similar). It also acts a harmonising layer when all the highlights (except the ‘snow’) have been applied.

‘No confusion, no division’.

Third layer of highlights
Repeat the process over a smaller area. Be careful to look closely at the high points. The paint has more white and is more opaque. Again, be careful to apply thinly, not too much water, feather out edges and build up in layers. If it looks too white, add a warm glaze.

Tip: avoid sudden changes of depth or contrast. Shading should all be gradual.

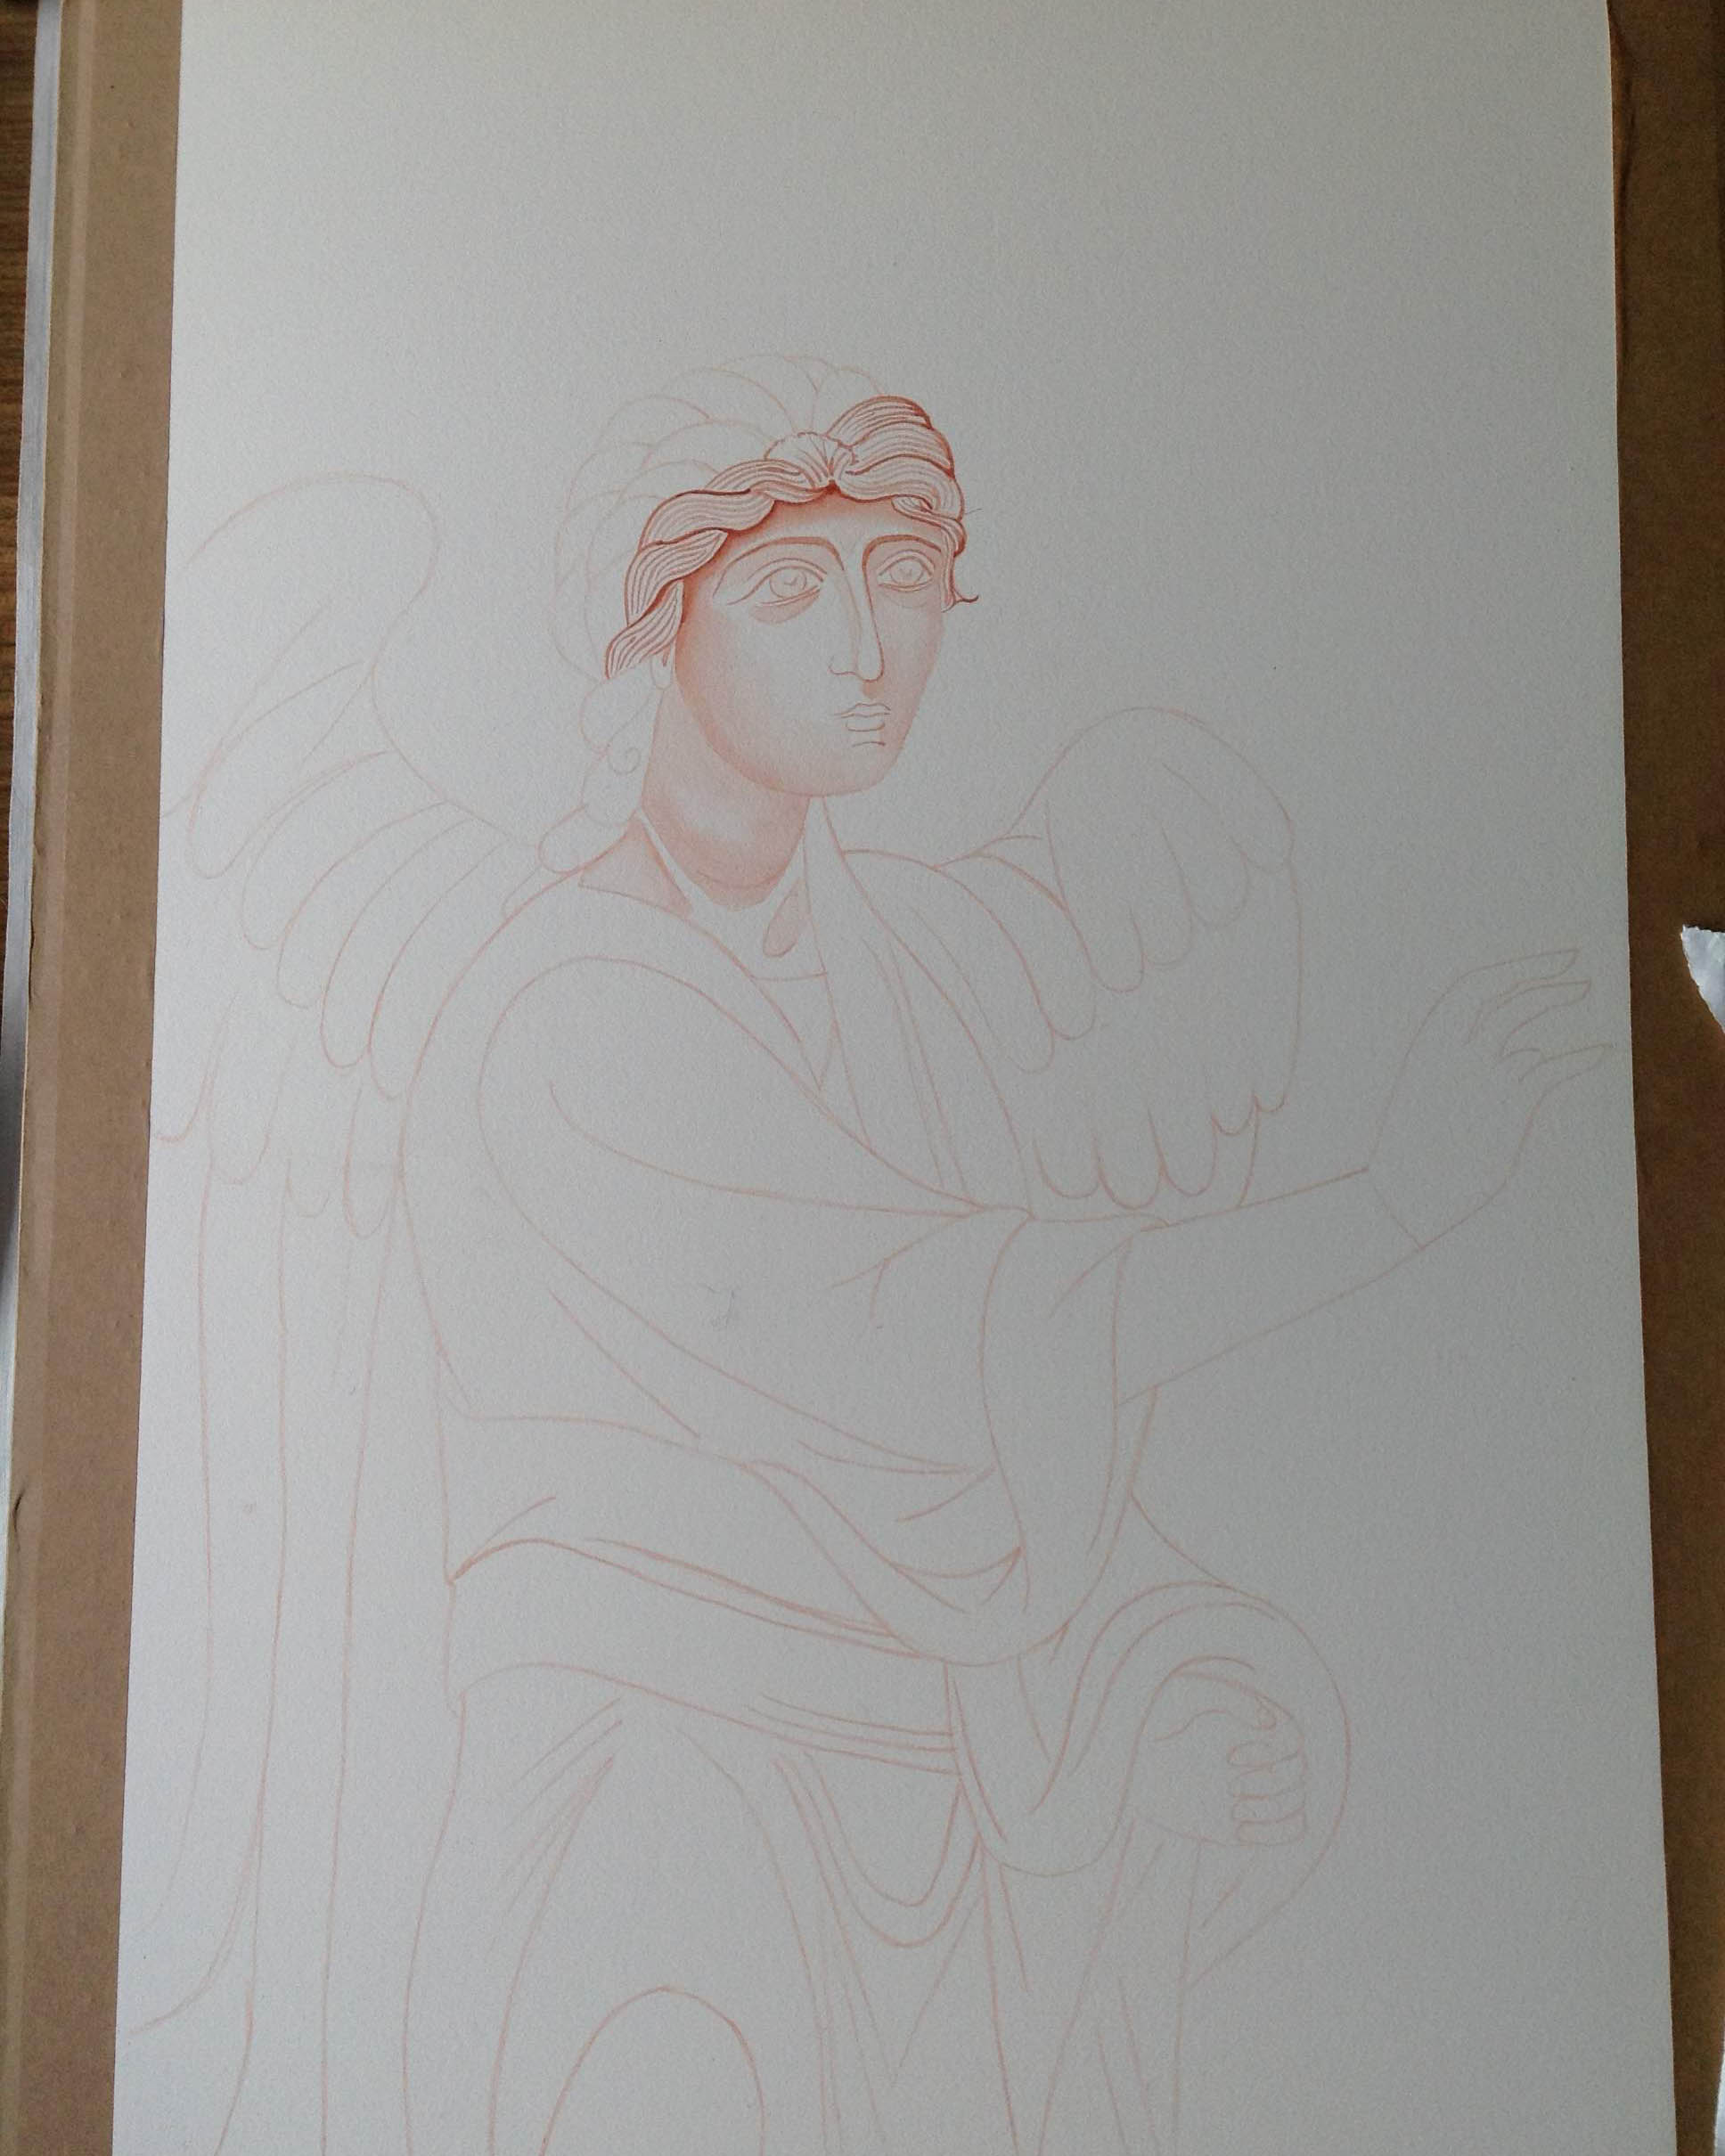
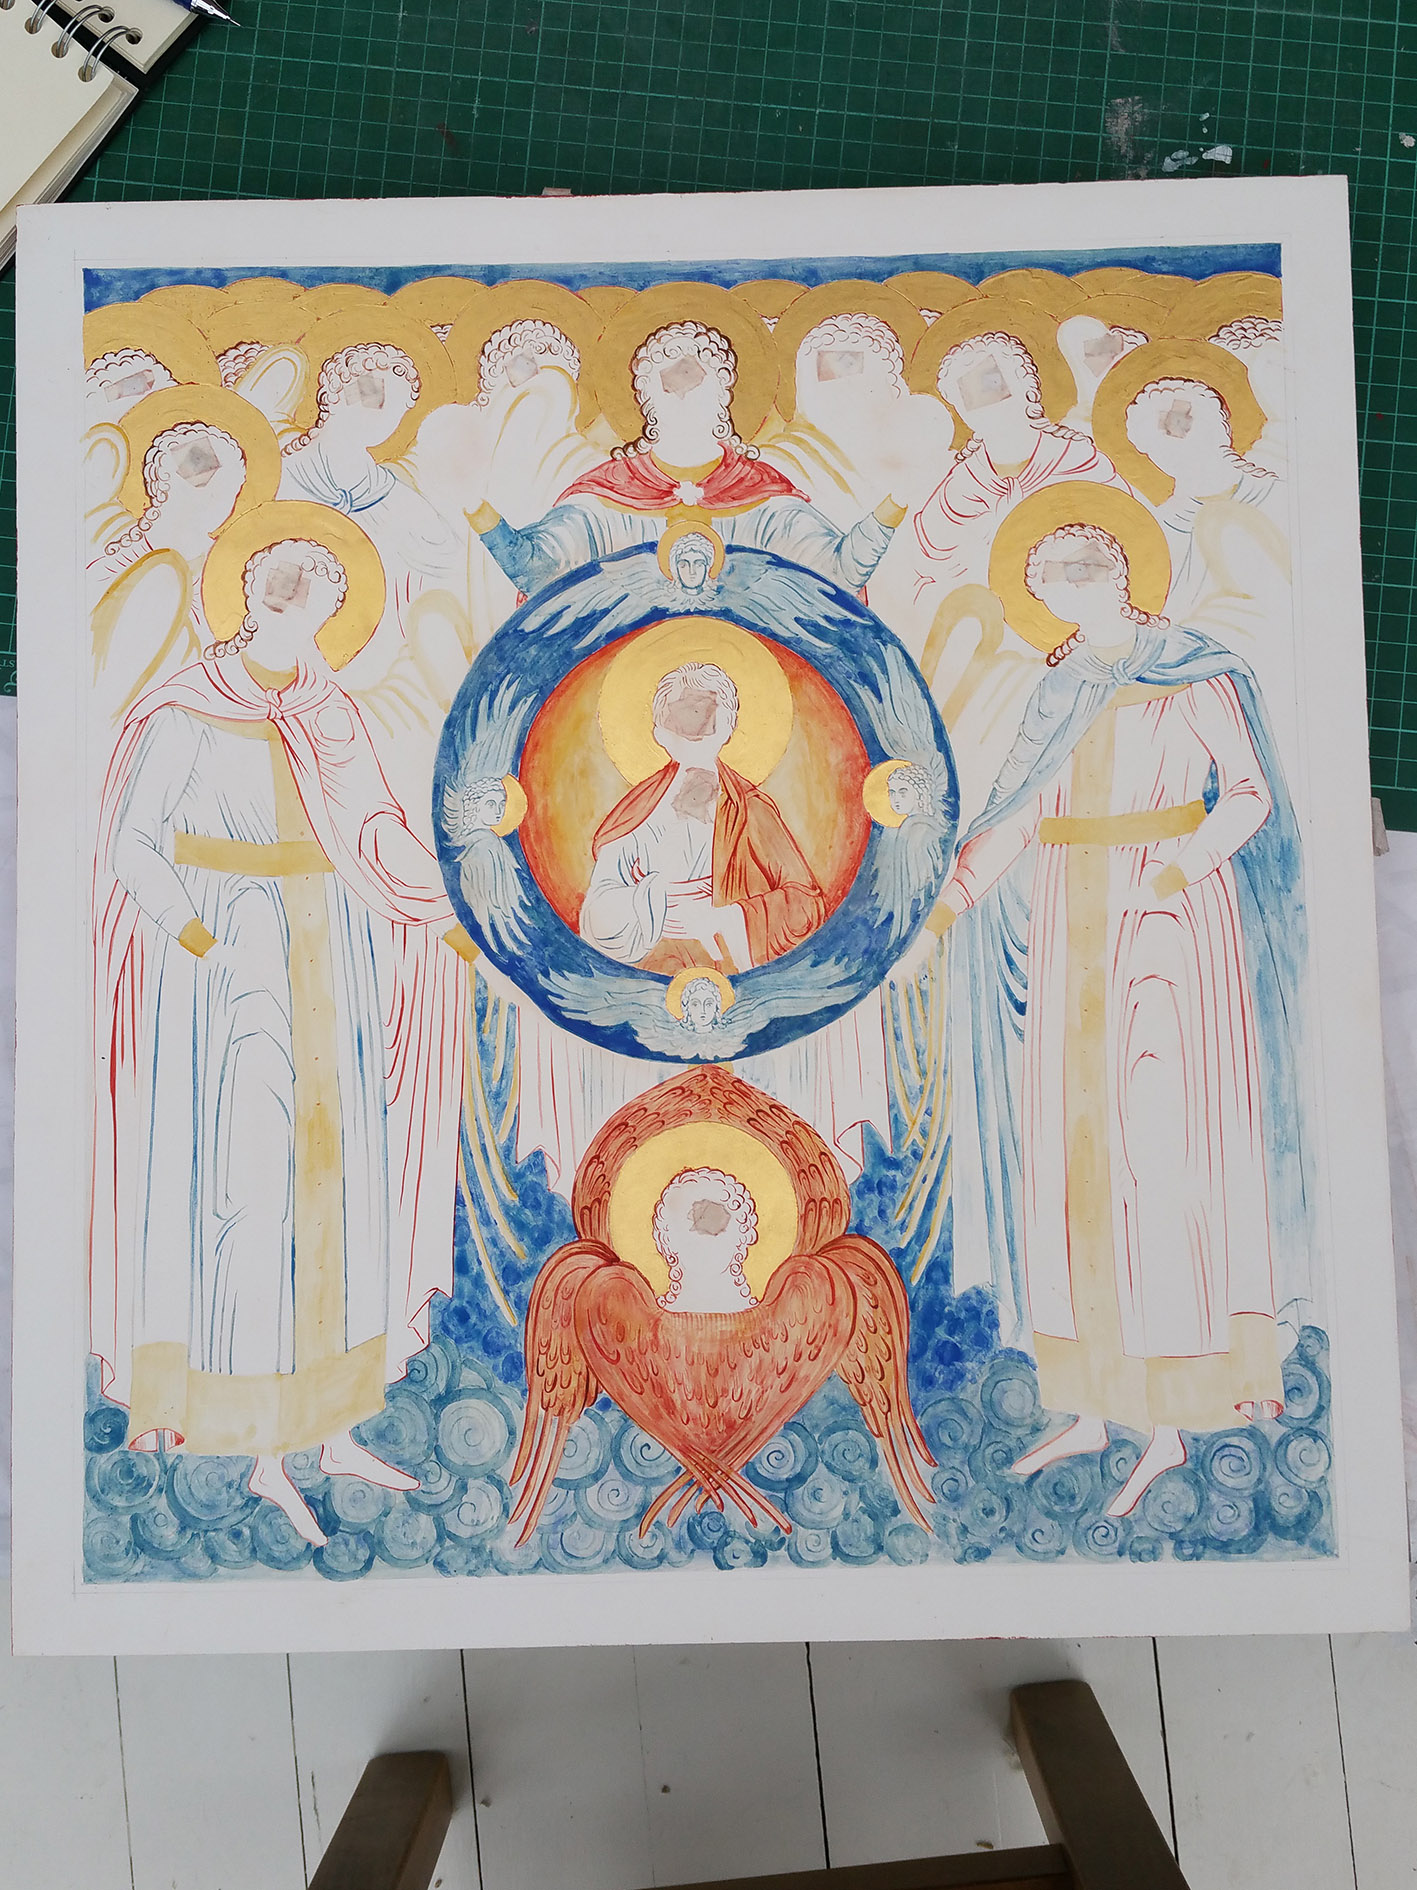
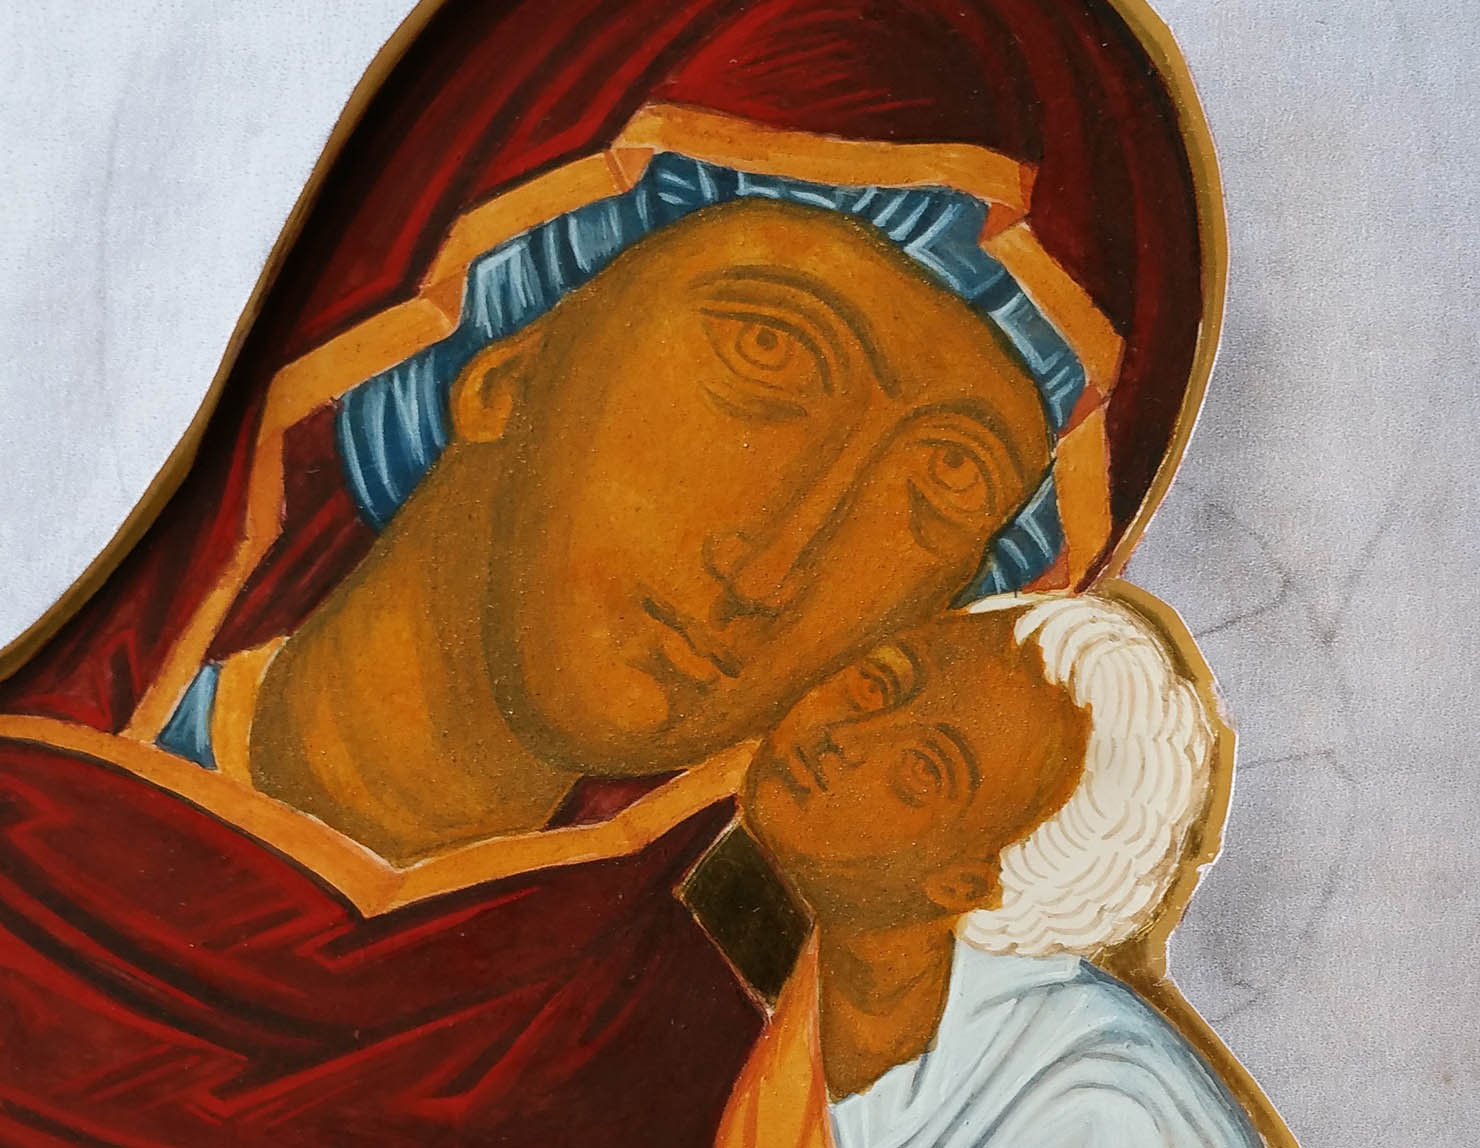
These two photos show that I’ve made a start on the eyes but I will cover the finishing details in my next post. I find the final highlights quite tricky and nearly always go adrift. That said I now leave the work for a week or so and come back to it with fresh eyes. I take a black and white photo and see where it’s out of balance. Or I cover the face with paper and start work building up the garments. There’s always plenty to work on!

I hope to be back soon to finish this sequence of posts and the final ‘snow’ highlights on the face but in the meantime, wishing you a peaceful and happy Advent.

Thanks for reading

Ronnie 🙂

Ps The finished icon can be seen here

Painting an icon of Archangel Michael – Part 1

A warm welcome and thanks to new subscribers – you’ve nudged me to write!  It’s been a while since I painted an icon so I thought I’d write a reminder to guide myself and maybe encourage others to pick up the brush again.

I’m looking back on the process of painting this icon of Archangel Michael (9.5 x 7” on 1” birch ply) looking in particular at the face painting stages with a summary of the earlier steps.

Working from my drawing of this icon, I transferred the key lines using tracing paper. I rubbed a pinch of deep red ochre pigment into the back of the paper with cotton wool, then located the tracing paper image on to the icon board and taped it top and bottom.   Using a hard pencil (H or 2H) I traced the lines to transfer the image on to the gesso.

Egg stock in the left dimple and a diluted mix alongside for glazing .

Next step is to fix the powdery lines to the gesso by painting over them with a dilute mix of red ochre.  My lines look a bit heavy-handed (see below) but the underpainting should be quite definite to withstand at least six or seven membrane layers.

Going right back to basics here: the egg stock is made up of 50% egg yolk, 25% distilled water and 25% alcohol (gin or vodka). A diluted mix of 20% egg stock and 80% water is used for thinning the paint/glazing. When mixing paint, add the pigment to the stock until it reaches consistency of thin cream. This mix can then be further watered down to get thin layers.  

Work stage of gilding halo in orthodox icon painting
Definite underpainting lines – important to get these in the right place at this stage! Note the small piece of card taped in place to protect gesso from compass point. Masking film applied either side of halo.

When the key lines are in place it’s time to water gild the halo. Water (and oil) gilding needs a chapter, let alone a single post! I’ve covered much of this technique in previous posts but a helpful tip is to apply liquid masking film (I use Winsor & Newton) before gilding.  I apply it around the edges of the bole in a band of about ¼” (5mm). Gold sticks to gesso during the gilding process and it can be fiddly to remove.

Painting background to icon
Applying background in thin layers

After burnishing the gold, I paint the background surrounding the halo before starting on the face. To get a crisp line for the halo, the compass line sits best on bone-dry tempera so I leave the background at least overnight. I use a compass with scribing nib attachment for the line around the halo. I draw the halo line before painting the face to avoid placing the compass point into the finished face.  I tape a small piece of card to the centre of the halo to protect the gesso from the compass point.

Drawing tools for inscribing halo in egg tempera on icon painting
Compass with the adjustable ink attachment

To paint the halo line I put a few drops of a fairly strong mix of white titanium (single cream consistency) into the side of the nib using a brush to transfer the paint. Dipping the nib directly into the paint usually leads to blobs!    

Outlines of drawing painted in thin layer of red ochre egg tempera
Gilding, background and halo line all in place – ready to start work on the face

Make sure all the features are where you want them to be. It’s a lot easier to move them at this stage! I double check my work by taking photos with my phone and zooming in/out to look again.

Aidan’s Tip: ‘Remember to paint with Distinction and Unity – there is no unity without distinction and no distinction without relationship’

After gilding, I apply a wash of dilute egg stock (10% egg stock 90% water) to seal the gesso using a squirrel mop brush. This offers an even surface for painting over. I apply these thin coats throughout the process – usually when I’m wrapping up the day’s painting session.

Aidan’s Tip: Remove any pigment which has strayed on to the gilding with a dry cotton bud. Do this as soon as possible as clay pigments set hard and will lift off the gold. 

Once the lines are in place then the underpainting and modelling of the face begins (I’ve used a different icon undepainting for this example). I’ve learnt that it’s important to spend time on this stage. Keep your drawing/icon master image close to refer to. Using Avana pigment, paint the form of the face evenly in thin layers ensuring that line weights vary in the appropriate places. For example, brows are thicker, eye socket line is light, the upper brow dense and the lower lid light. The underpainting should be clear and well shaded enough to withstand 6-7 membrane layers.

Building up the underpainting (a different icon)

Larger and more dominant shapes need stronger modelling whilst minor/ shallow forms are best left to be modelled by highlights.

Other colours can be used for underpainting skin tones such as Yellow Maimeri mixed with a little Ivory Black. Also 80% terre verte and 20% yellow ochre (Maimeri light). It’s worth experimenting to see the difference each combination makes.

Applying the first thin wash over the face
I cut a paper mask to protect all the other areas where I’m not working.

When the underpainting is in place I apply a very thin wash of avana over the face and leave it. The longer the better! Applying the membrane can be a bit tricky as it’s easy to make ‘holes’ during the process and disrupt the underpainting. If the underpainting has tempered/dried for at least a week it’s more stable to work over. Again not forgetting I live in cool, damp Scotland!  

My next post will be about applying the membrane layers and deepening the shadows but in the meantime, if you’d like to see the finished icon for encouragement – it’s over here

Thanks for reading and all the best with your own icon painting!

Ronnie 😊

Archangel Gabriel – A Listening Ear

Every now and again, I’m asked how to get started icon painting. I always recommend painting monochromes on smooth (hot pressed) best quality watercolour paper. I recall the first time I saw some of these red ochre studies by Aidan Hart’s past students and I found them captivating. They were on the wall in a workshop given by Aidan Hart at Walcot Hall over 10 years ago.

Archangel Gabriel – large completed monochrome
Use a very thin light line of ‘English Red Light’ red ochre egg tempera with a sable brush to mark the outlines.

For the last few weeks, I’ve been having a bit of a sort out of my studio (and my overspill areas). Over the last few years I’ve gathered quite a gallery of work that’s lying unseen as I have no more wall space!

I made a decision to go through all my work and list it for sale in my Etsy shop as I can’t keep holding on to things – there’s no room to move! Also, letting go of things makes way for the new so let’s make a start with looking back over this large monochrome of Archangel Gabriel.

Gradually build up the shape of the face in very thin washes. I’ve been impatient with the dark hair lines

Before I go any further, I have already written about this monochrome here. It’s really interesting to reflect back on this post from 8 years ago as I’ve become a lot kinder to myself. I can see that things I once thought weren’t good enough actually were a great foundation – they just needed a bit more work and creativity. SO – if you are being hard on yourself – put your work away for a few years then revisit when you have had a few edges knocked off and away you go – again!

Building up the forms of the hair and face

The best way to start as always is with a drawing. Sometime this too can be daunting so be kind to yourself – this is a learning process. You can always make a tracing of the icon you want to paint by outlining the main forms to get familiar with the shapes, shadows, proportions and lines. You could also try laying a grid over the prototype, then draw into your own grid at a larger scale. This can help you can anchor the key features.

With this monochrome – I drew onto a large sheet of cartridge paper (inexpensive paper is fine for this stage), then traced over and rubbed red ochre pigment into the back of the tracing paper. It is them ready to transcribe on to the watercolour paper. You could use pencil but the graphite smudges and I wanted to keep the paper clean.

The paper has been stretched with a damp sponge and taped to a board.

I use Fabriano Artistico Hot pressed watercolour paper, 300gsm. You can use other brands, but the weight and the hot pressed finish are really well suited to monochromes. I stretched this one but I didn’t really need to. Even though the paper can buckle, it can also be flattened as I discovered later. There are plenty of You Tube videos to help you do this but in short: face the artwork down on a clean dry sheet of paper, place a spray dampened sheet of paper over the back, then place a pile of books on top and leave for a few days. This works a treat.

The face of Archangel Gabriel…but there’s something missing…

Once you have the red ochre line in place from the tracing – it’s best to fix it in place using a dilute mix of egg tempera in red ochre or whatever colour you are using – the red/gold/earth ochres all work well. I think the most valuable thing I’ve learnt from painting these is not to rush them – work in the finest layers you can and build up very gradually.

The almost finished Archangel – with a finely layered background of very thin washes of red ochre.

Looking back through my old notes from Aidan’s class, I wrote as follows:

Eyebrows: When painting the eyebrows, the top line is soft and the ends are also soft. Look at an eyebrow, the hair is densest lower down, then feathers upwards (not as I have done here!). When painting the brow, show the graduation of tone. Facial features grow out of the background. Find the high point of the eyebrow in relation to the rest of the curved brow. Pay attention to the descent of the brow.

Lips: Look at the lips in profile, the light falls and hits the lower lip, the upper lip is drawker and in shadow. The lower lip projects and the recess below the lip is alos in shade. Note the gap at the corner of the lips.

This monochrome of Archangel Gabriel has only had a few brief outings since my diploma. Once in a short lived exhibition at the Bar Convent in York and a couple of weeks on the walls of the Tolbooth, Lanark. Lockdowns – say no more!

Protect the icon with paper and start to map the outline of the head band

When I looked at this the other day I realised there was something missing…the hairband and ribbons! This is quite significant as Archangel Gabriel is the patron of communication and this goes two ways – listening and responding. The ribbons either side of the ears are symbolic of listening – important! I had based this icon on the prototype of the Ustyug Annunciation icon. This doesn’t show the ribbons but since I have learnt the symbolism of the ribbons – they are too significant to leave out – so on they go – very late but much needed additions.

Adding a film of titanium white to form the headband
Final headband and ear ribbons

Gold leaf is not the best surface to paint over but I laid a dilute layer of egg tempera mix first, let it dry and built up in layers. I used quite a lot of egg mixed with the white pigment and applied it thinly. It goes on with a lot of beading at first but as it dries, each layer helps the next.

Finished monochrome of Archangel Gabriel.

The finished size of the overall mounted work is 50 x 70cm and now listed in my Etsy shop. Postage and insurance have shot up, especially overseas. The weight, packaging and protecting the glass of a large frame really bumps up the price so I’ve taken this out of its frame and will post in its mount and backing ready for the new owner to frame.

As always, thanks for reading and for still being here on this meandering path with me 🙂

Ronnie

For the Feast of St Francis

Today, 4th October is the Feast of St Francis. I’d like to share some of my work from my student days on Aidan Hart’s diploma course when we were encouraged to paint monochrome studies on watercolour paper. I found these studies a little less intimidating as they were ‘only on paper’ rather than the gessoed boards which we had all spent several days preparing.

I knew I was going to paint an icon of St Francis on a gessoed board so wanted to prepare a study on paper first.

However, instead of painting a monochrome, I decided to see how painting an egg tempera icon on paper would turn out. The drawing above is taken from one of Aidan Hart’s icons of St Francis. This is the traced outline over the pencil sketch which I made from his prototype which you can see here.

I can’t find any record photos of the underpainting on paper but it would have been with thin layers of Terre Verte pigment and a few washes of the Yellow Ochre Maimeri mixed with a tiny dash of English Red Ochre, applied in thin washes.

The process on paper is the same as on a gessoed board – I followed exactly the same steps.

Returning to the icon on paper, you can see both the underpainting of face and garments have had ‘membranes’ of colour and I’ve begun to add some facial shading and highlights.

I like faces to have soft highlights – I have often added the brightest areas only to wash them back with French Ochre Havanna so they blend in. There is a lot of flexibility in egg tempera – it is surprising how thin washes of one pigment over another can help things sit better together.

Finally we arrive at the lettering and gilding the halo.

Working on paper, I applied a dilute coat of upva glue (flexible when dry) over the surface to be gilded – this acts as a seal over the paper. About 20-30 minutes later I applied a second less dilute coat and as soon as it was just about dry I applied 23.5 carat transfer gold leaf.

I referred back to the drawing for the centre point of the halo, placed a strip of cardboard over the face for protection from the compass point, held it all very steady and drew a circle around the halo. I pencilled out the lettering and then traced and painted them on.

Finally, the work was framed and included in the final student exhibition at the PSTA in Shoreditch. It is now available to purchase from my Etsy shop here.

It’s almost the end of the day here but just in time to wish you peace and blessings on the feast of this gentle yet powerful saint.

Thanks for reading,
Ronnie

Oil Gilding the Council of Archangel Michael (pt2)

Summer is the best time for gessoing icon boards. It’s a messy job and I like to make the most of working outside especially sanding the boards. I wrote about the method of gessoing on an earlier post here.

3 sanding the large icon board.jpg

Making the most of a dry sunny day to sand the gesso smooth

I felt that the icon of the Council of the Archangel Michael should be painted on a large board as there are a lot of figures. I don’t know the size of the original icon, but small faces can be tricky so the size I went for was the optimum I can work with at home: 40 x 42cm. With it being cut from 24mm birch ply it’s quite heavy.

I placed the board on a towel to prevent it from sliding around the table whilst I sand. Red ochre rubbed over the surface helps to show up any scratches I had missed.

Once it had been sanded down with 1200 grade sandpaper, it was ready to oil gild. I chose the oil gilding method (matt finish gold) because it’s more robust than water gilding.  Having so many figures and faces it will be handled quite a bit during painting.

finding scratches

Red ochre shows up scratches which still need to be sanded

I moved my drawings on to tracing paper so it was ready to transcribe on to the gesso. Although it is possible to oil gild after painting, I prefer to gild before painting the faces. I find both methods of gilding challenging so I will keep practising!

It isn’t necessary to scribe the areas to be gilded with the oil gilding method but I find it helps contain the shellac. Aidan Hart protects the gesso from the compass points with a wooden ruler which works very well but if you don’t have a ruler to hand, several layers of masking tape over some card helps (see photos below).

transcribing halo on icon

compass points on gesso

Protecting the gesso from compass puncture marks

Anyone of a ‘certain age’ will understand when I say that some red ochre rubbed over the scribed areas helps me to see where I’m going!

transcribing drawing

Aidan taught us the following method of oil gilding which I will summarise below. You can also see some amatuer video clips from our class demonstration on You Tube here.

Gold transfer leaf is applied on to several layers of shellac but first the gesso is sealed by painting on a thin layer of tinted shellac. Tinting is done with a pinch of red ochre or vermillion. Leave it to dry for a day then lightly sand working your way through the sandpaper grades from 600-1200. The following day, repeat the process but using untinted shellac. Leave it for a day and then sand as before.

shellac on halos for icon gilding

Shellac ready to sand

It is then ready to gild. Aidan suggested using Le Franc’s 3 hour gold size. Shake well then apply one very thin layer and place it in a dust free place, like a plastic box.

Wait for an hour at least (1-3 hours) then test whether it is ready to gild by touching the surface with your knuckle. If it squeaks, it is ready to apply gold transfer leaf. If not, wait a little longer and re-test. Drying time depends on the thickness of the layer and the drying conditions.

Small areas of shellac are fiddly to sand smooth and as you can see under the scrutiny of the camera, there are a few missing dots. However, I’ve since touched these up with some shell gold.

oil gilding on icon

Oil gilded halos

Wait two or three hours and then it should be ready to polish the gold using a gilder’s mop, working from light to medium pressure.

After waiting a few days to let the gilding harden, I could carry on with transferring the rest of my drawing.

transfer of whole drawing

Gilding complete, time to transcribe the rest of the drawing

I kept the compass protection pads on so I could add the halo outlines as soon as the sky had been painted. That’s all for this post but I will sign off with a photo of the icon a bit further along.

underpainting icon of Council of Archangel Michael

Outlines of figures applied and underpainting begins

Once again, thanks for reading!

Ronnie

Membrane Technique for icon faces

icon painter's work space

Spring cleaned workspace

I’ve had a few requests for a glimpse at my notes from the icon diploma course taught by Aidan Hart at the PSTA. There are a lot to sift through and they’re a bit illegible, even to me. However, I plan to revisit and re-write them at each stage of painting an icon but bear with me as this may take a while!

painting with italian Gold Ochre pigment and Ivory black

Underpainting the faces

I’ve already made a start with the pigment grinding crib sheet and now that I’m currently underpainting an icon, I’ve written up my notes for this stage. They are on my website on the Crib Sheet page and I will share a link at the end of this post.

underpainting face of Blessed Virgin and Christ Child

Underpainting complete

For the underpainting, I’ve found that mixing an earth green from Italian yellow ochre and ivory black has been a little less sticky than using terre verte.

Don’t forget to apply a dilute wash over all the unpainted areas before applying the membrane or it won’t cover evenly.

I still find it tricky to apply the membrane layers evenly but at least I know better not to fiddle with uneven areas. Just go and do something else for a few hours to let it properly dry then apply another couple of thin layers.

icon painting with membrane technique

Three layers of thinly painted membrane applied

Next stage is applying the shading and highlights, but for now here are my notes: Membrane technique part one underpainting and membrane

By the way, the pigment grinding demonstration went well. More on the results of that when I use the pigment to paint!

finished mid tones on an icon face

Five layers of the membrane applied

Thanks for reading,

Ronnie

Lettering of the Melisende Psalter

hand made book of the Melisende letters

‘Melisende’ –  lettering from the 12th c

Long overdue, but here’s the last installment from my dissertation on lettering which would be lovely to see adapted for use on contemporary western icons. For the last subject, I chose the Melisende Psalter, an extraordinarily beautiful example of ‘East meets West’.

It was written in Latin and thought to have been produced in the scriptorium of the Monastery of the Holy Sepulchre, in the Crusader Kingdom of Jerusalem sometime between 1131 and 1143. It is attributed to the work of six artists, and a scribe who are thought to be of French or Italian origin as the work reflects their backgrounds.

The introduction features 24 full page miniatures of scenes from the life of Christ, with Greek inscriptions, painted with gold backgrounds.

Annunciation Melisende Psalter British Library crop.png

Detail from the Annunciation (image from the digitised British Library Manuscript)

The manuscript is held in the British Library Manuscripts Department (Ref Egerton MS 1139), London.   

The word psalter derives from the old English word psaltere/saltere which came from church Latin Psalterium and simply means ‘a volume containing the Book of Psalms’. These hand written and illuminated books often had other devotional material bound in as well and were most widely owned by wealthy lay persons. They predate the later emergence of the ‘Book of Hours’.

5-a-melisende

Letter A adapted from the Melisende Psalter

Looking at the letters in this manuscript, it was hard to know where to begin as there are so many examples to choose from. It really is a rich resource for both iconographers and calligraphers alike.

I decided to illuminate a few letters to bring out their qualities as stand alone designs. The letters are confident and stems terminate with a flourish and the double stems add a light but strong quality to the letters. This example is painted with Azurite and Malachite. I have applied a few washes of azurite over the malachite to get this velvety soft green.

letter B Melisende

Melisende letter B

This example is painted with lapis lazuli and malachite. I’ve washed a few layers of blue over the green to deepen the green and offset the brightness of the gold.

The letters themselves are on raised gesso – a slightly more flexible mix to the gesso used for icons. This is Patricia Lovett’s recipe and it gives a flexible surface which burnishes up a treat when gold leaf is applied. Patricia’s book ‘Illumination Gold and Colour’ gives more practical guidance on this and is on sale at Cornelissen’s in London (or by mail order)  where you can get all the materials needed to paint your own letters. If you do get a chance to visit Cornelissens in the next few weeks, you will see some of the work by the icon diploma students on display in the window – more about this in the next post.

Before I share the letters which I painted from this manuscript, I’d like to give you a taster of one of the illuminations in this psalter as how it’s a useful resource for icon painters.

magi bring ing gifts melisende

Melisende Psalter – Magi bringing gifts to the Christ Child, Image from the British Library Digital library

To see this image and others in the psalter, here’s the link to the British Library page.

I love the movement of the Magi and how their composition directs the viewer’s eye to observe them placing their gifts at the feet of the Christ Child under the stern direction of the angel. Even though these are tiny paintings, they are dynamic and vibrant.

Back to the lettering. I’ve attached an eight page document with a full alphabet of hand painted letters which are an interpretation of the letters in the Melisende Psalter. Feel free to print them off or save them till later for use on your own icons. I would love to see them in use one day! 11-melisende-letters-v1

letter C Melisende gilded lapis lazuli

Letter C in Lapis lazuli – based on examples in the Melisende Psalter

Thanks for reading,

Ronnie

Show Time!

fixing icons at exhibtion

Icon hanging begins – and no – I’ve not driven Iain to smoking – yet!

I’m still getting over this last week. It’s been intense; a wonderful and unforgettable week. Lots of planning, packing, dawn starts, long car trips, carting, hanging, dismantling and so on.  I’m a relative local living in Staffordshire so my friends travelling from Sweden, Germany and Dublin must be feeling exhausted.

I’m going to add a few practical tips for anyone who is planning an exhibition. Plan well ahead. Bring large and small spirit levels, electric drill with selection of screws, pencil, measuring tape, portable steps, blu tack, plenty of bubble wrap, sellotape, pritt stick, masking tape, the cling film roll tape that protect sides of pictures, plastic crates with lids, flask and snacks.

icons in back of car

Wrap up the icons well.

When the car load was dropped off outside the PSTA, in Shoreditch, the doors weren’t yet open. Although not raining, it was overcast and I was glad the icons were all in waterproof containers and well wrapped. Pre-book your car park in London – it’s much cheaper.

Ronnie And the mandilion

Placing the Mandilion

Invite family and friends to help. My husband helped me put all the icons up and our son arrived with his camera and took this shot and a few others. It was non-stop all day – you have to work at quite a pace to get finished before closing time.

icons by Ronnie Cruwys

Sun glancing in from the rooflights

Bring a tube of polyfiller and a scraper as there is the inevitable re-shuffle to get things right. Thanks to Romsay at the PSTA, for finding some white paint and a roller too!

Icons by Ronnie Cruwys

Most of my work up

Susan, a fellow student – or graduate (that sounds good!) kindly lent me this table as I wanted to share my Nativity workbook, lettering books and some of my course work folders. I will write a little more about the Nativity workbook on another post.

visitor to triptych

Triptych up and an early visitor arrives

While we were putting up our work in the main exhibition area, Aidan was busy placing more work out in the foyer.

Aidan putting icons up at PSTA Shoreditch

Aidan displaying students’ icons in the foyer

We left the PSTA late Saturday afternoon with Aidan kindly finishing up for us.  When I returned on Tuesday for the Preview, this was the glowing view from Charlotte Road. The evening went in a whirl – I wanted to speak to so many more visitors than I did – to thank you all so much for coming and for being part of this blessed and beautiful stage in our life as fledgling icon painters.

My thanks go to the PSTA for running this course but especially to Aidan Hart for his spiritual guidance, patience and his innate joy shared with us, his diploma students, throughout the last three years as he has taught us how to see with the eye of the heart.

9 PSTA.jpg

All quiet before the doors open for the Preview  

I hope to be able to share a link to photos of all our work once these have all been co-ordinated on a photo-sharing site, but the next post will be about our exhibition now up in Cornelissen’s…watch this space!

Thanks for reading,

Ronnie

8-sisters

My sister –  this one is Meggie!


All gone quiet

It’s all hands on deck at home as finishing off seems to take almost as long as actually painting an icon. Our last icon session is only days away and details of the graduation show next month are now up on the PSTA website. I would be delighted if you could come along though I know many of you are miles away. It promises to be a great show as my fellow students have produced some breath-taking work.

I plan to continue with the blog after the course has finished as I haven’t posted any where near as much as I had intended.

I will be back in touch when I get a moment and will leave you with these two icons which are almost complete…varnishing, picture hooks and cord still to add.

iconpainting of St Hilda of Whitby by Ronnie Cruwys

St Hilda of Whitby

Icon painting in egg tempera of St Francis of Assisi

St Francis of Assis

Thanks for reading!

Ronnie


Northern Grace

monochrome study of st hilda of whitby on fabriano paper

St Hilda of Whitby

St Hilda had been left to one side as a drawing on stretched paper (fabriano artistico 300gsm hot pressed) for the past two years.  I chose to paint St Hilda because she is a local saint to me. When I was a youngster, Mum and Dad used to take us to Whitby on family trips and as a teenager, I worked in York Minster, close to where she was baptised, so she has always been there in the background.

The drawing was in preparation for my painted panel icon which I last wrote about here, but had always intended to paint it. Today was the day.

Here’s the drawing in full – I’ve darkened the photo so you can see my construction and correction lines. After erasing lines that might be distracting, I began painting using a blend of pigments which I know are really warm and earthy.

2 Hilda first washes of colour

Building up the tones

There are some pigment combinations which are lovely to work with – one of which is French Ochre Sahara and French Ochre Havanna. Pigments look quite soft on water colour paper.

3 Pigments ochre sahara

Mixing pigments

Mixing up pigments is best done separately (unlike how I’ve shown!) then add small quantities of the stronger colour to the weaker colour. A very strong pigment, such as English Red Ochre, would overwhelm any other pigment and has to be used sparingly when mixing.

When all the painting was done, I gilded the halo.

St Hilda work in prog Cruwys

Gilding paper is a breeze compared with water or oil gilding an icon boards!  I used Roberson’s acrylic gold size which works well with transfer gold . The size is painted on in two layers, thinned down with a few drops of water. The first layer seals the paper. (Tip: If you rub some washing up liquid into the brush before you use the size, it’s easier to wash out after and protects the brush).  I add a touch of red ochre to show where I’ve painted and to give some background to the gold.

5 applying gold size to halo

Applying gold size to the halo

It’s been good to reflect on the life of this strong northern saint, patron of learning and culture especially in these post-Brexit days. St Hilda lived through dangerous and difficult times – her father was murdered when she was a child. Baptised in 627AD, close to the place where York Minster now stands, she grew up as a noble woman but later became the founding abbess of a monastery in Whitby. More pertinently, as a Celtic Christian, she chose to graciously accept a vote at the Synod of Whitby which didn’t go the way she had wished. Quoting from this last link:

     ‘In Northumbria, along with the politics of the time, there were two strains of Catholic Christianity, and they could not be reconciled: Celtic and Roman. Celtic Christianity, which emanated from Ireland, was less structured than the Roman variety. The Celts were independent, wandering from place to place all over Europe, where they would establish centers of learning and teach. Celtic Christianity relied on monasteries and abbeys where the abbot was supreme rather than the cathedral and bishop system the Romans followed. The Romans viewed the Celtic brand of Christianity as “rural.”’

6 st Hilda monochrome gilded Cruwys.jpg

Completed study on paper

If you would like to read a little more about St Hilda, there is a good write-up about her life by the Order of the Holy Paraclete here.

We still live in troubled times and it helps to connect with the saints. Hilda was considered so wise that kings and princes sought her advice. The Venerable Bede describes her:

“All who knew her called her mother because of her outstanding devotion and grace”.

Thanks for reading,

Ronnie