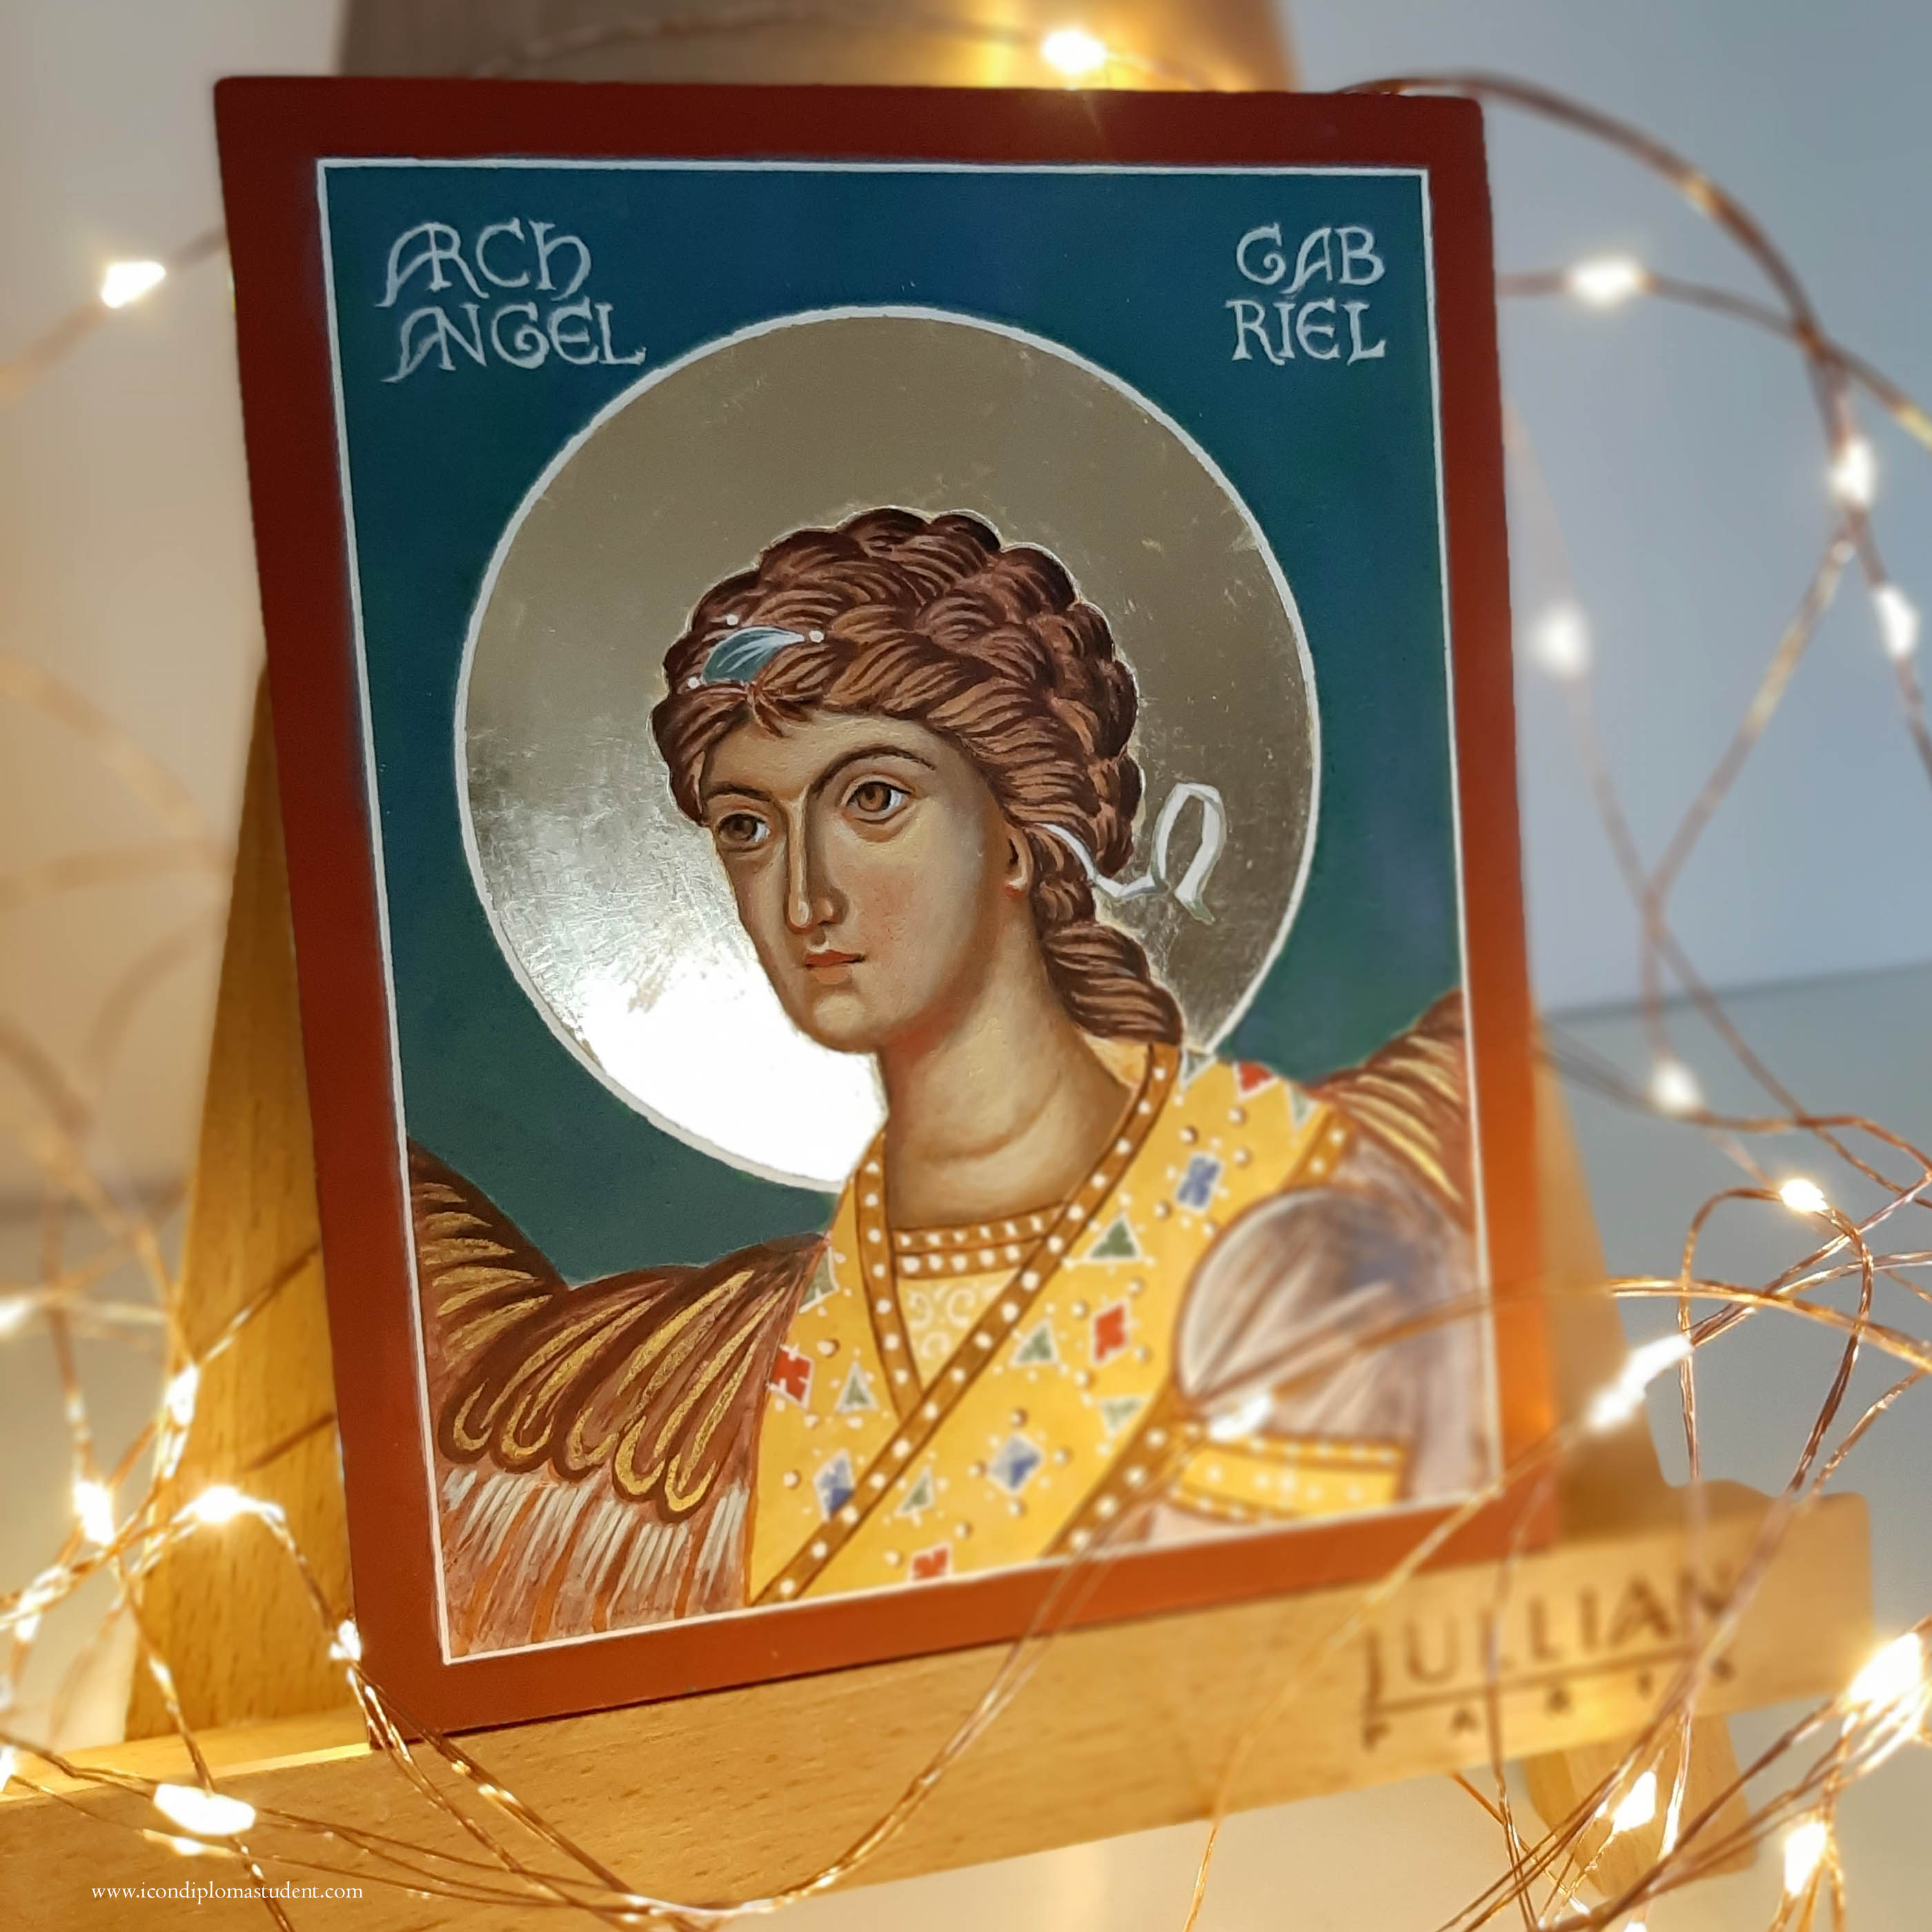
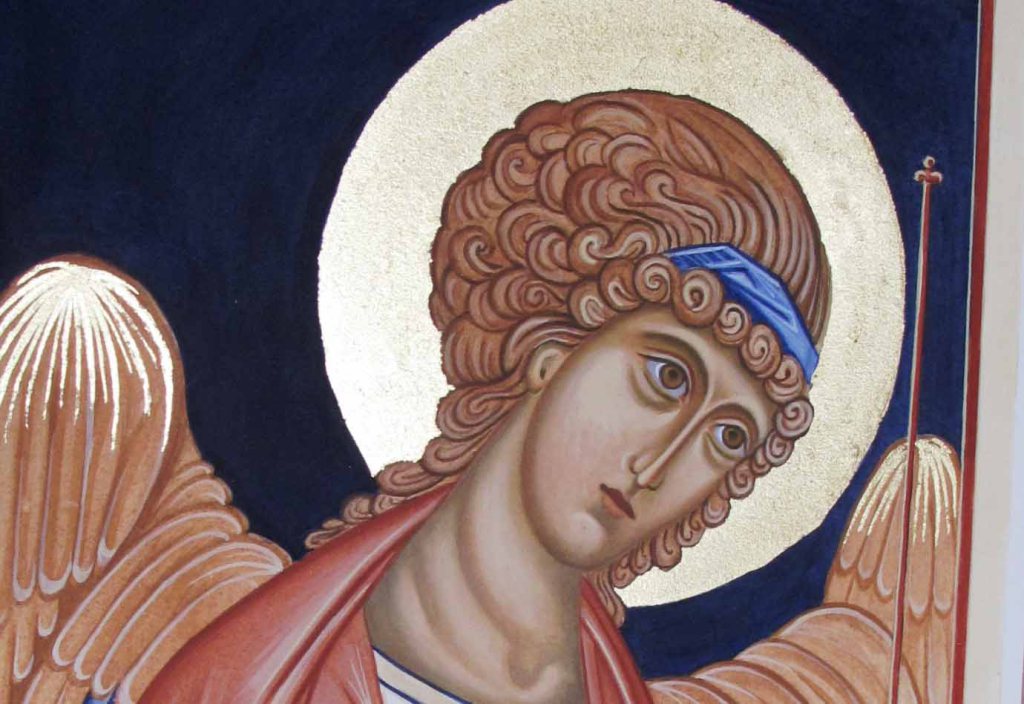
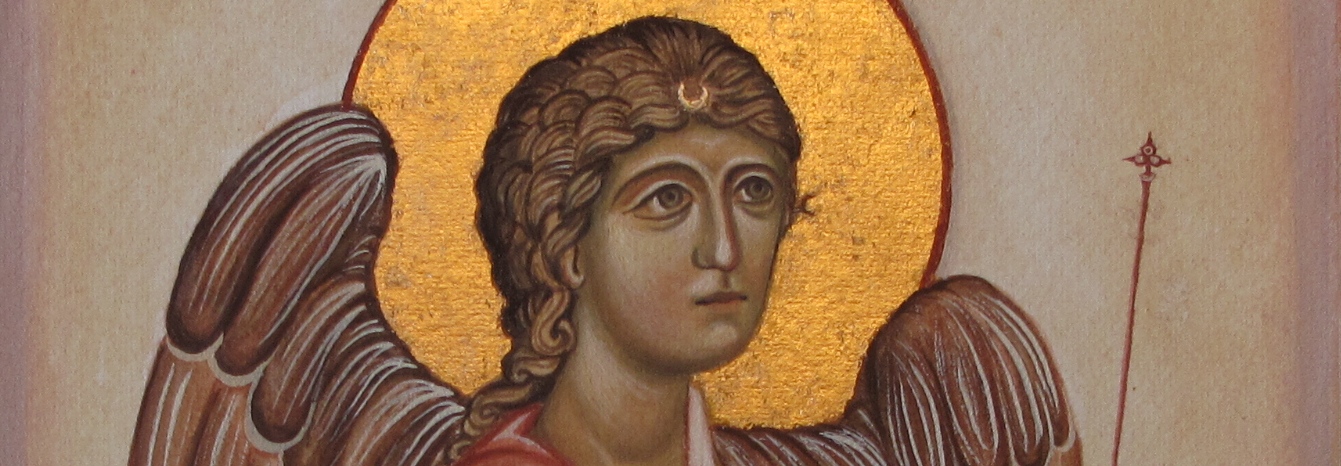
Archangel Gabriel, Icon size 14.5 x 11.5cm x 2.5 cm thick birch ply
Hand-sized icons are tactile and so beautiful. A few years ago, I had some thick birch ply cut into a selection of small sizes which I gessoed all at the same time. In many ways, they are just as much work as larger sized icons (and can be harder on your eyesight!) but they become such a relatable size.
Some photos below show a few steps of the process of painting a small icon – this one is of Archangel Gabriel. As we approach Christmas, I just wanted to close 2022 with a practical post, perhaps to inspire you for the New Year year ahead!
Below are a series of photos of the process of painting this hand-sized icon. Hope they help you in your own work!
Cut pieces of Birch Ply with scrim applied ready to gesso.Boards have been gessoed and now held in a Black and Decker work mate ready for me to sand off the rough edgesEdges all sanded. I also give a light sand to the gesso to remove the rough surface ready for hand sanding.Bole warming in a bain marie ready for gildingFirst layer of gold leaf applied to halo – note the masking tape over a small piece of card to keep the centre point of halo. Also I have applied masking fluid to save scraping off the gold from the gesso.Burnishing the halo after gildingPainting the background and letting it harden/temper overnight before adding the white line of halo (otherwise the paint spreads)Using the dip pen compass to apply the white halo line. Once in place, remove the masking tape/card from centre point. Applying a few coats of dilute egg glaze to seal the gesso ready for painting.I wrap the icon in tracing paper to protect it as I workUnderpainting the face using a mix of Yellow Maimeri and a little Ivory BlackApplying several thin layers of membrane in a mix of yellow ochre and a dash of red ochre glazesWorking into the darker areas of the face with Avana Ochre Gradually add thin layers of face highlights in Yellow Maimeri and white – if it all gets too stark, add a wash of warm Italian goldStudio audience!The next part is to complete the garment, hair and wings and then to add the lettering.Then finish the sides, add hooks and cord.
The finished icon can be seen here whilst available.
Wishing you and your families/friends the peace, light and love of Christmas!
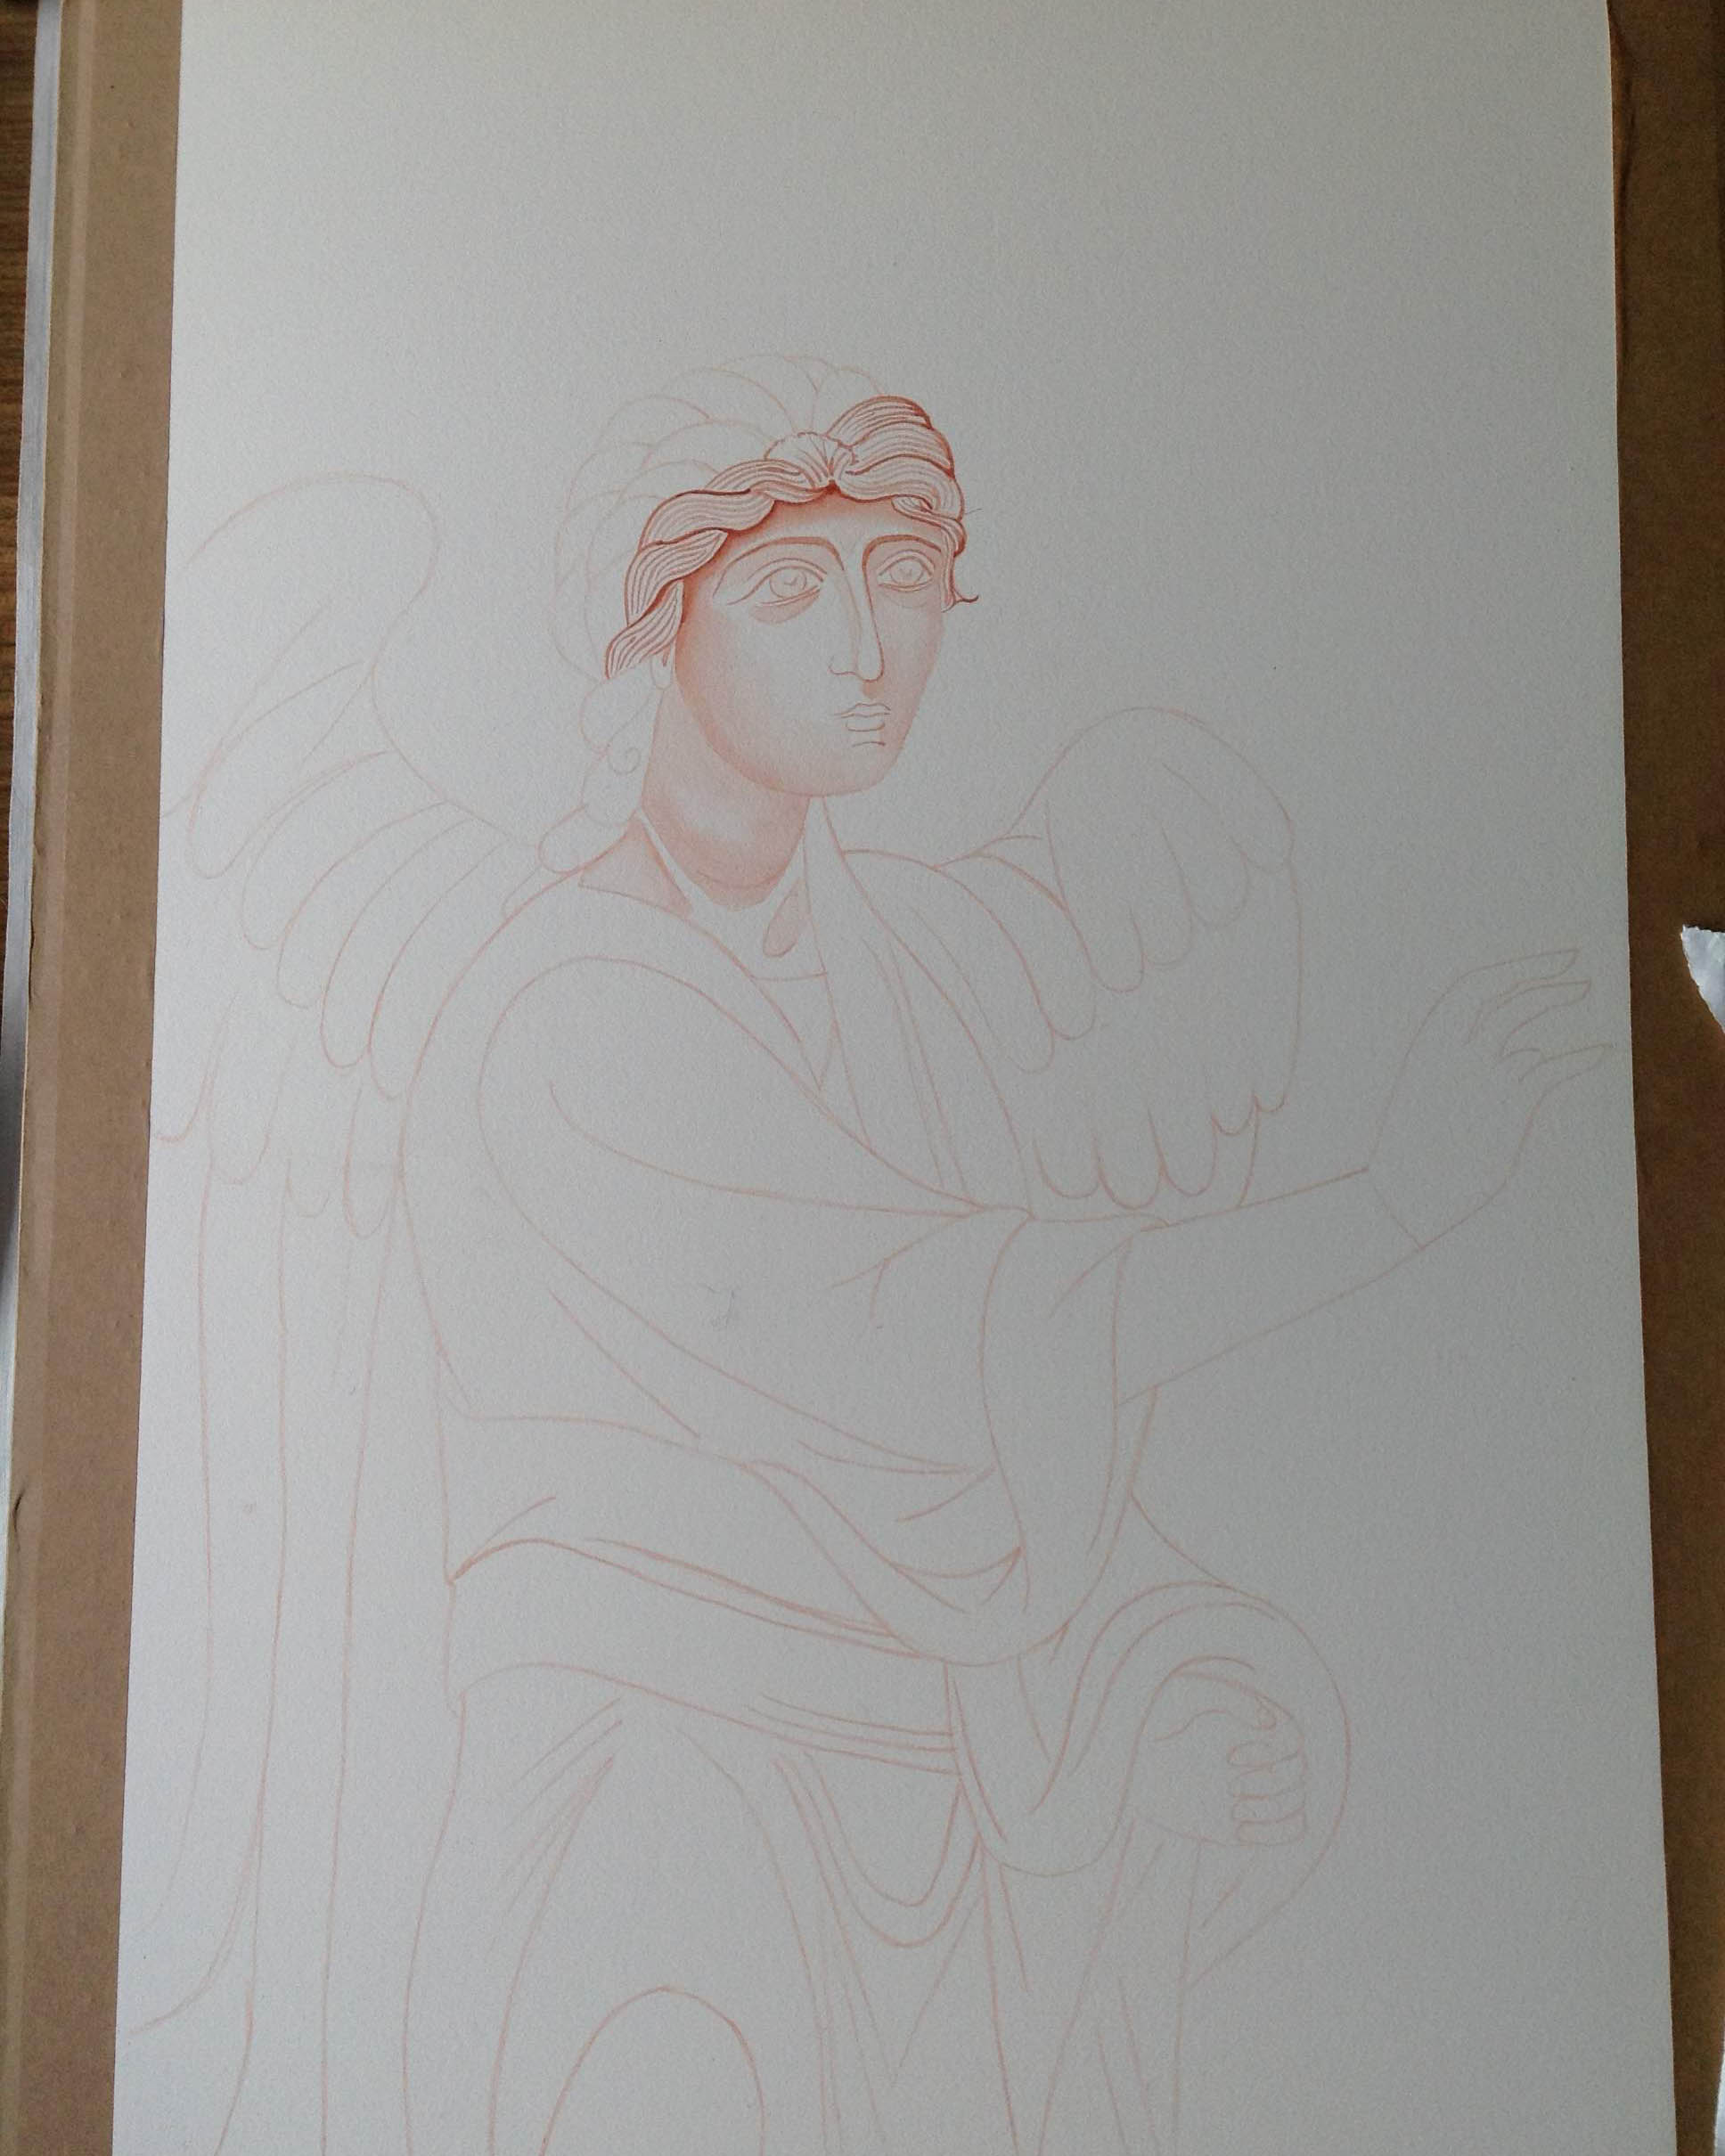
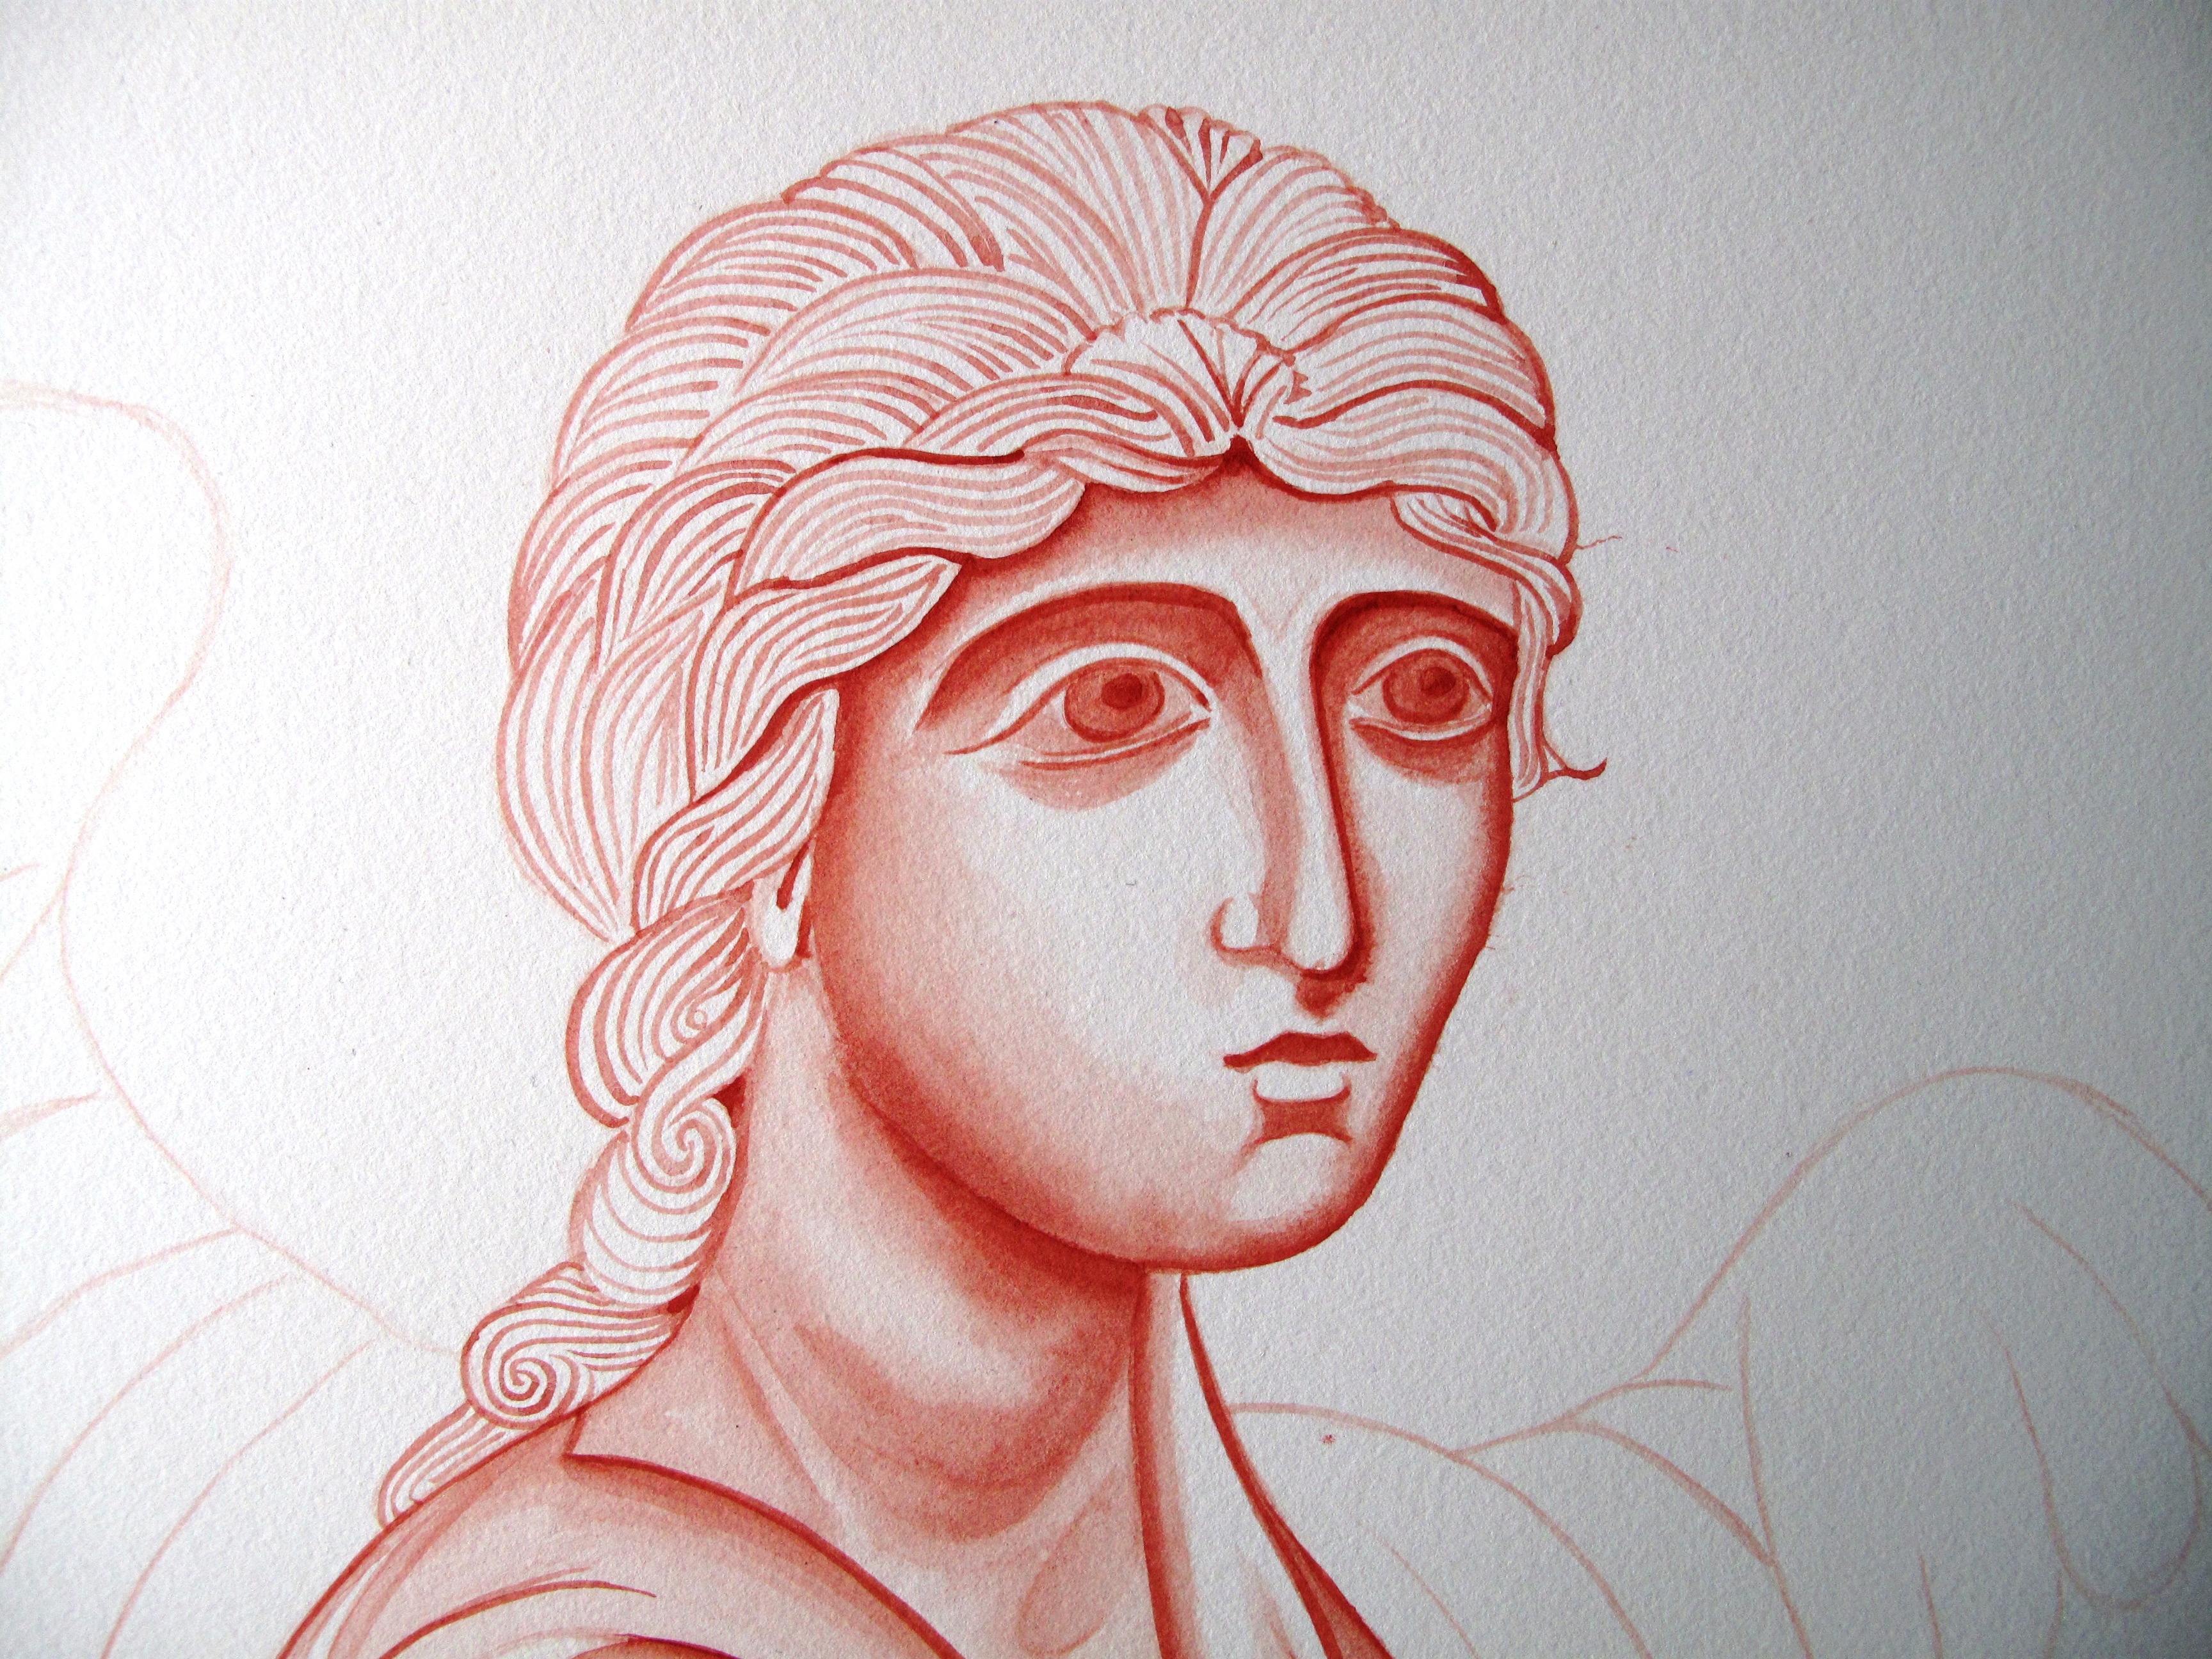
Every now and again, I’m asked how to get started icon painting. I always recommend painting monochromes on smooth (hot pressed) best quality watercolour paper. I recall the first time I saw some of these red ochre studies by Aidan Hart’s past students and I found them captivating. They were on the wall in a workshop given by Aidan Hart at Walcot Hall over 10 years ago.
Use a very thin light line of ‘English Red Light’ red ochre egg tempera with a sable brush to mark the outlines.
For the last few weeks, I’ve been having a bit of a sort out of my studio (and my overspill areas). Over the last few years I’ve gathered quite a gallery of work that’s lying unseen as I have no more wall space!
I made a decision to go through all my work and list it for sale in my Etsy shop as I can’t keep holding on to things – there’s no room to move! Also, letting go of things makes way for the new so let’s make a start with looking back over this large monochrome of Archangel Gabriel.
Gradually build up the shape of the face in very thin washes. I’ve been impatient with the dark hair lines
Before I go any further, I have already written about this monochrome here. It’s really interesting to reflect back on this post from 8 years ago as I’ve become a lot kinder to myself. I can see that things I once thought weren’t good enough actually were a great foundation – they just needed a bit more work and creativity. SO – if you are being hard on yourself – put your work away for a few years then revisit when you have had a few edges knocked off and away you go – again!
Building up the forms of the hair and face
The best way to start as always is with a drawing. Sometime this too can be daunting so be kind to yourself – this is a learning process. You can always make a tracing of the icon you want to paint by outlining the main forms to get familiar with the shapes, shadows, proportions and lines. You could also try laying a grid over the prototype, then draw into your own grid at a larger scale. This can help you can anchor the key features.
With this monochrome – I drew onto a large sheet of cartridge paper (inexpensive paper is fine for this stage), then traced over and rubbed red ochre pigment into the back of the tracing paper. It is them ready to transcribe on to the watercolour paper. You could use pencil but the graphite smudges and I wanted to keep the paper clean.
The paper has been stretched with a damp sponge and taped to a board.
I use Fabriano Artistico Hot pressed watercolour paper, 300gsm. You can use other brands, but the weight and the hot pressed finish are really well suited to monochromes. I stretched this one but I didn’t really need to. Even though the paper can buckle, it can also be flattened as I discovered later. There are plenty of You Tube videos to help you do this but in short: face the artwork down on a clean dry sheet of paper, place a spray dampened sheet of paper over the back, then place a pile of books on top and leave for a few days. This works a treat.
The face of Archangel Gabriel…but there’s something missing…
Once you have the red ochre line in place from the tracing – it’s best to fix it in place using a dilute mix of egg tempera in red ochre or whatever colour you are using – the red/gold/earth ochres all work well. I think the most valuable thing I’ve learnt from painting these is not to rush them – work in the finest layers you can and build up very gradually.
The almost finished Archangel – with a finely layered background of very thin washes of red ochre.
Looking back through my old notes from Aidan’s class, I wrote as follows:
Eyebrows: When painting the eyebrows, the top line is soft and the ends are also soft. Look at an eyebrow, the hair is densest lower down, then feathers upwards (not as I have done here!). When painting the brow, show the graduation of tone. Facial features grow out of the background. Find the high point of the eyebrow in relation to the rest of the curved brow. Pay attention to the descent of the brow.
Lips: Look at the lips in profile, the light falls and hits the lower lip, the upper lip is drawker and in shadow. The lower lip projects and the recess below the lip is alos in shade. Note the gap at the corner of the lips.
This monochrome of Archangel Gabriel has only had a few brief outings since my diploma. Once in a short lived exhibition at the Bar Convent in York and a couple of weeks on the walls of the Tolbooth, Lanark. Lockdowns – say no more!
Protect the icon with paper and start to map the outline of the head band
When I looked at this the other day I realised there was something missing…the hairband and ribbons! This is quite significant as Archangel Gabriel is the patron of communication and this goes two ways – listening and responding. The ribbons either side of the ears are symbolic of listening – important! I had based this icon on the prototype of the Ustyug Annunciation icon. This doesn’t show the ribbons but since I have learnt the symbolism of the ribbons – they are too significant to leave out – so on they go – very late but much needed additions.
Adding a film of titanium white to form the headband
Final headband and ear ribbons
Gold leaf is not the best surface to paint over but I laid a dilute layer of egg tempera mix first, let it dry and built up in layers. I used quite a lot of egg mixed with the white pigment and applied it thinly. It goes on with a lot of beading at first but as it dries, each layer helps the next.
Finished monochrome of Archangel Gabriel.
The finished size of the overall mounted work is 50 x 70cm and now listed in my Etsy shop. Postage and insurance have shot up, especially overseas. The weight, packaging and protecting the glass of a large frame really bumps up the price so I’ve taken this out of its frame and will post in its mount and backing ready for the new owner to frame.
As always, thanks for reading and for still being here on this meandering path with me 🙂
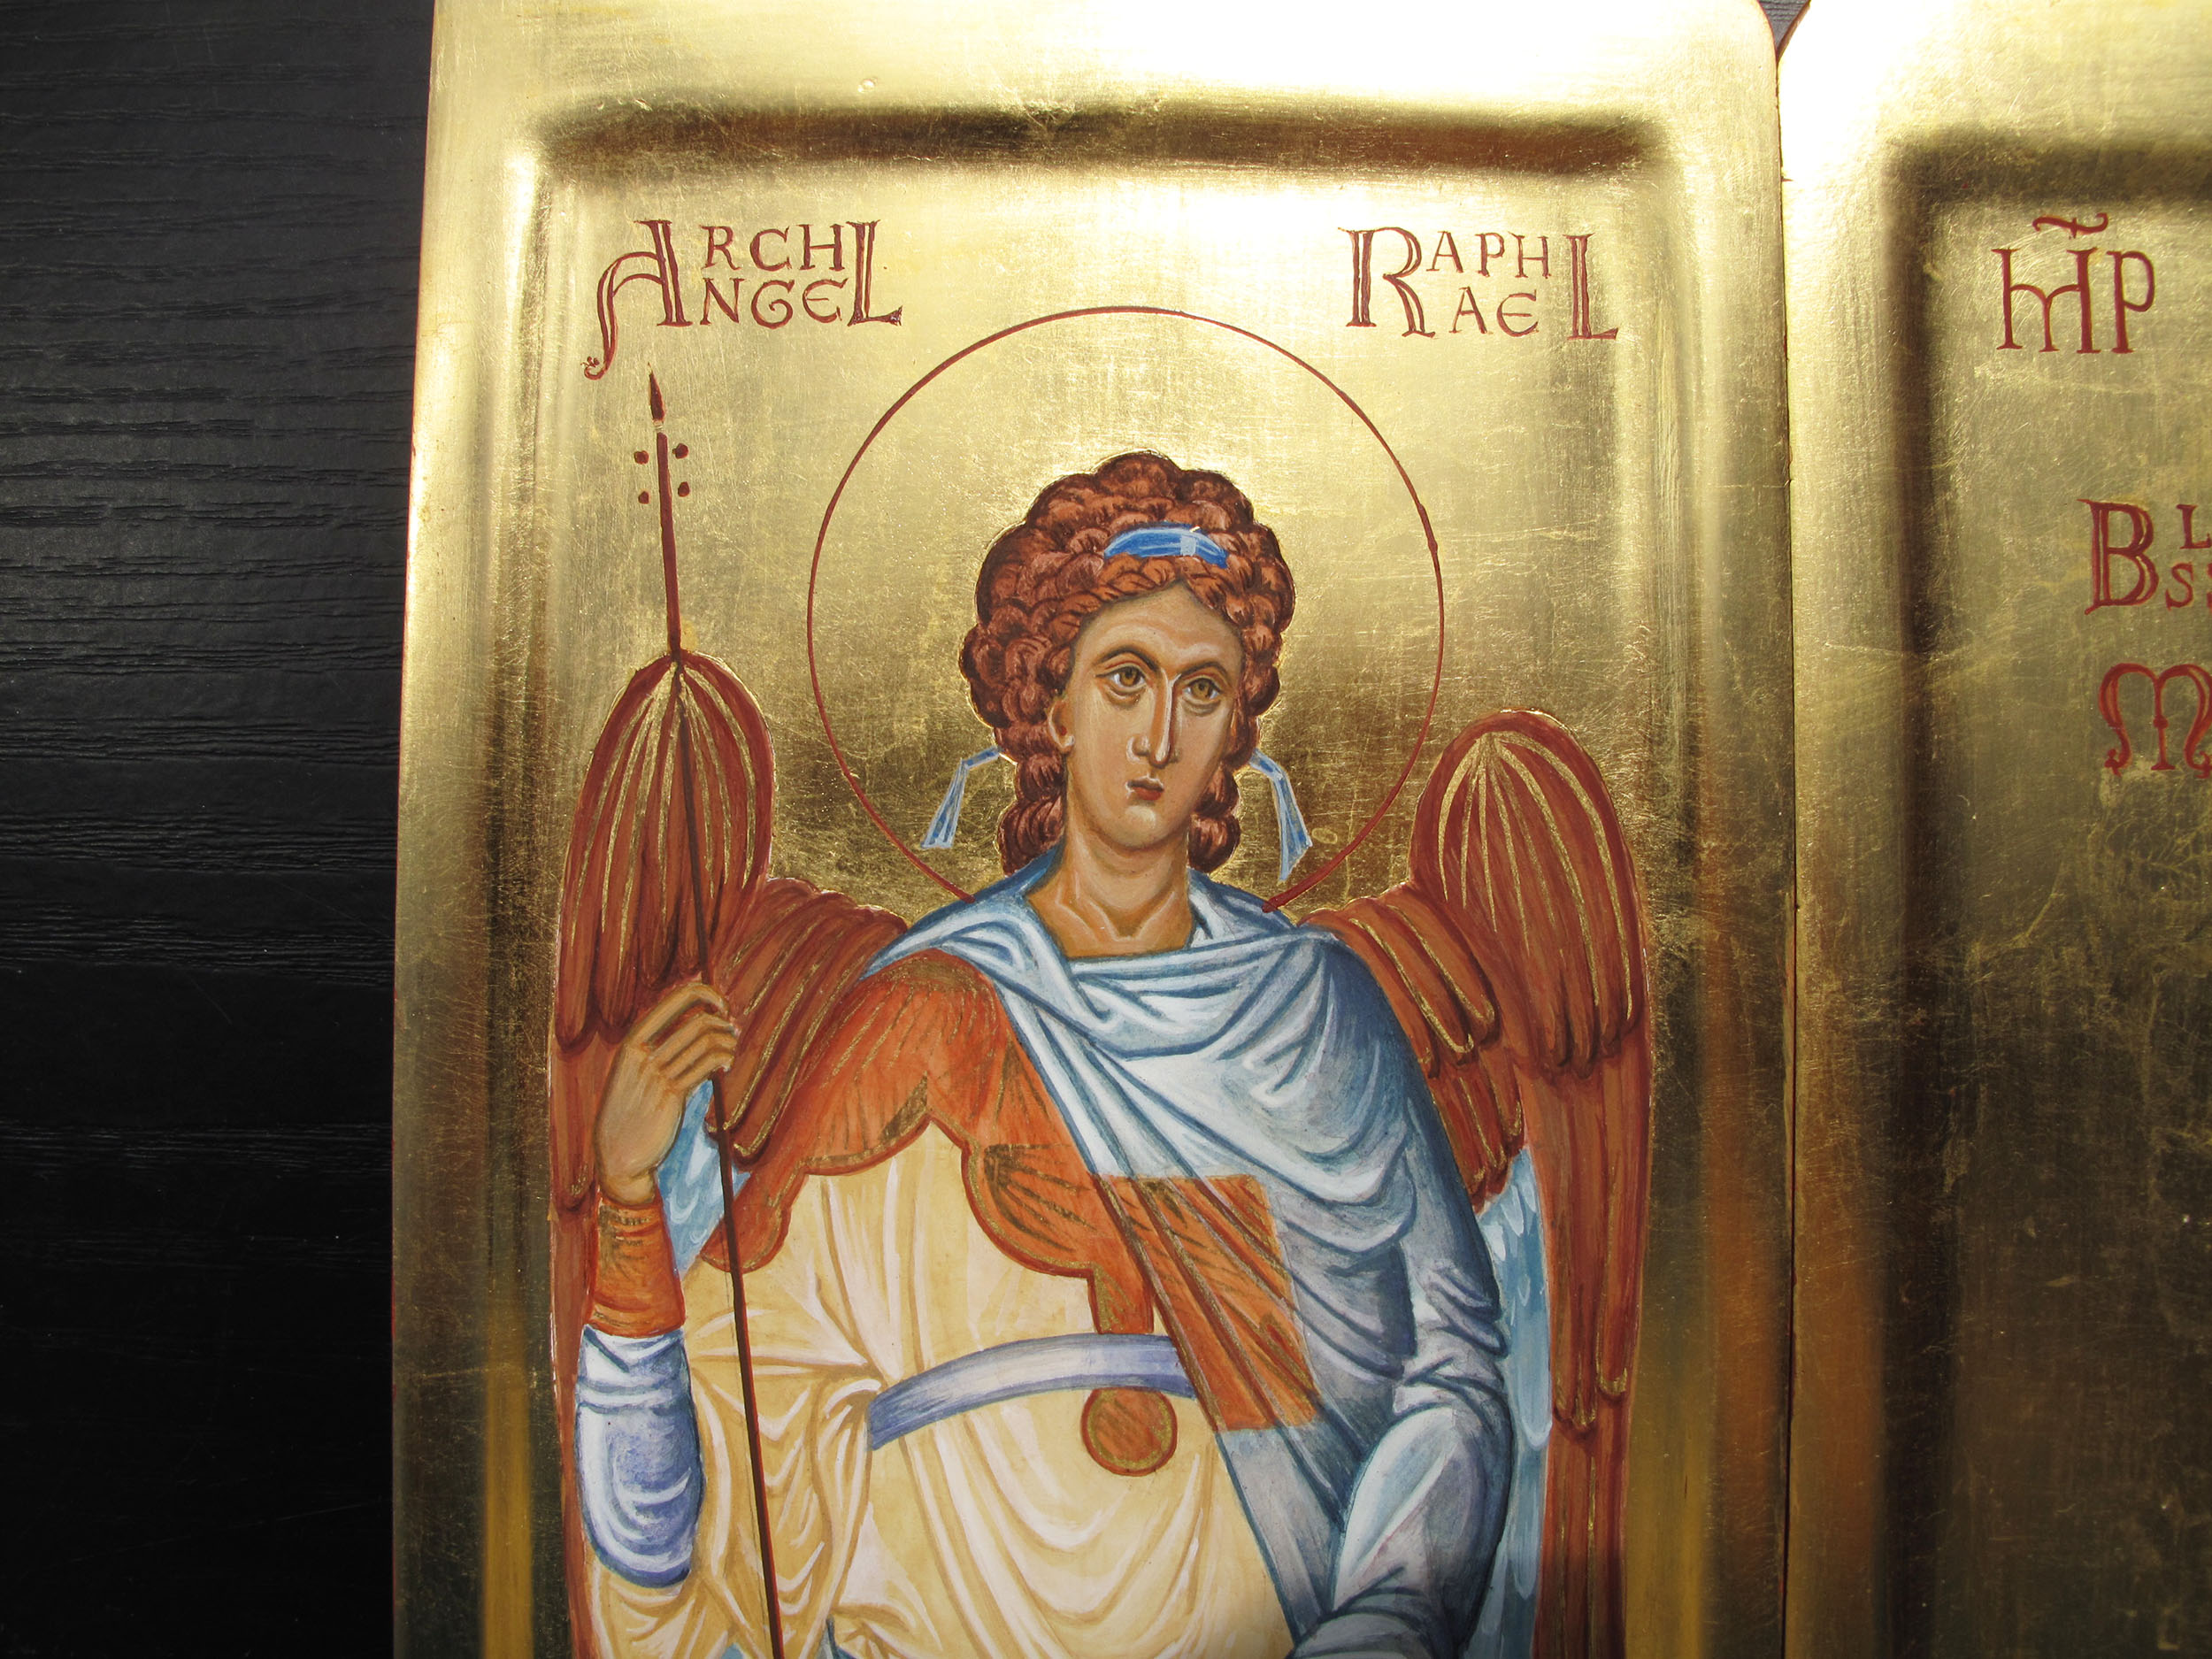
As September gives way into darker evenings and mornings, it pulls back many memories of the ancestral hearth for our family. It’s a time of remembering our loved ones and lighting a candle. It is the time to honour the Archangels on the feast of Michaelmas.
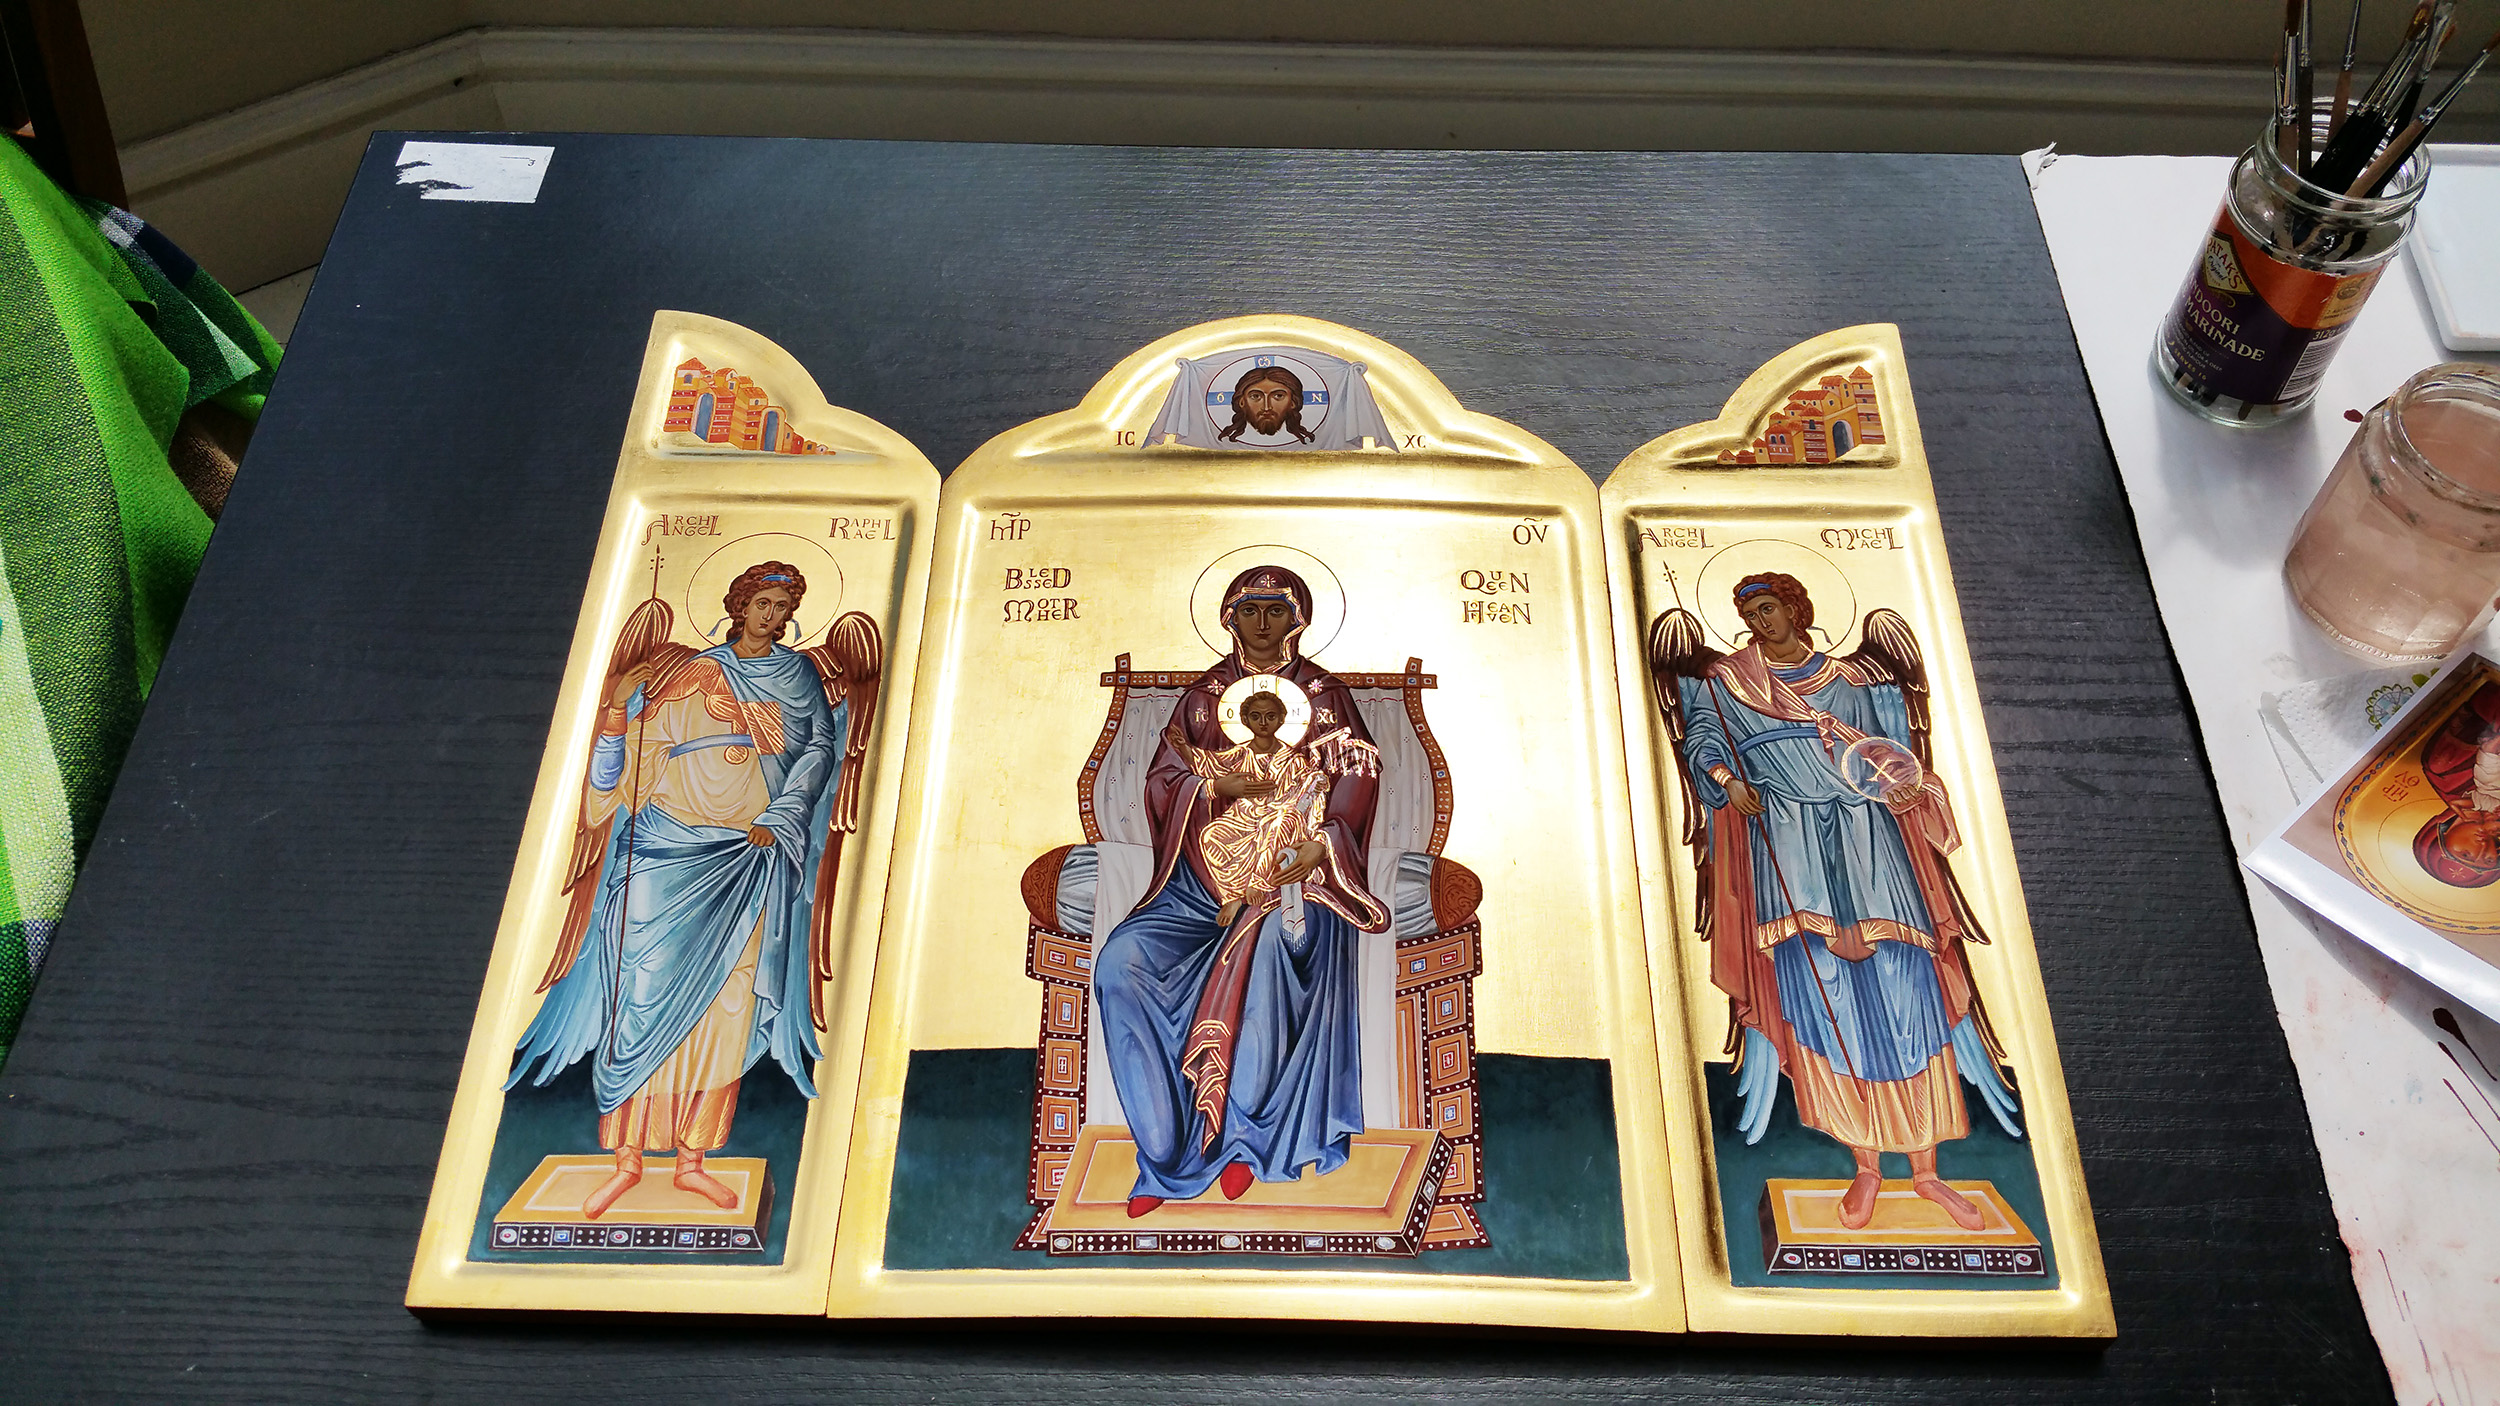
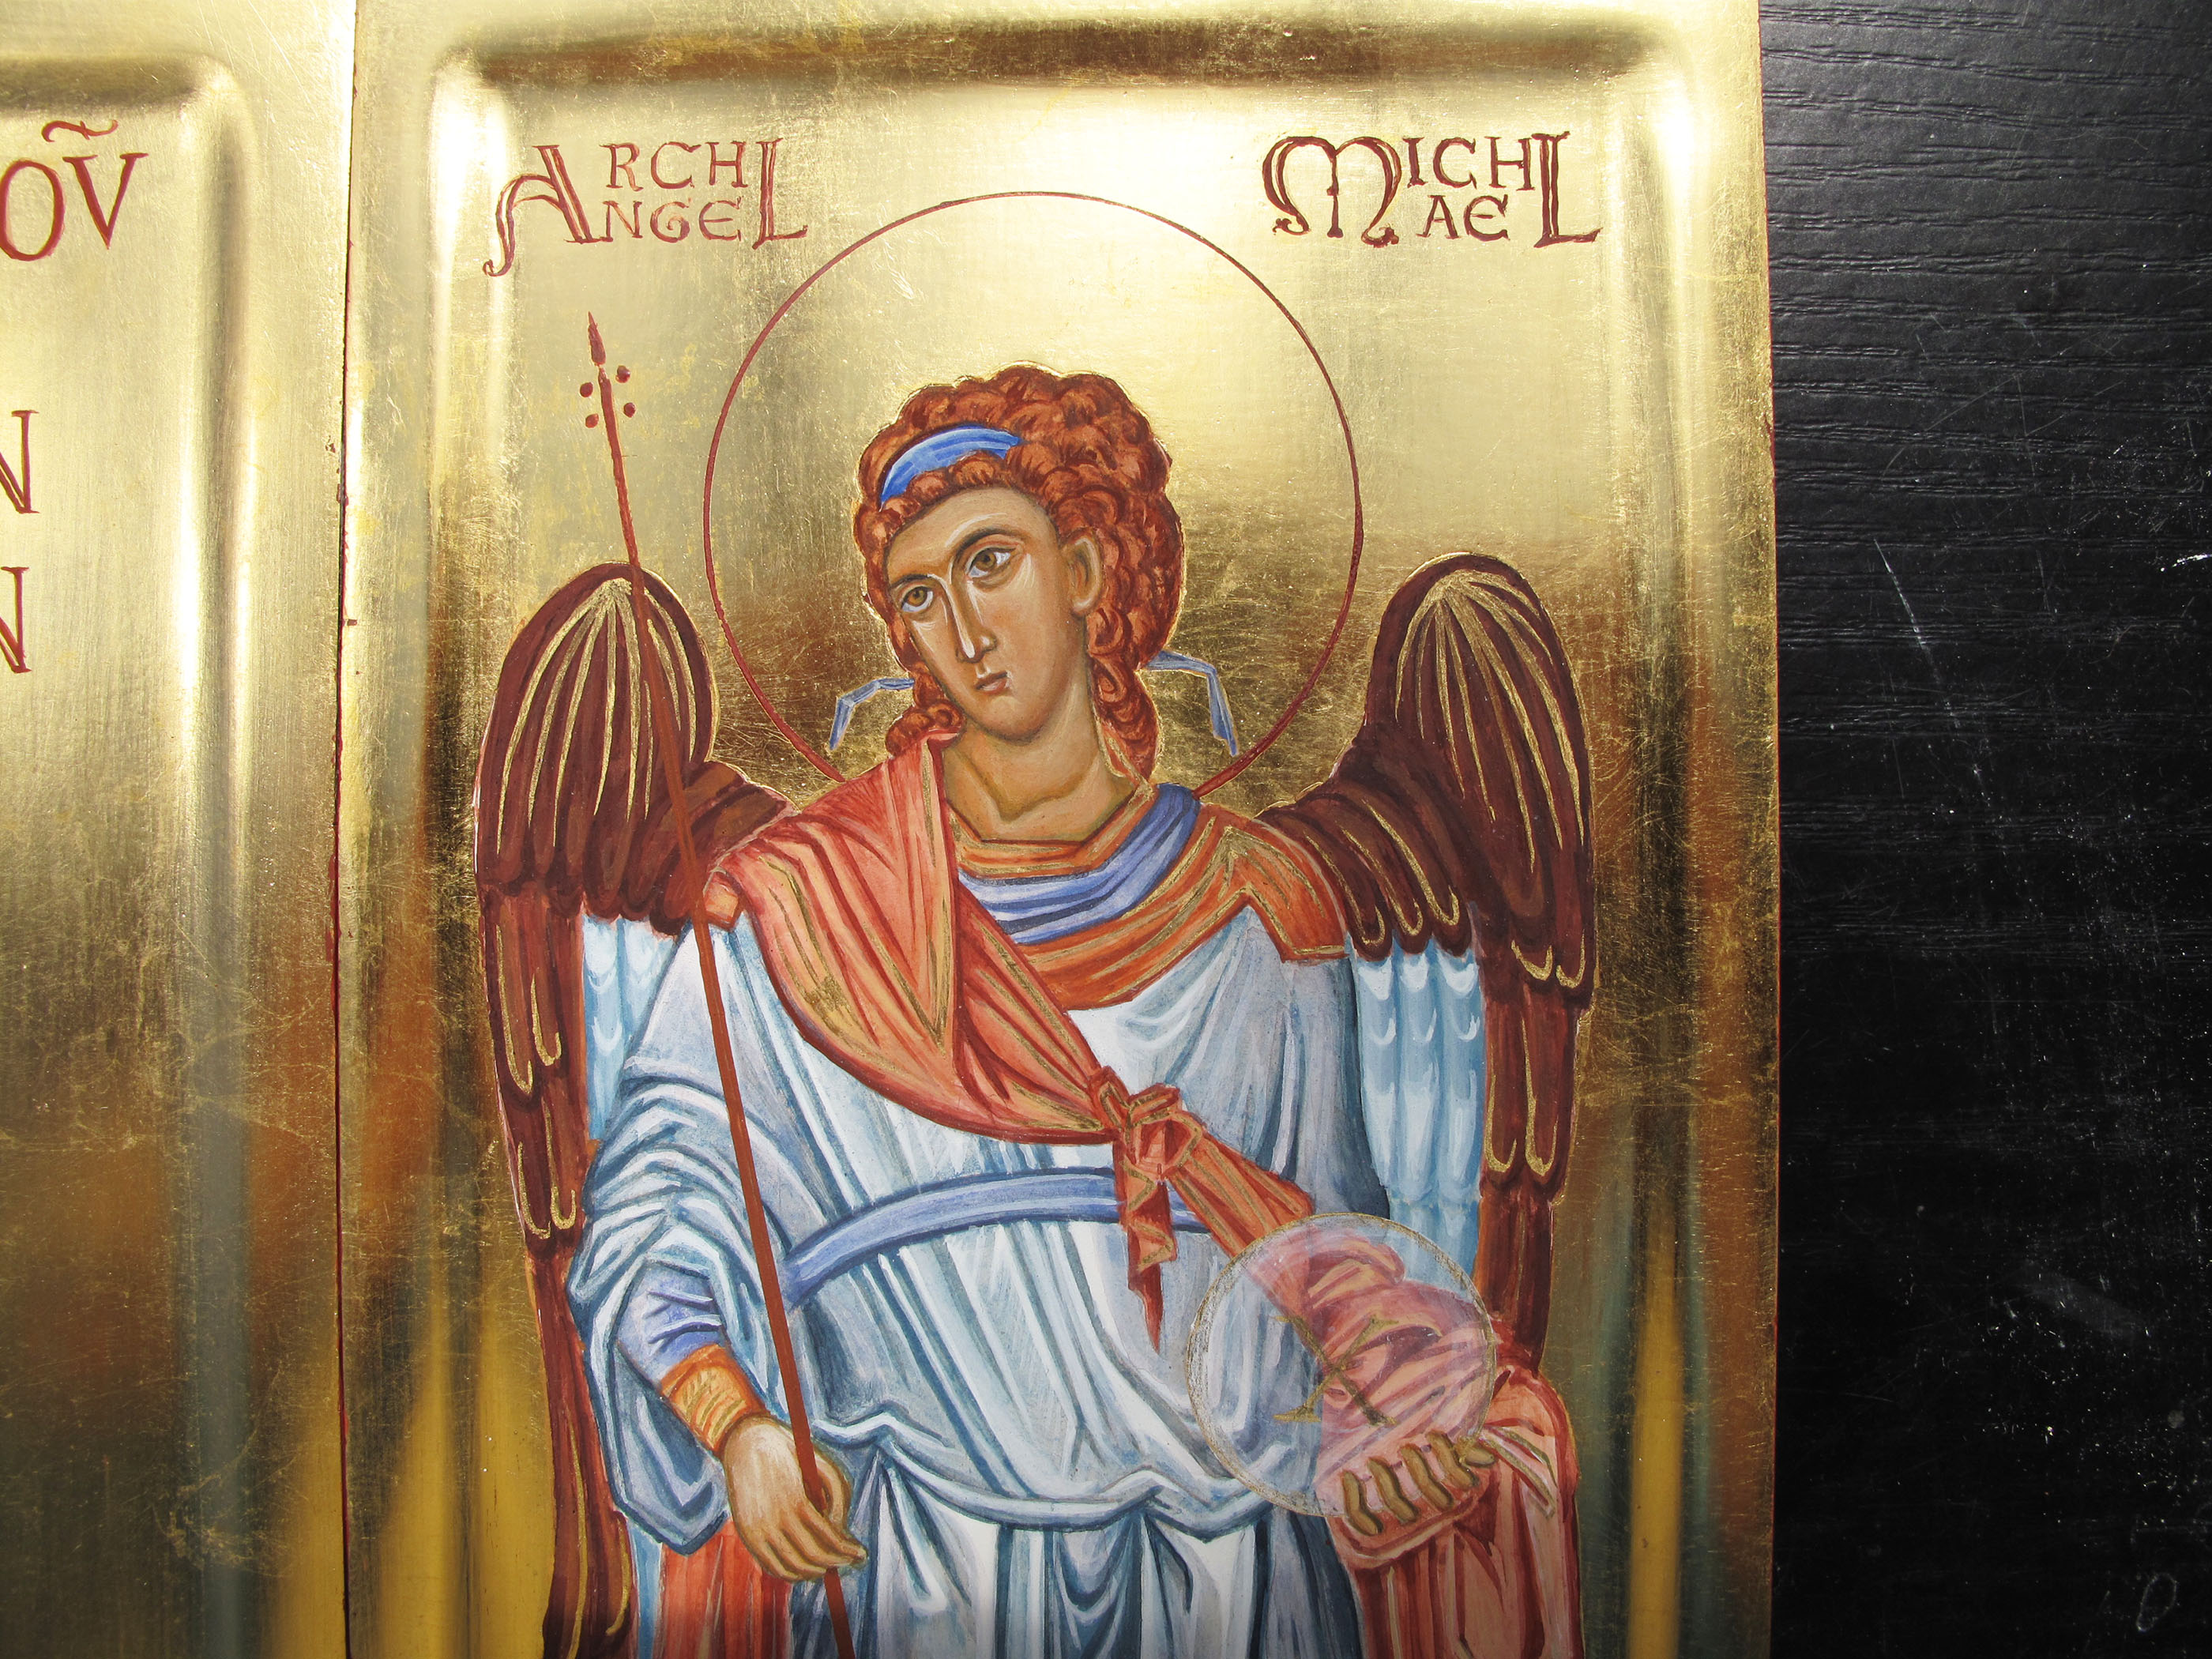
This was a triptych which I painted for my sister – she had seen a small version years ago and loved the way the doors opened up for the big reveal and had wondered if I could ever paint one for her one day. I’m so glad I did!
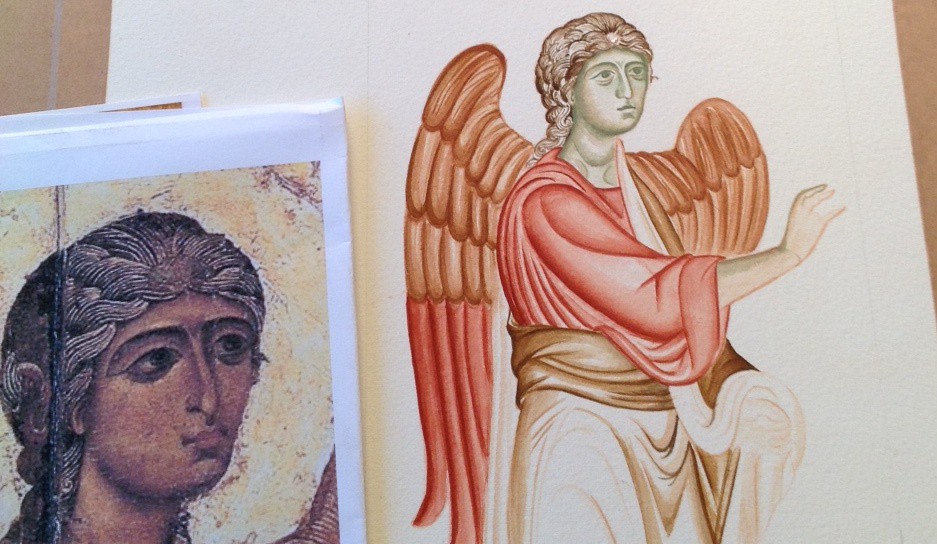
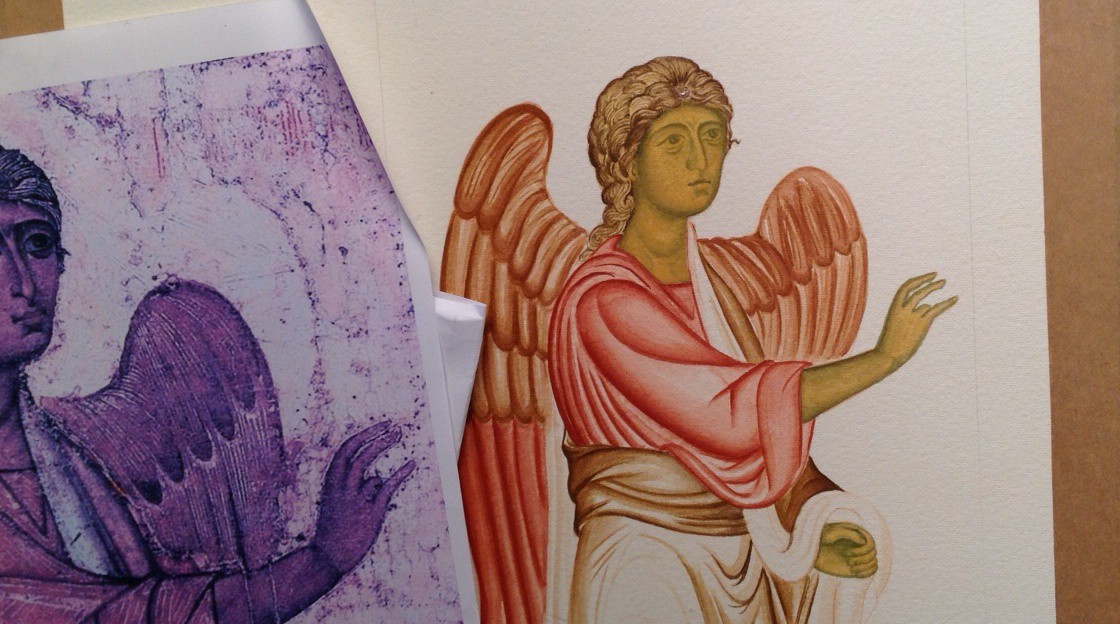
The images for these two Archangels which stand either side of the Blessed Mother and the Christ Child are based on the frescoes of Chora in Istanbul, seen high up in the dome.
I’ve written about this triptych previously in this blog but for this evening, I wanted to include a sequence of work-in-progress photos of an icon which I painted on watercolour paper of Archangel Gabriel.
If you haven’t got a gessoed board ready prepared, some heavy 300-400gsm+ smooth hot pressed watercolour paper is a really beautiful surface to work on. If you can find cotton content paper then it will be archival and long lasting in the right conditions.
You will see from this photo that I’ve used a pencil grid to help draw the image – don’t hesitate to use all the help you can get as you go along. Turning the master image upside down to refer to also helps you to tune into the areas of light and shade, angles/directions, hard and soft edges and so on.
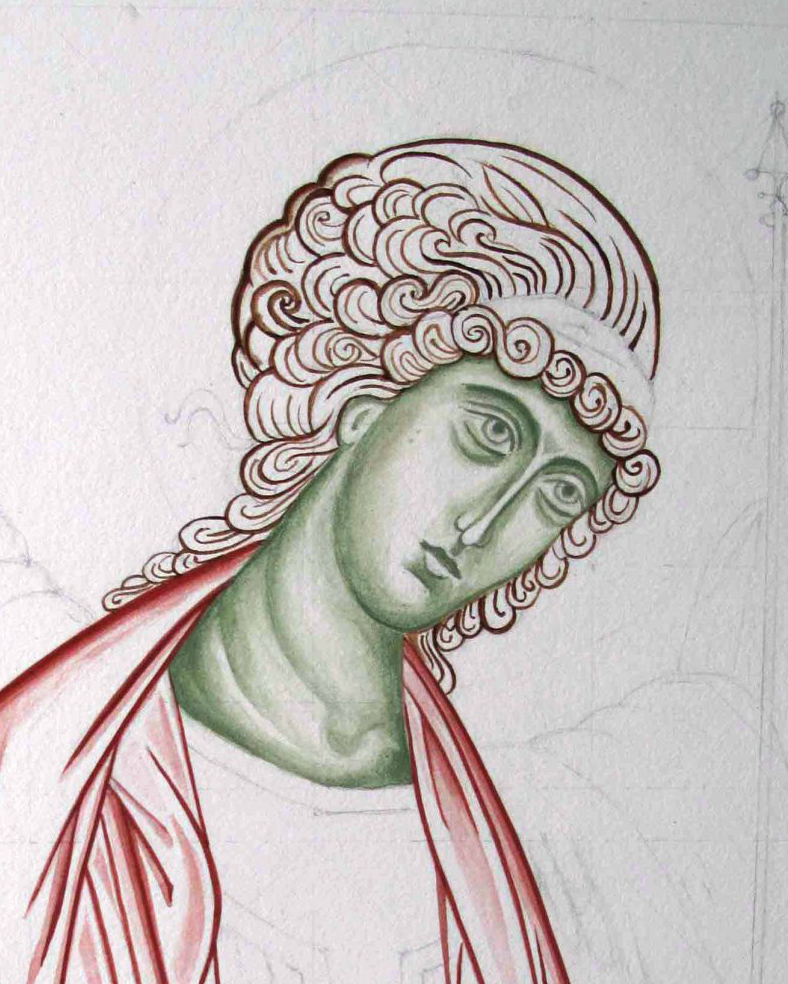
I have under-painted the face in the pigment Terre Verte. You could also use Yellow Maimeri and ivory black to get a different green.
I have used a mix of English Red Deep and French Ochre Havanna for the hair, wings and robes.
This is a thin wash of Yellow Ochre Maimeri and a touch of Red Ochre light for the membrane over the skin. The red ochres are really strong pigments so you will only need a diluted drop of it for warmth.
Adding the facial highlights in thin layers of Yellow ochre Maimeri and titanium whiteBuilding up very thin layers to model the faceAdding shell gold to the wings
You can see this icon completed and framed together with a few other icons here on my Etsy shop page.
Final details of the red line around the halo and ribbons to denote listening
And finally to close this post on the Triptych – here it is complete in the UK and ready to fly to Australia – with my Aussie sis joining in a wee family gathering!
Triptych in UK – sister in Aus! Sisters!
In the meantime, trusting you all into the care of our celestial helpers.
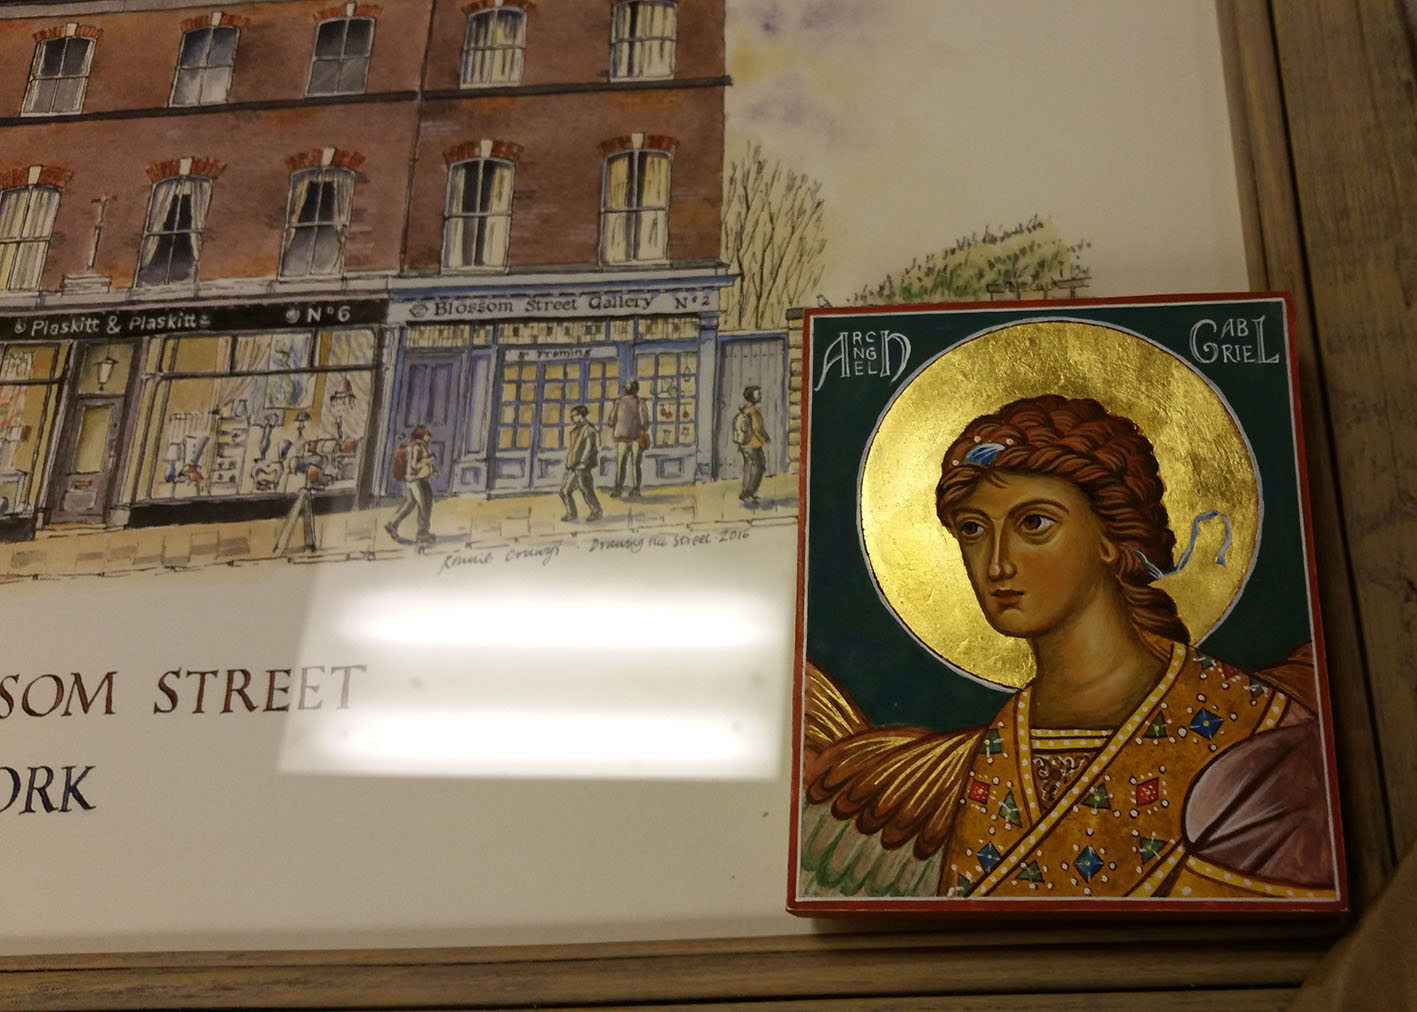
Kim and Jules run the Blossom Street Gallery, just outside Micklegate Bar in York. They stock my Drawing the Street limited edition prints and in February this year, I called in to catch up with them having finished the icon diploma.
I had a tiny icon of Archangel Gabriel with me which I brought out to show them as I was telling them about the course. One thing led to another and I am now booked in for a joint exhibition of icons and streets next Spring!
I had a few ideas for themes for the icon exhibition, but none were really firing me up, so I sent a request up to the heavens and within the day I had my theme and central icon. I subscribe to a blog by ‘Hokku’ and this timely post landed in my inbox:https://russianicons.wordpress.com/2017/03/20/the-council-of-the-archangel-michael/
Blossom Street Gallery is almost opposite my former school, All Saints, previously called The Bar Convent when I attended. There was a school legend that the Archangel Michael had once appeared there to protect the convent from imminent danger. So, when I saw this icon called ‘the Council of the Archangel Michael, I knew I had found my centre piece icon and my theme ‘A Gathering of Angels’.
A year isn’t long to prepare for an icon exhibition so I got started with the drawings. It was a wonderful way to focus during what turned out to be a bumpy few months.
Garden at Fiona Stanley Hospital Perth
Life is better lived slowly
I made an unplanned visit to my sister in Perth WA who was unwell but I find sketching and drawing icon figures very calming. I wrote a little about the visit over here.
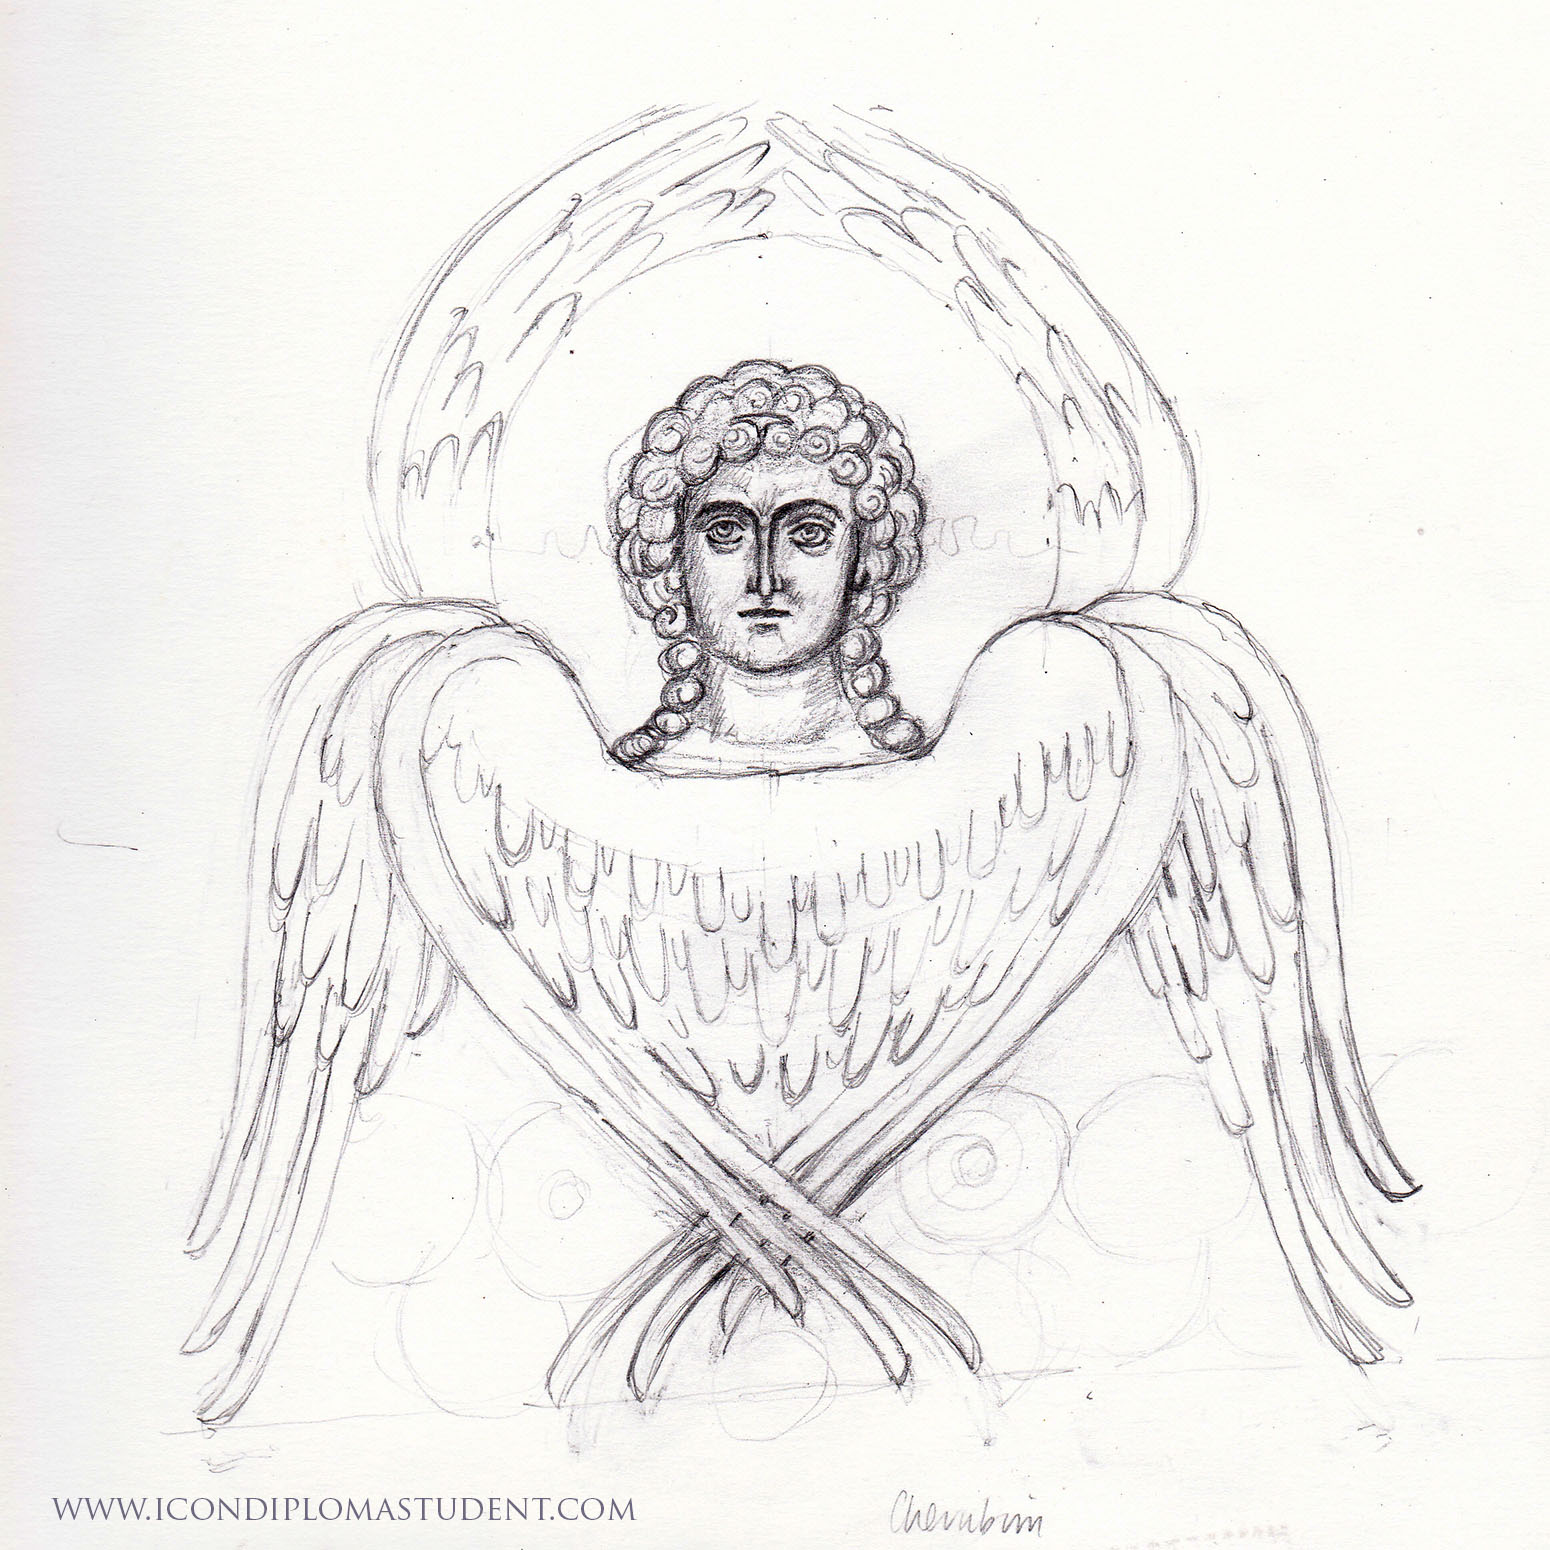
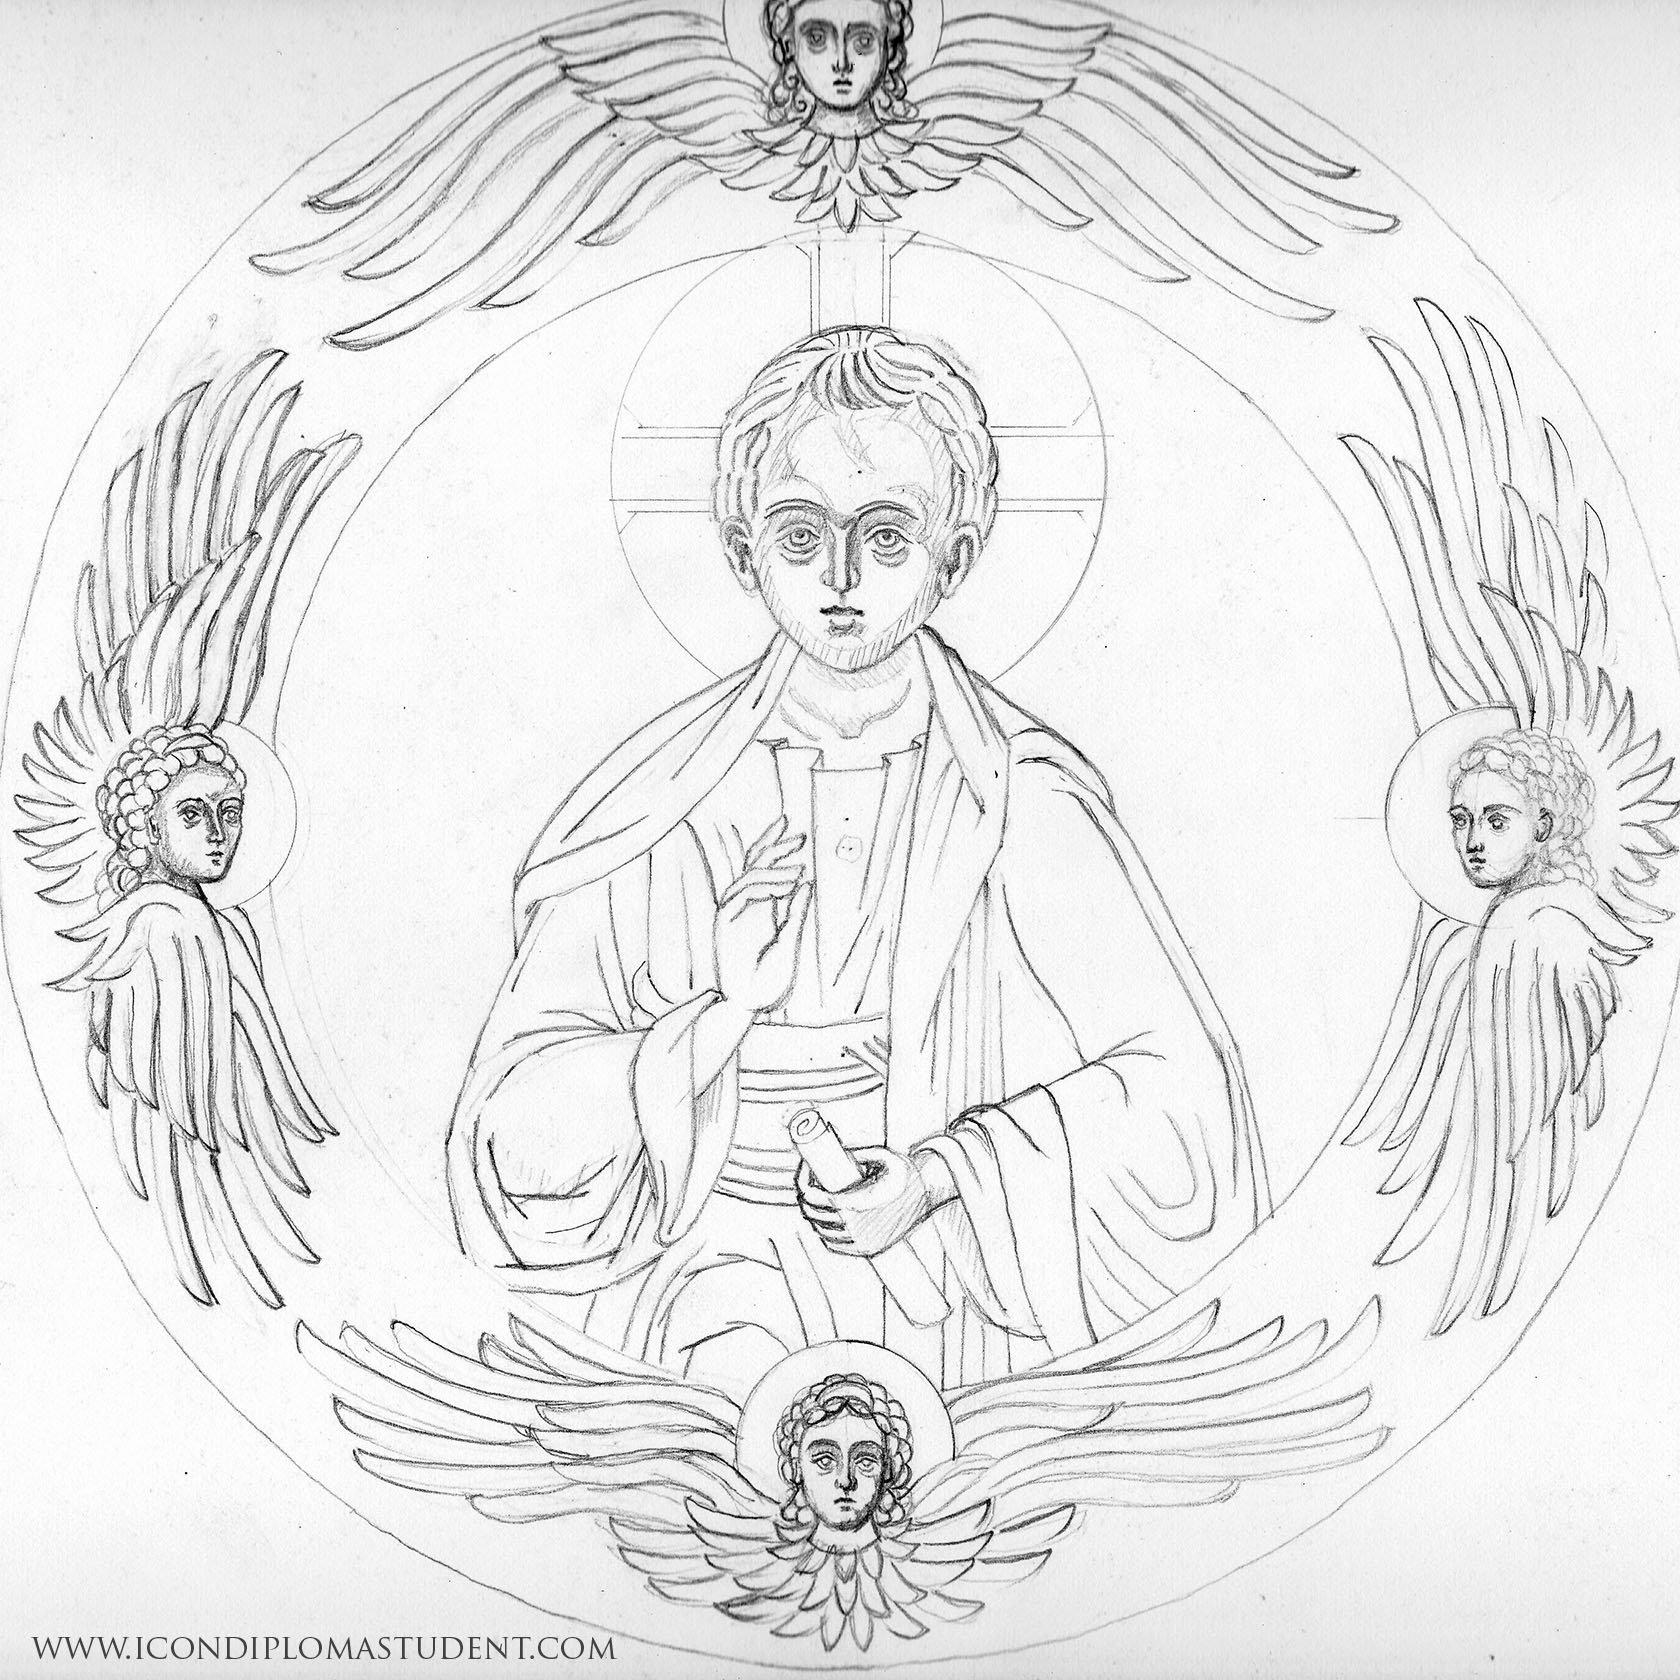
The Council of Archangel Michael is a rich icon and full of life so I drew the main figures separately in turn. I drew the cherubim below late into the evening while my sister rested. I smile and am so grateful for all the help we are still recieving from these celestial helpers.
Cherubim from the Council of Archangel Michael icon
Drawing of the young Christ within a circle of seraphim
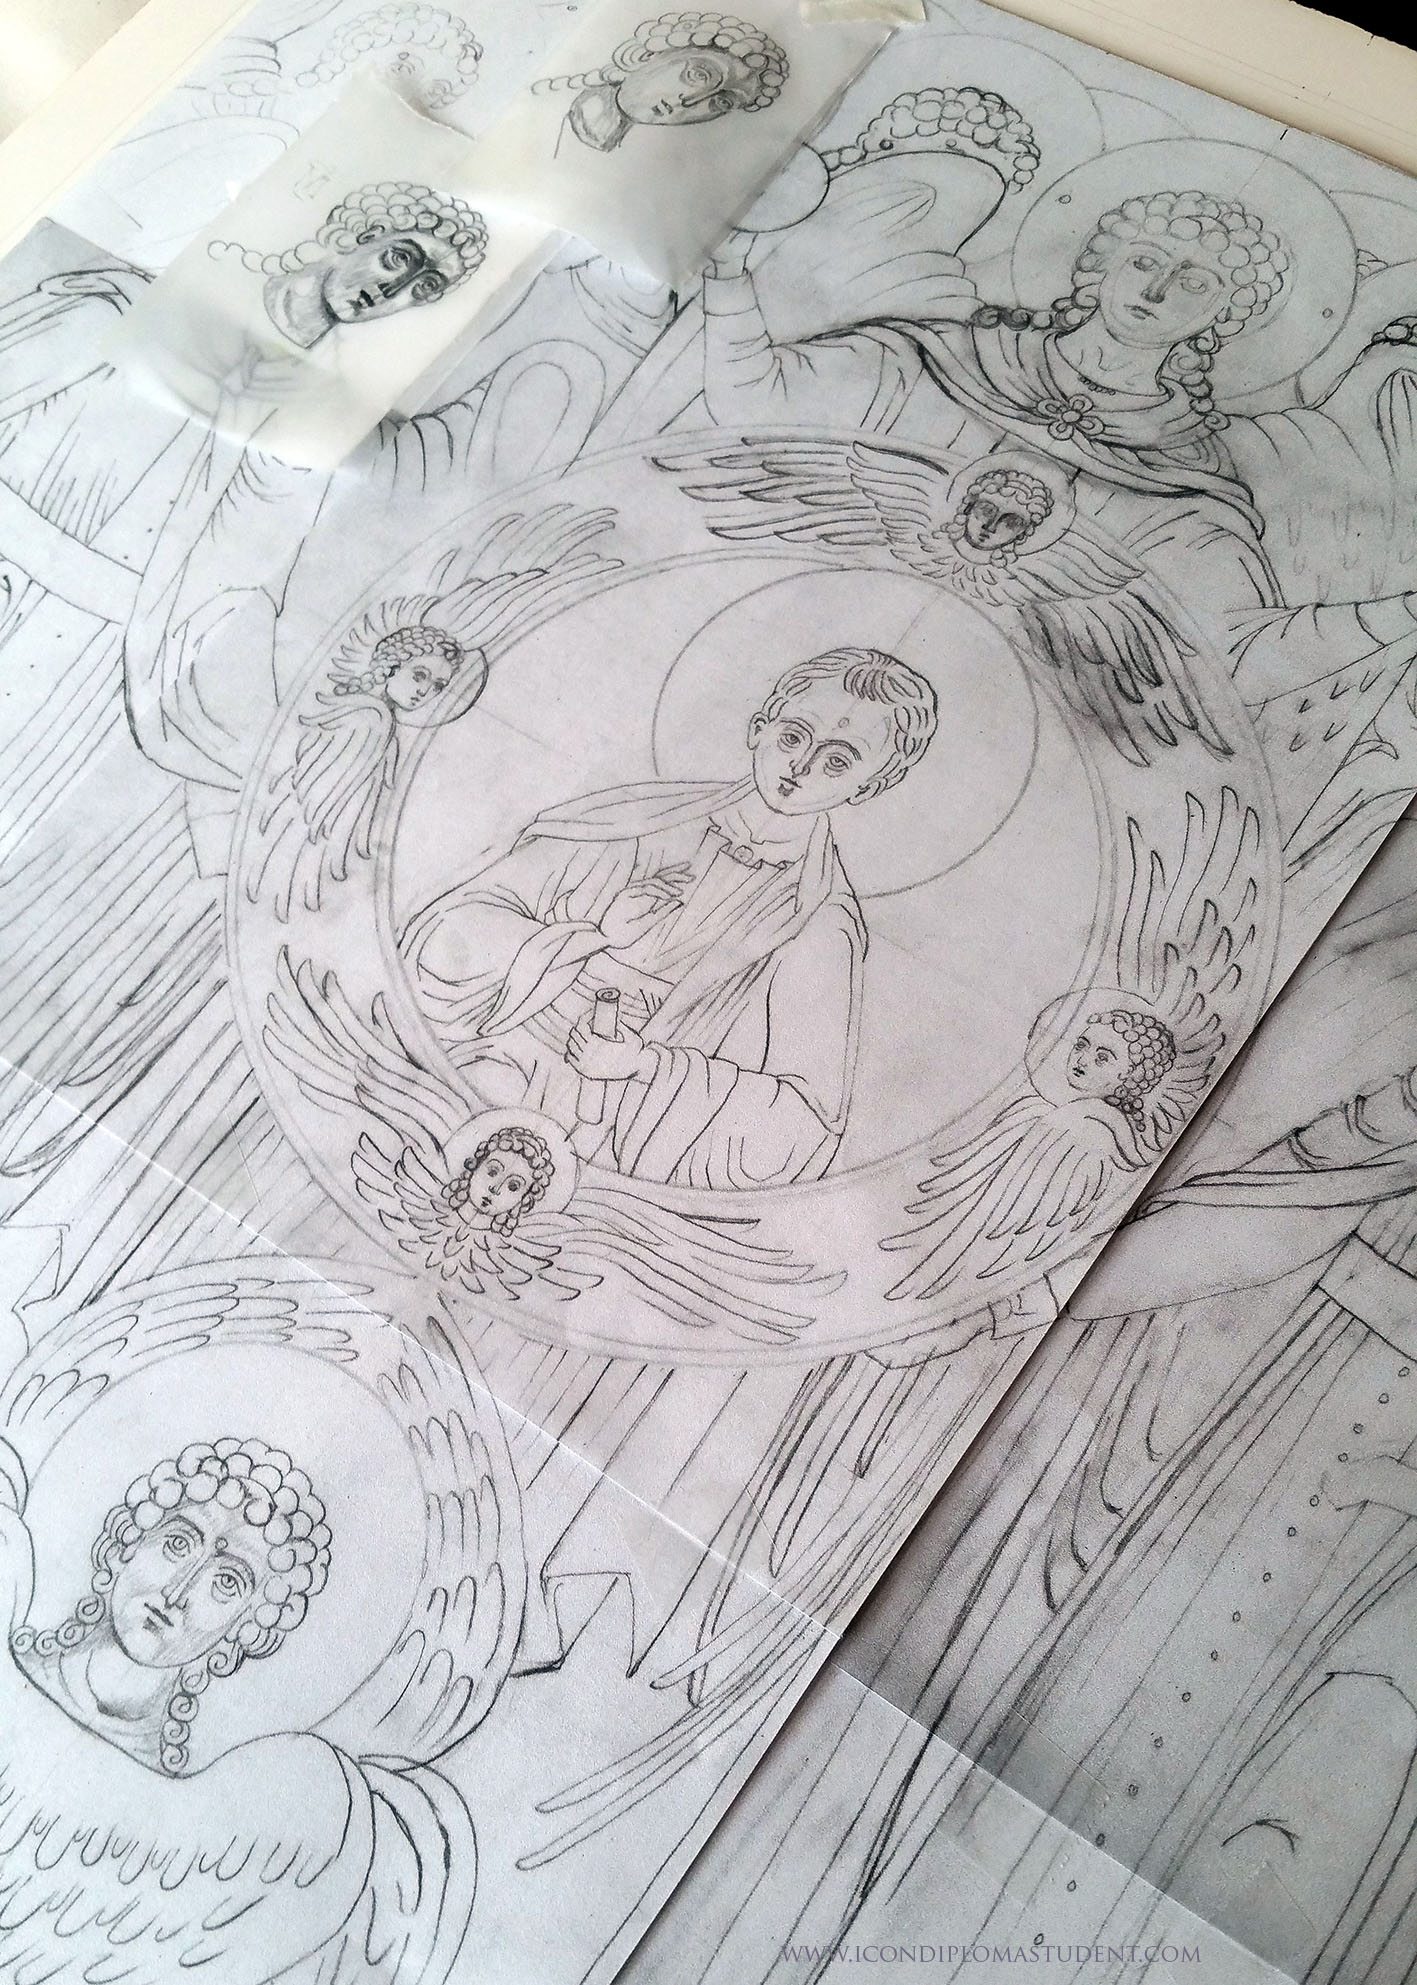
Full drawing ready to transcribe
The overall drawing is too big for me to scan at home but the photo gives you an idea of the overall composition. The finished icon will be just over 40cm square.
Hope you will join me as the rest of this icon unfolds!
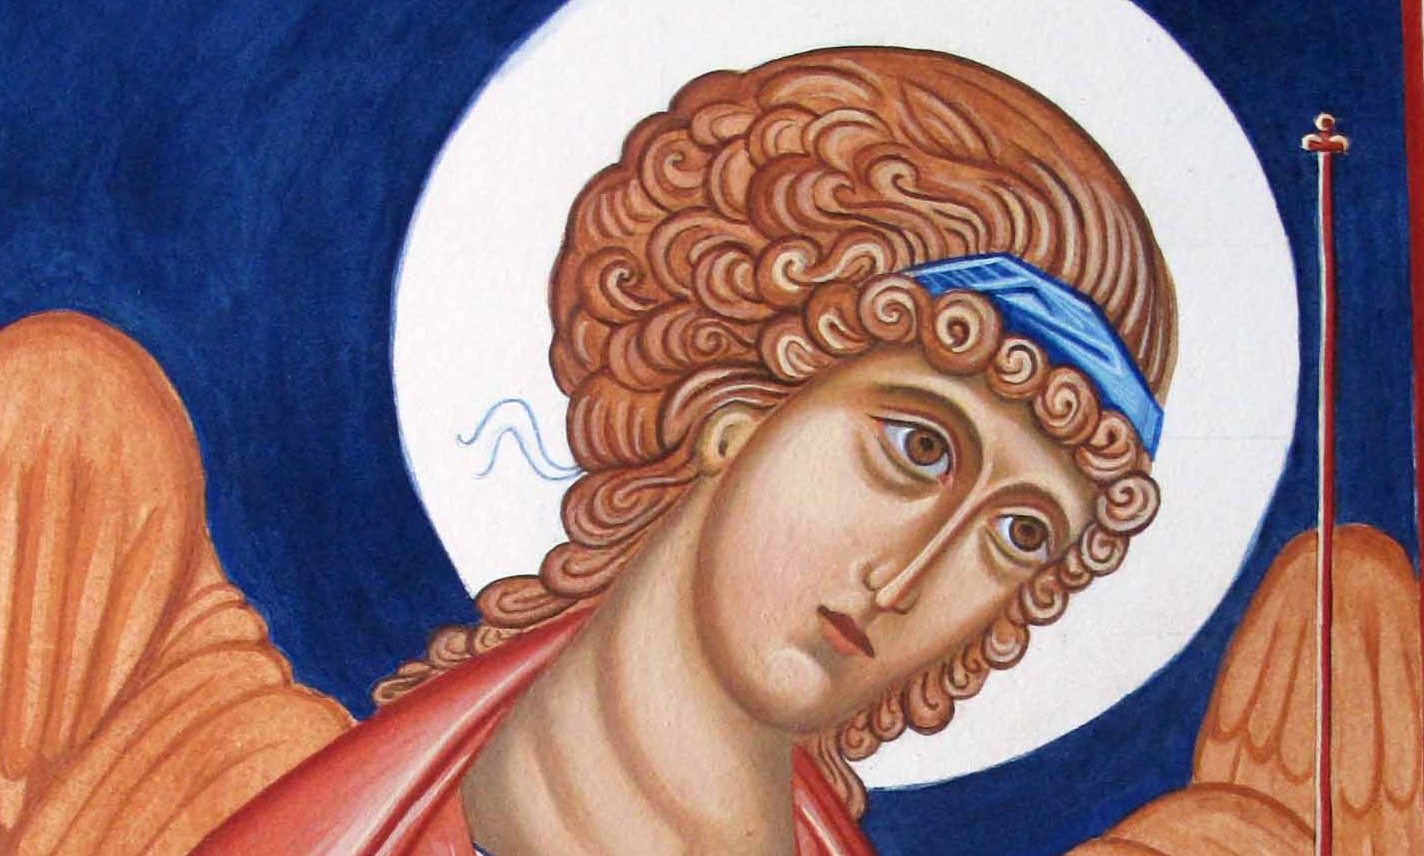
Warmest wishes for Candlemas on Thursday! Here’s Archangel Gabriel, first icon of 2017.
Archangel Gabriel
This post is short and sweet while I’m gathering my thoughts on varnishing icons…or rather questions. I’d love to hear of people’s preferences – there seem to be so many options yet each with drawbacks.
Bye for now
Ronnie
PS Prints and cards of this icon are now available from Smith York Printers.
Hello icon friends, While I was recovering from the fractures, I was keen to get my arm painting or drawing again in some way. Since I was pretty limited in my mobility, I decided to make use of some pre-stretched water colour paper which was mounted on a board light enough to handle. I really liked the monochrome studies which we painted in egg tempera on paper and thought I would tackle some different garments as a way of practice before returning to make amends to the hashed up garments of St Francis.
Drawing on to stretched water colour paper
This proved to be a delightful exercise and although it doesn’t have the translucency of painting on to a gessoed board, the results are surprisingly soft and gentle. It is also a great way of practicing if you don’t have an icon board to hand.
Underpainting garments, hair and face
The paper is 300gsm Fabriano cold pressed water colour paper, which accepts the pigment really easily once it has been stretched. I dampened the paper again where I was painting large areas which helped to blend the pigments.
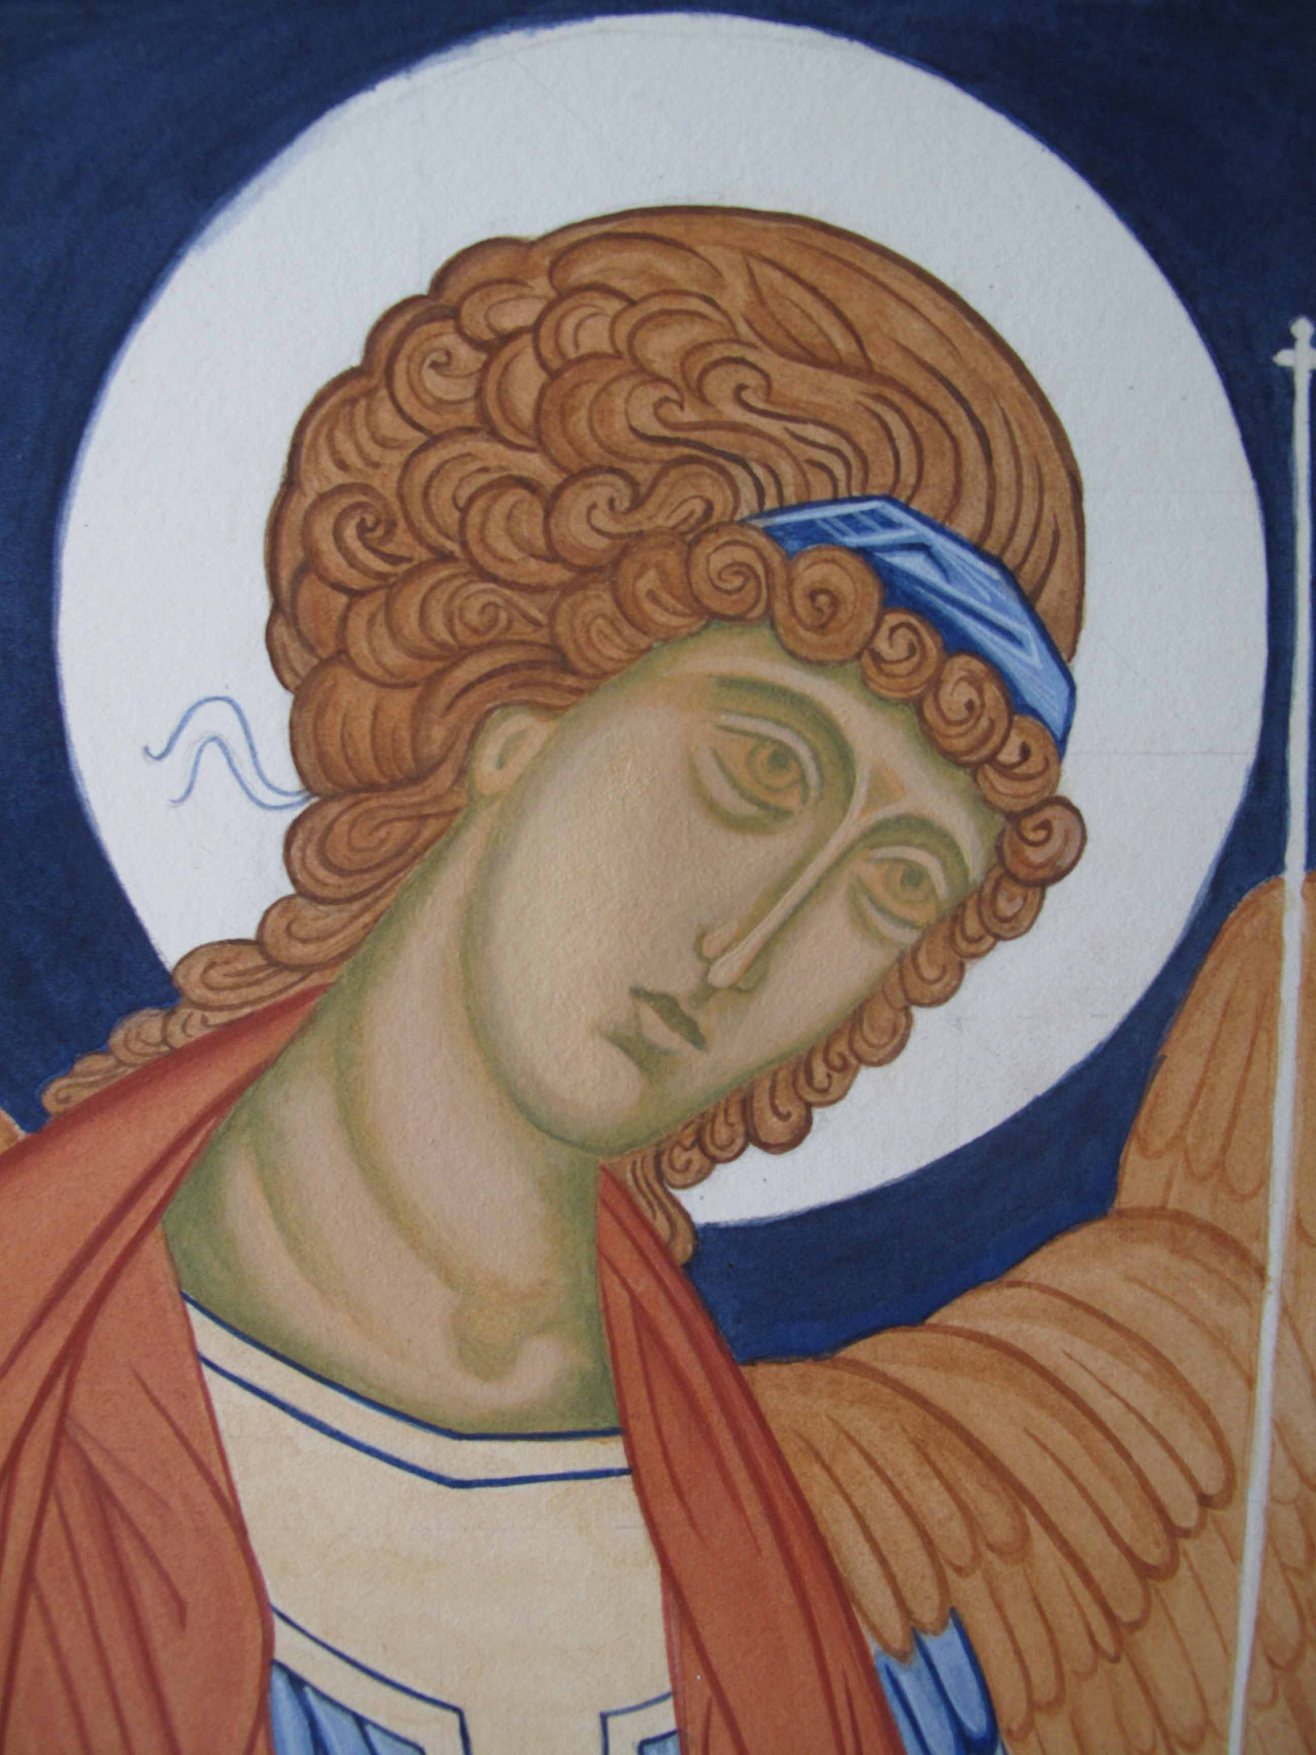
Underpainting the wings and adding membrane to hair
For the garments, I chose English Red Deep with a little Raw Umber and for the wings, I chose French Ochre Havanna with a dash of English Red Deep. The blue in the garments and hair band is Ultramarine Blue light with a dash of Raw Umber and the background is the same blue but with a little Ivory black added.
Adding membrane to the face and to garments
applying garment highlights
Highlights added to garments and face
Applying gold leaf to the halo and wings
The original framed icon is available to buy in my Etsy shop here.
A few lines to say thank you for your companionship during my first year of icon painting. It has been lovely to have your quiet support and interest encouraging me to keep on posting and writing up notes etc!
There are a few more video clips of Aidan Hart’s in-class demonstrations over on You Tube and I have written up some supporting notes to go with them. These are not direct transcripts, simply notes to help as you try out the various stages of painting.
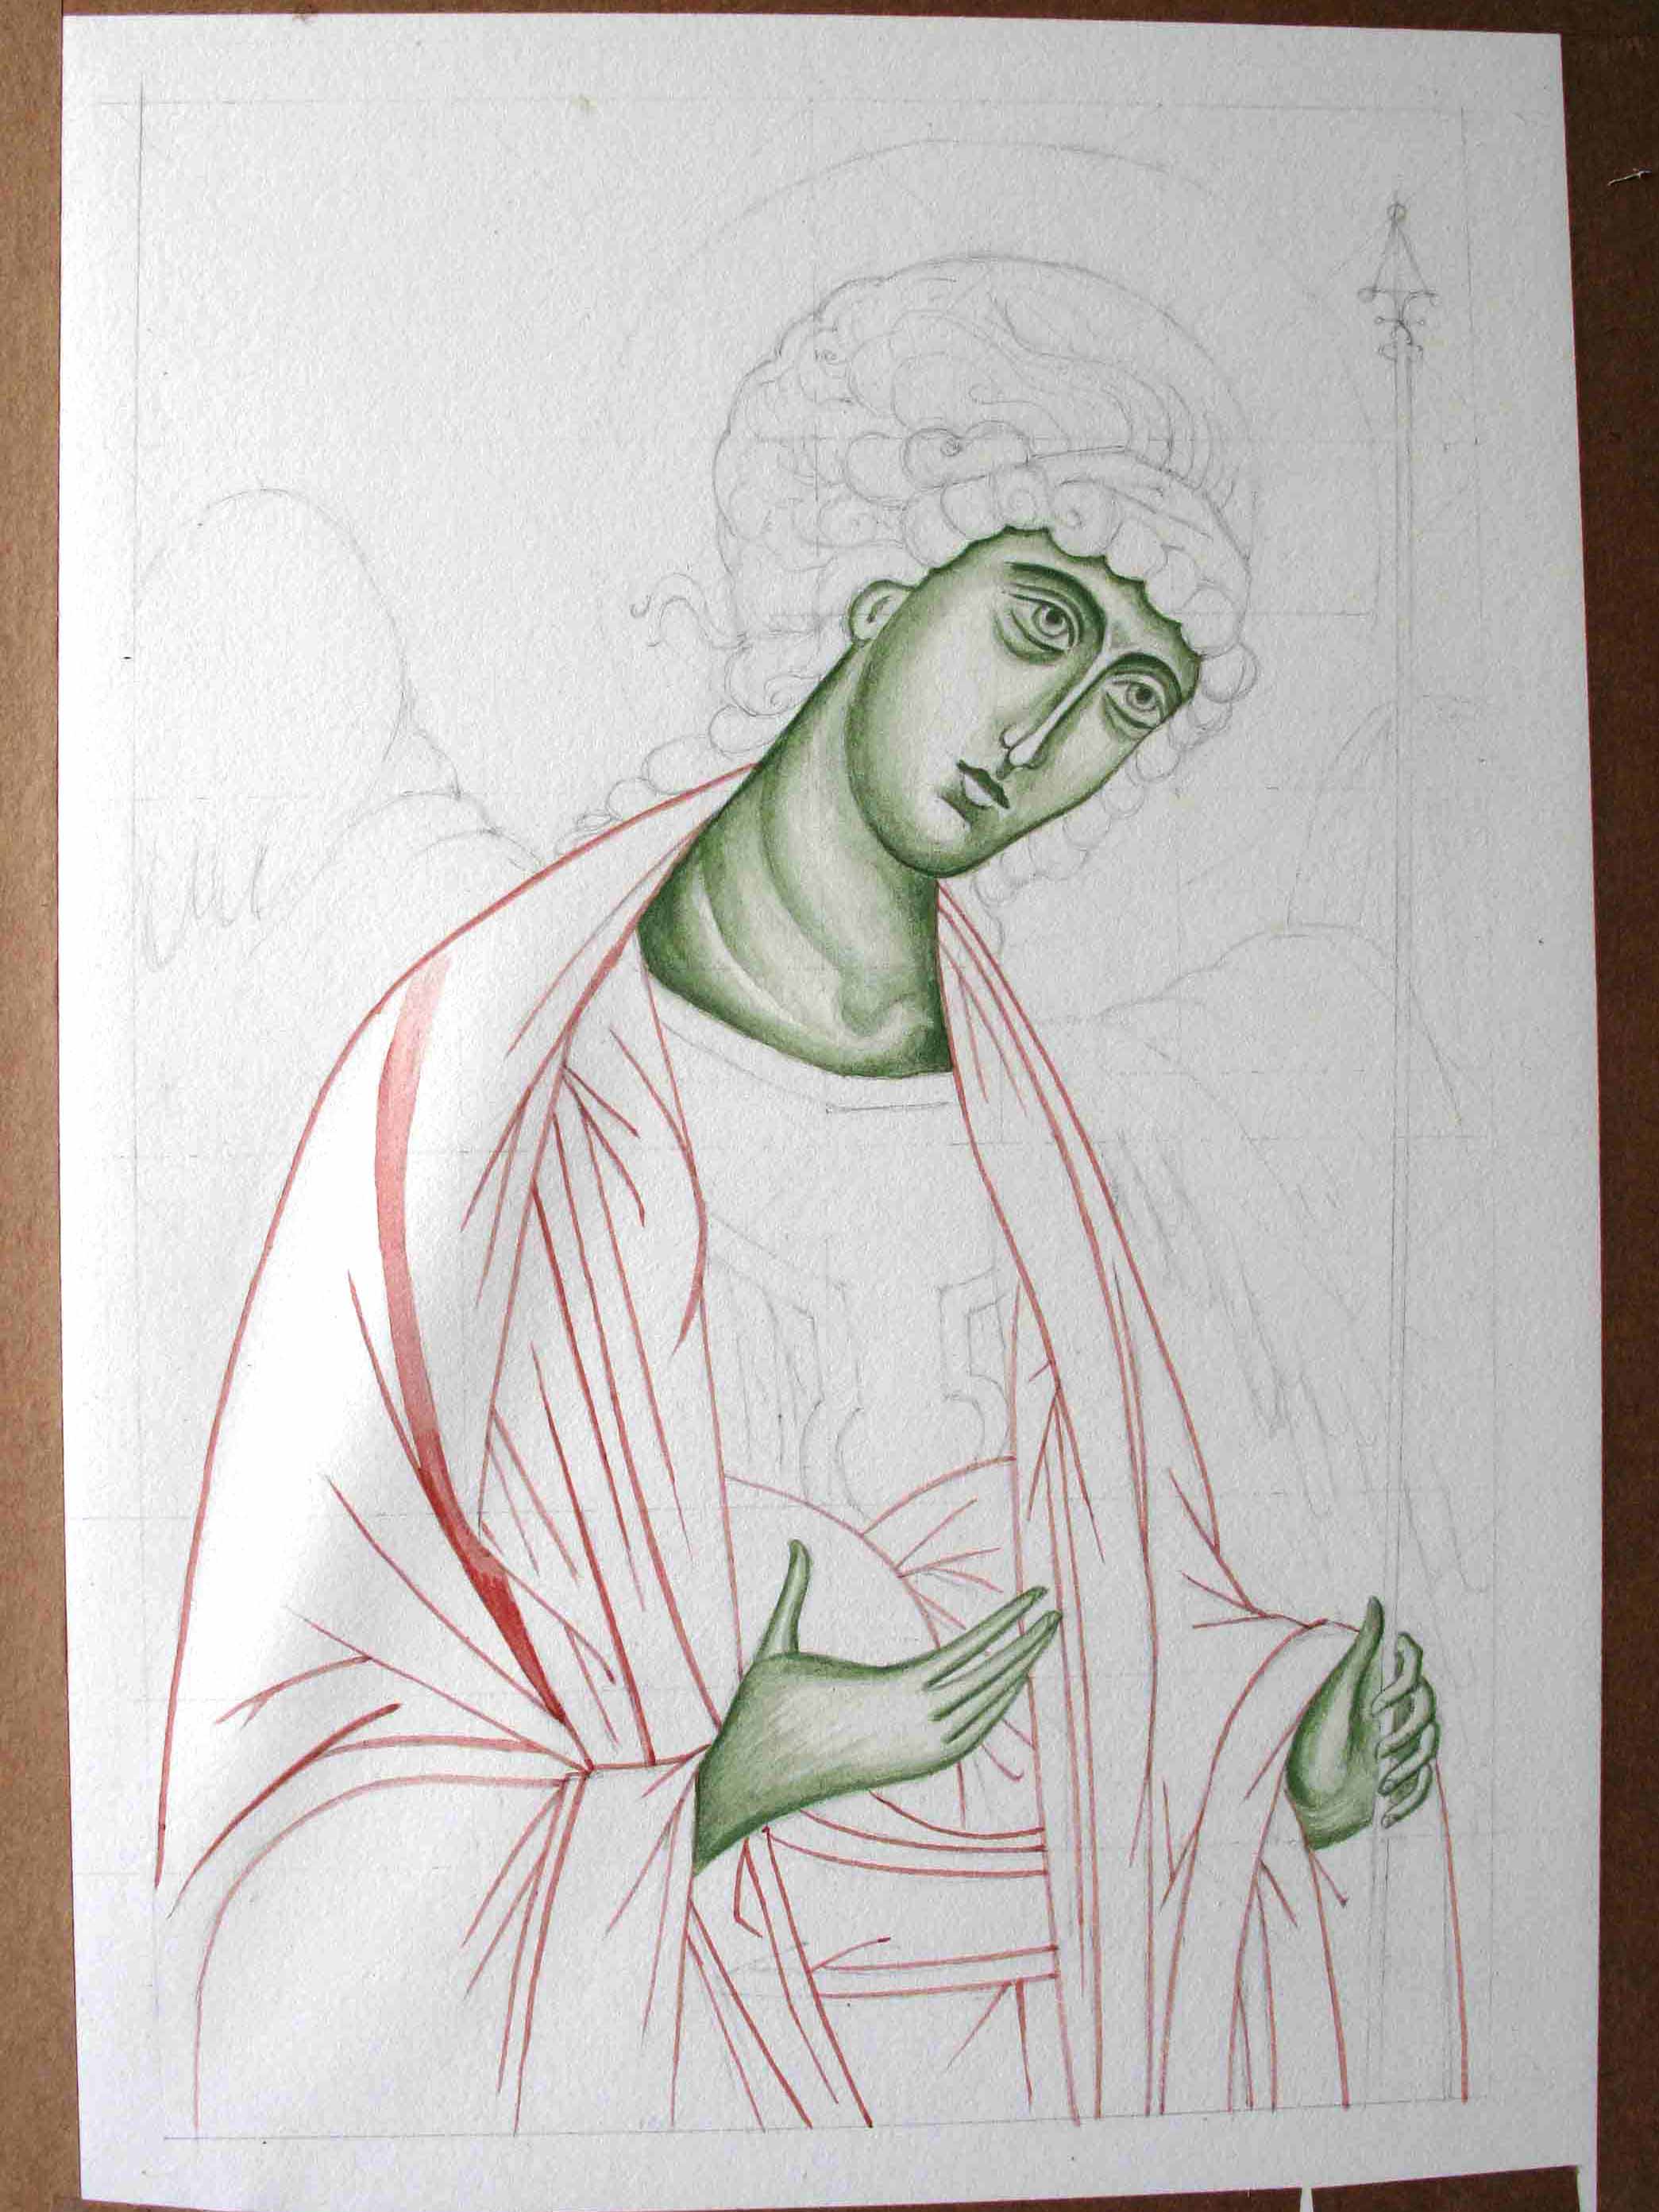
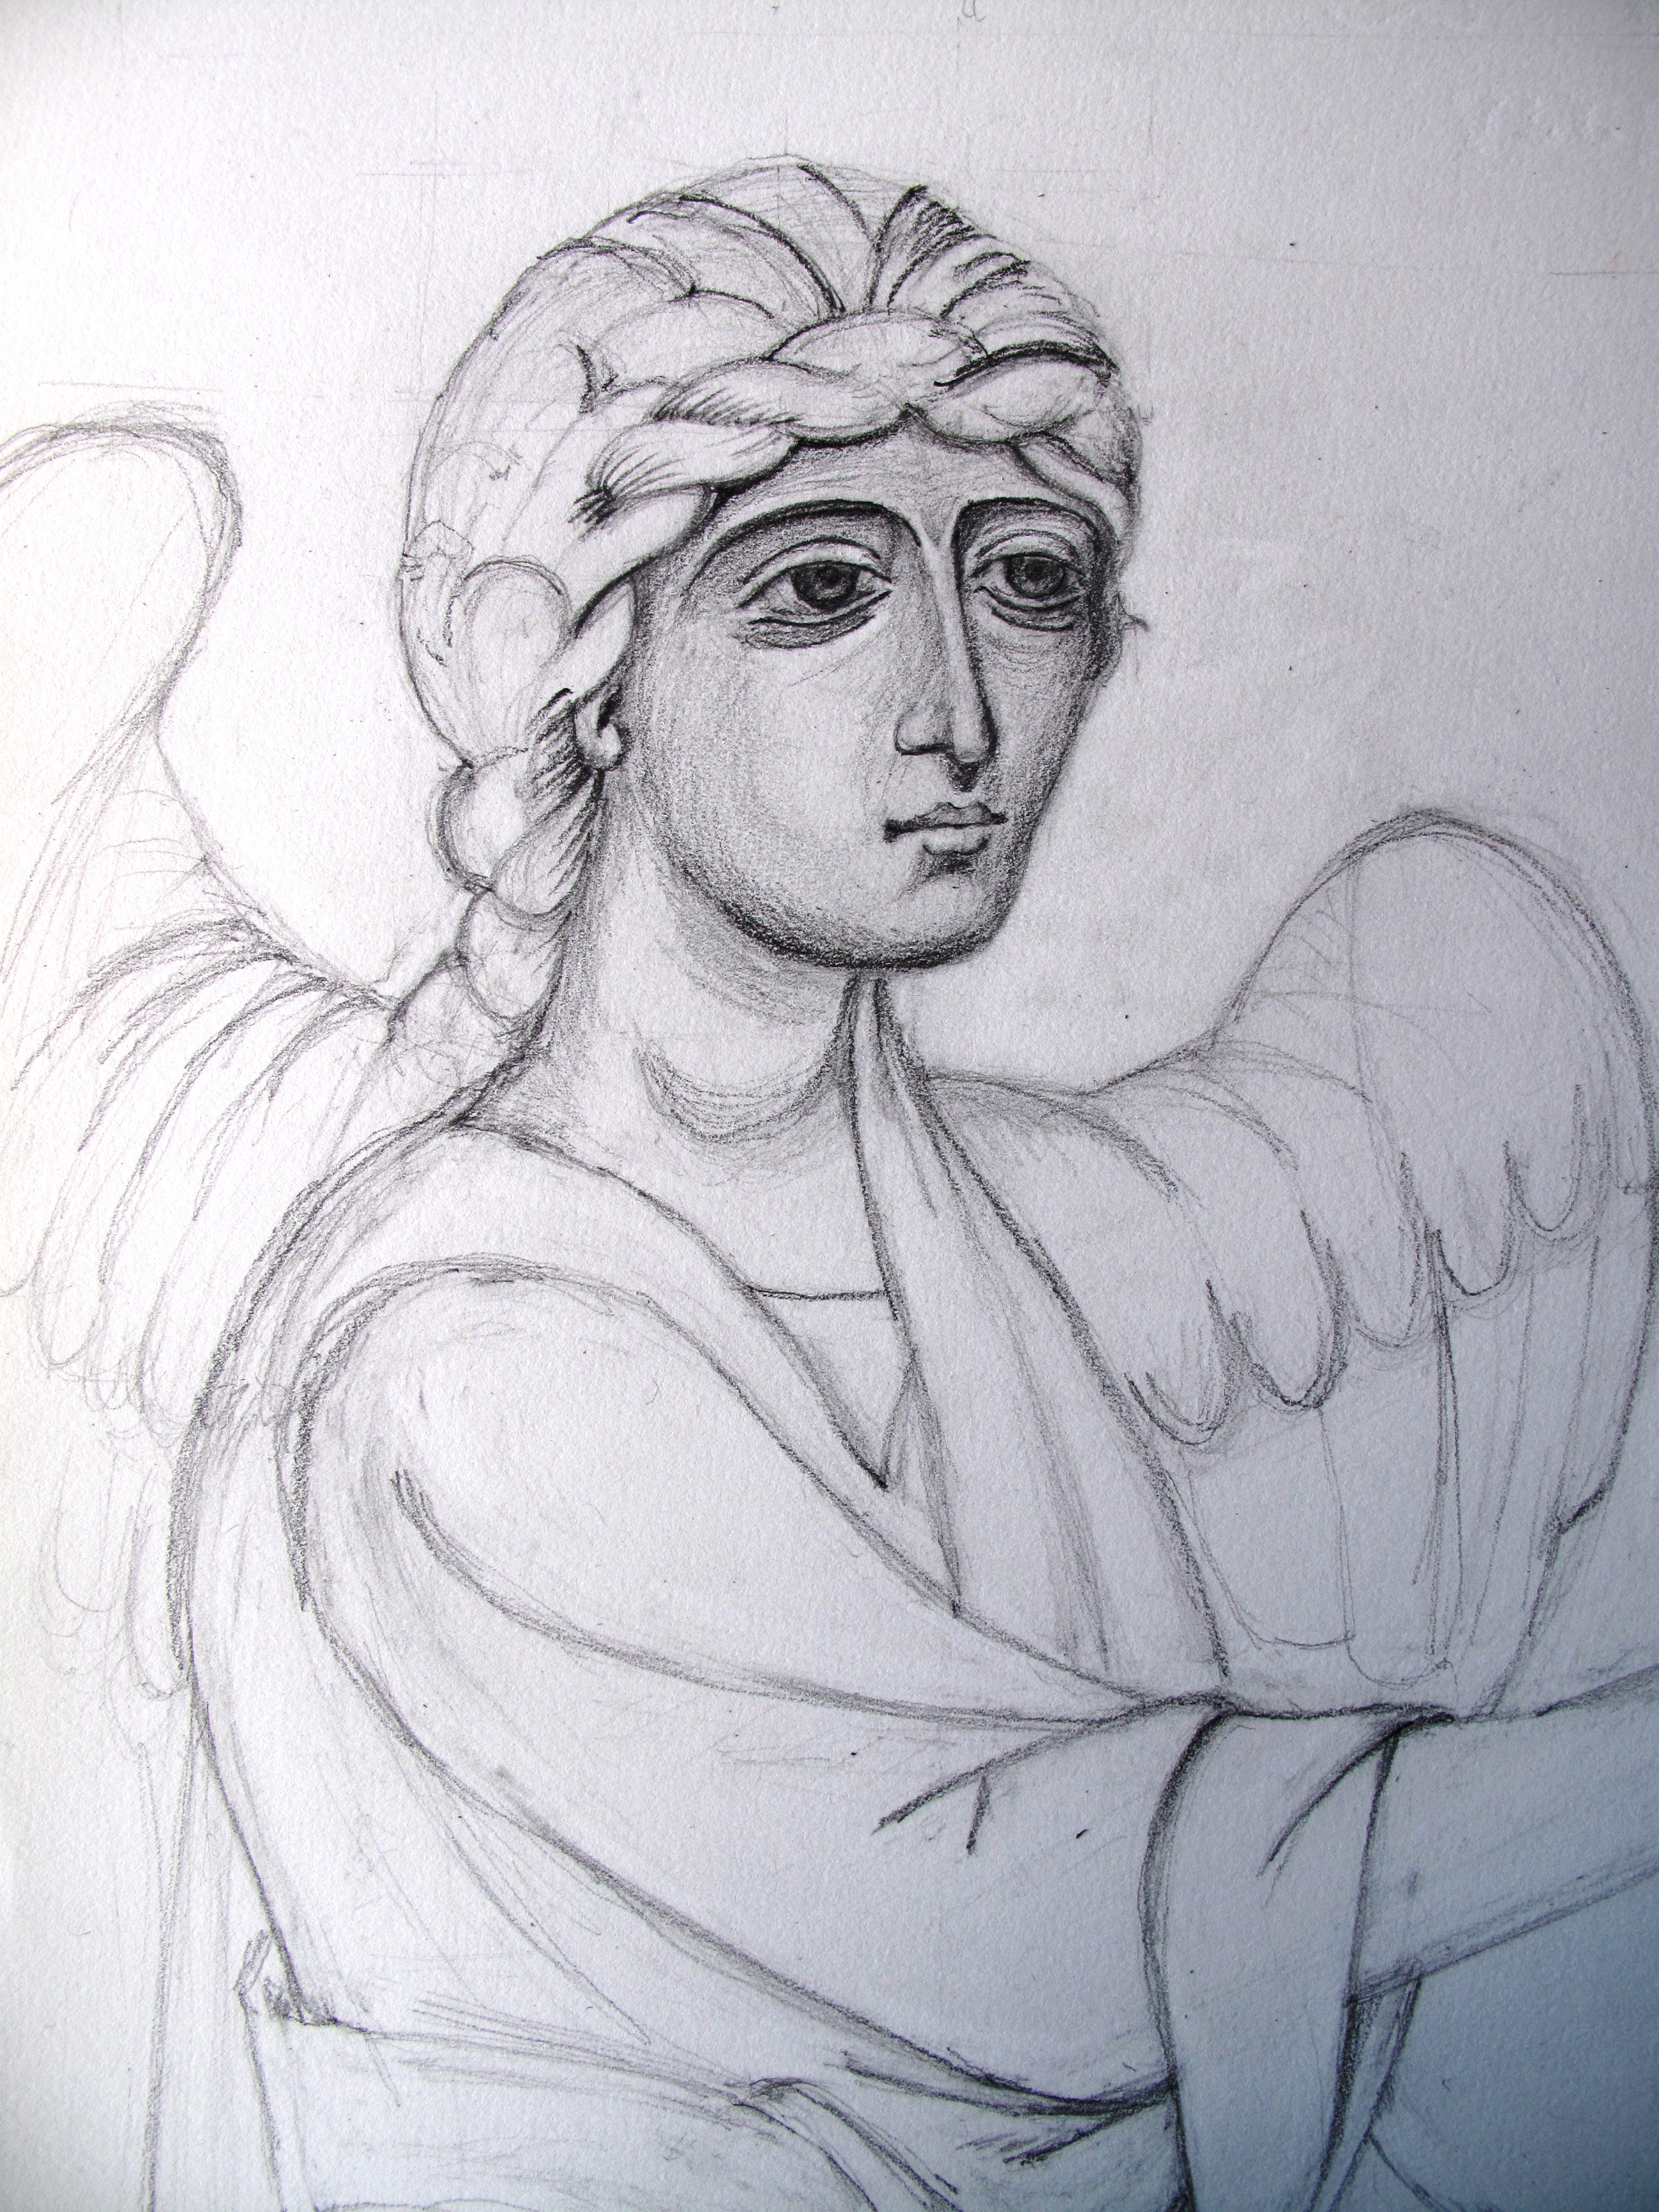
I have enjoyed the monochrome icon studies on watercolour paper and thought I would have another go at the Archangel Gabriel based on the Annunciation of Ustyug. I stretched some Fabriano Artistico paper and painted using the membrane technique. The colours are much softer on paper – lines are not quite as crisp unless you go over them several times. However, it is a great way of practicing if you haven’t got a board prepared.
Underpainting: the face is in Terre Verte and a touch of Yellow Ochre Maimeri, garments and wings in a mix of English red ochre, French ochre Sahara and Avana.
Membrane applied to flesh parts.
Building up the hair and facial highlights.
Highlights added to wings and sleeves
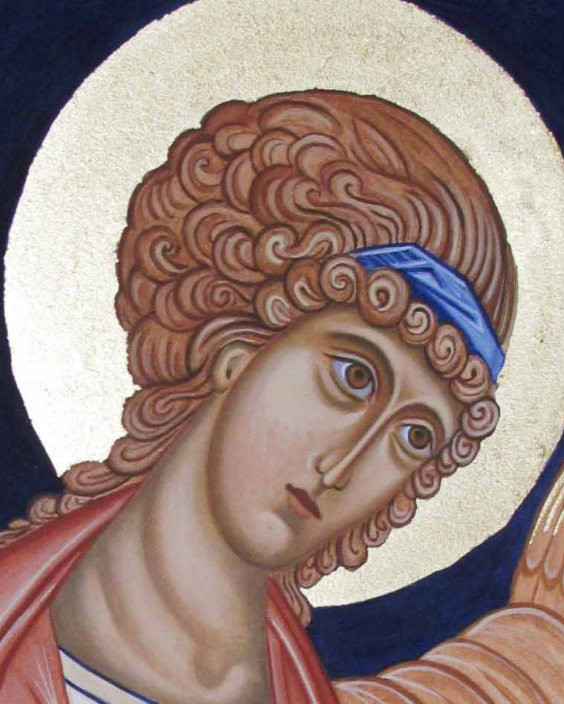
Preparing to gild using Roberson’s gilders size – applied over the halo which has undercoat in red ochre.
Gilding the halo. Applying final facial highlights
Finished angel with halo, staff and lettering.
It is a better attempt than my last one but there is a long way to go before I become fluent and produce anything nearly as elegant as the original. All the same, it comes with my very best wishes for a happy, peaceful and blessed Christmas wherever you are in the world. Thanks for reading.
Happy Christmas, Ronnie
PS…Some years later and I did revisit some of the finer details on Archangel Gabriel’s face – around the upper lip. I am now happy with this and it is listed here in my Etsy shop.
The image above represents a quick sidestep past another effort which ended up in the experience bin. I had started this stage quite pleased with my decision to stretch myself by working on a larger image. I transferred the outline of my final drawing of Gabriel on to A2 sized paper which gave Gabriel the space to outstretched his arm in full.
Transferring the final drawing on to unstretched A2 Fabriano Artistico watercolour paper
On went the image using a sheet of paper which I had rubbed with Armenian red bole (a red pigment) to act as transfer paper. Then I painted lightly over these lines to fix them.
Painting the outline on to the paper
So far so good. However, as I washed over the larger areas, the paper began to cockle.
Image of Gabriel 1
I then got caught up concentrating on the face rather than building up the image lightly and evenly as a whole. I looked at the face in comparison with the original and decided I had gone so far adrift that it was only paper and I should start again, and start properly. I am sparing you a larger image of my first Gabriel who looks rather stern!
Gabriel looking nothing like the original!
So, down to the DIY shop to buy an MDF board cut a little bigger than A2, together with some water colour tape and this time soak the paper in the bath for a few minutes, tape it to the board and let it dry. By this stage I had had enough, so I left the board and wet taped paper flat on the floor overnight and by morning it was dry and had stretched beautifully!
Gabriel with a softer face
This time, I tried to develop the whole figure and garments at the same time. There are numerous mistakes with the garment folds which I realised as soon as we got the handouts on our next Icon session but at least I can see where I have gone adrift.
I have attached Aidan’s handout notes on painting standing figures and garments if you would like to find out more on this subject. I am concentrating on our homework for the time being but will come back to Gabriel in a few more weeks.
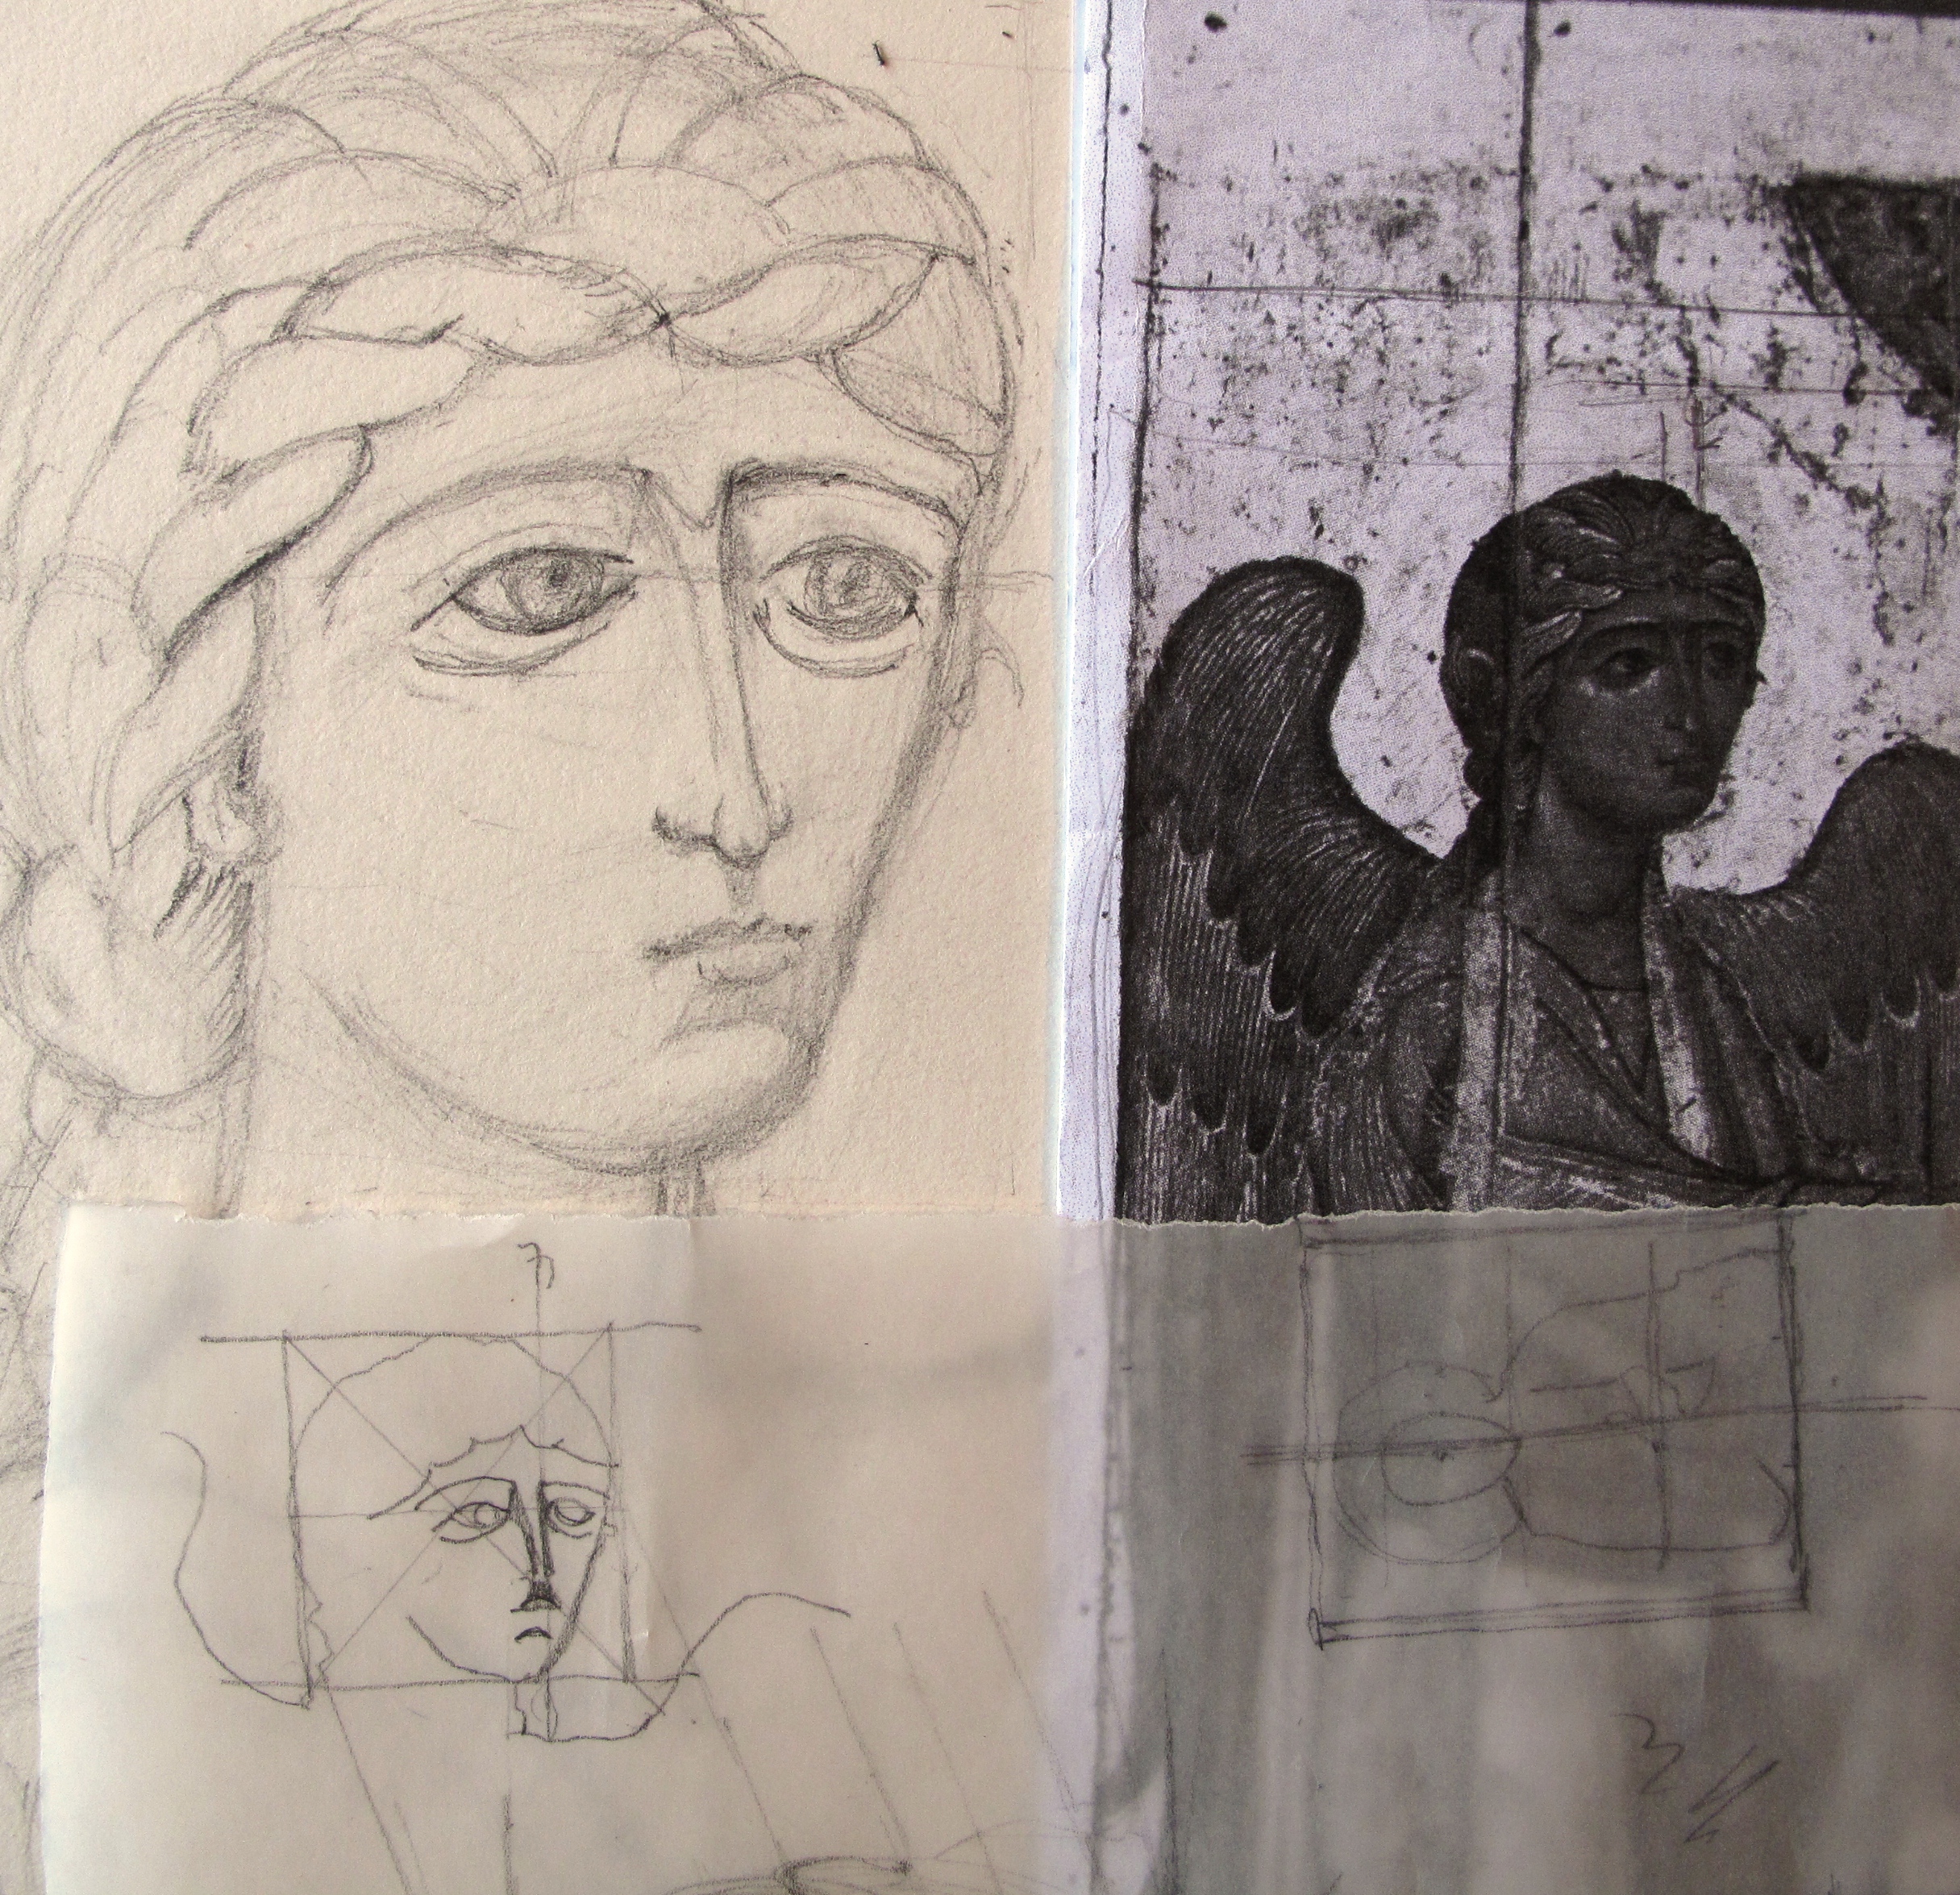
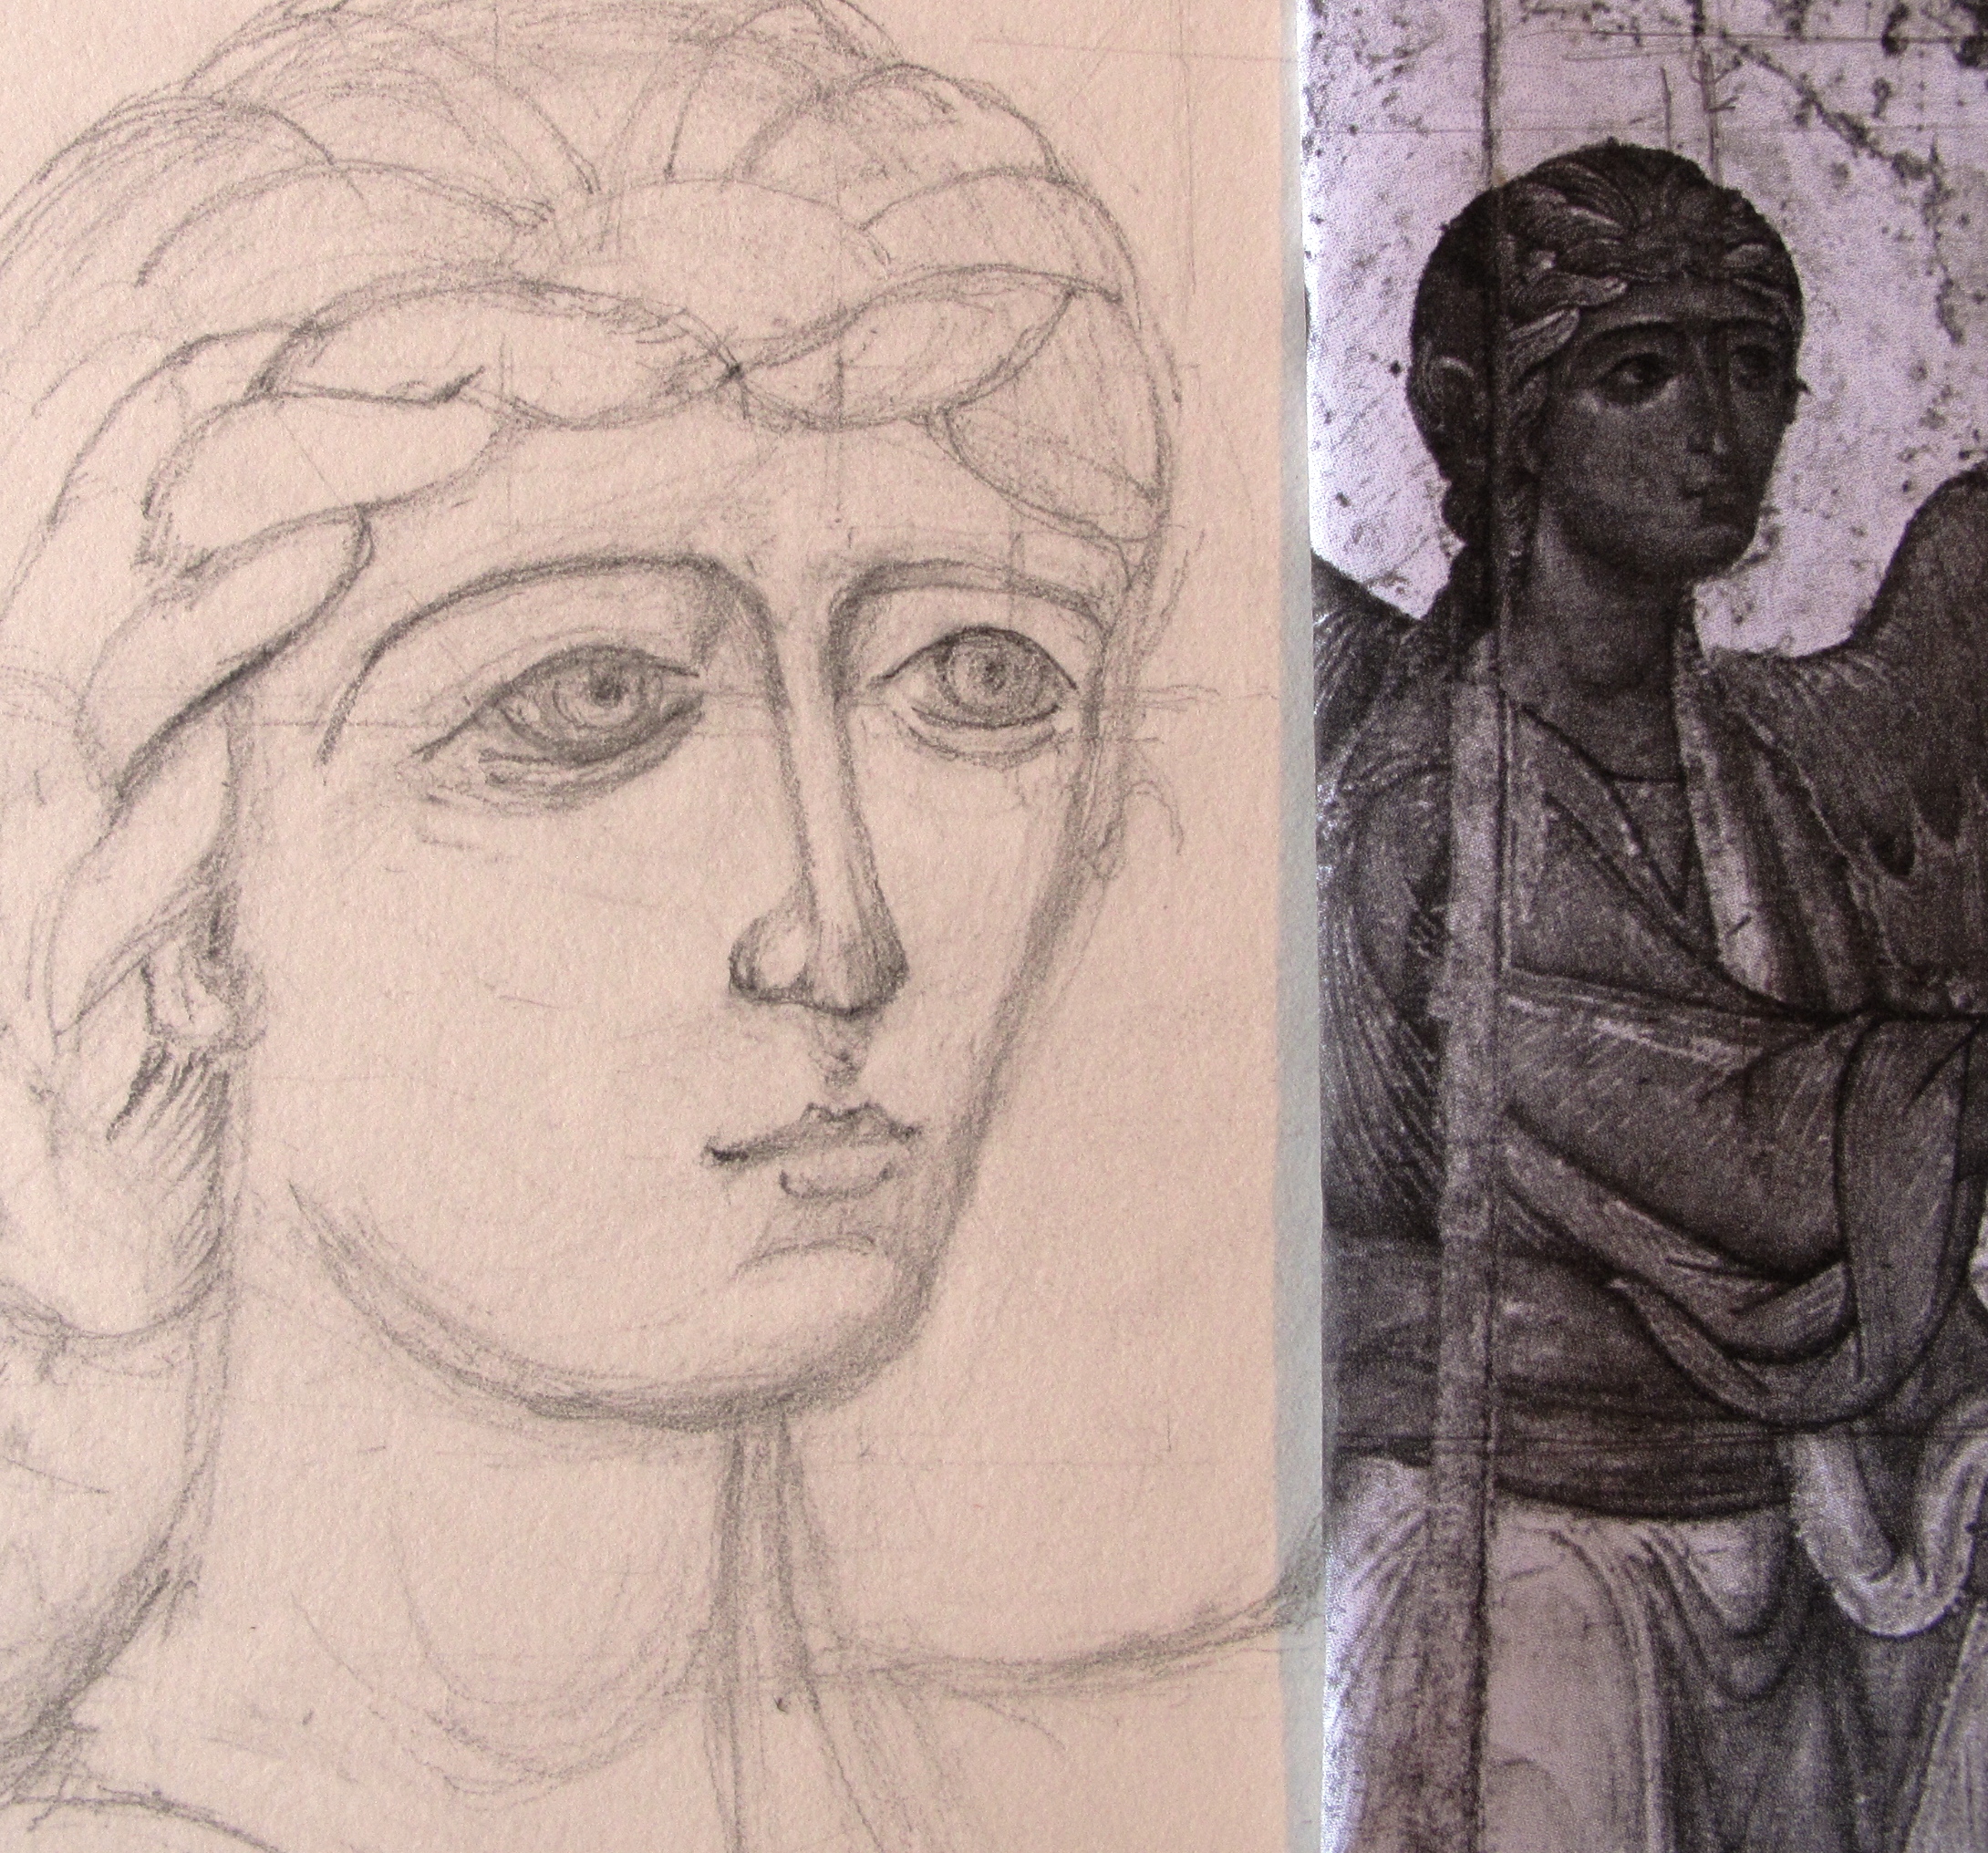
It is one thing hearing how to do something and another altogether applying it via the end of a brush or pencil. I set out to try another upper body monochrome of the Archangel Gabriel from the beautiful image of the Annunciation above and in the course of this I have befriended a whole group of mistakes – let me introduce a few!
I lightly sketched out the image ready to paint over but saw immediately that I had run into difficulties. First of all, I didn’t get the overall composition right.
Preliminary sketch of Gabriel
I had set out the upper body study on A3 paper but in doing so found I had cut off the hand. This seemed to lose the whole point as the hands are so expressive of the whole message that the image contains. Looking at it now, for this exercise I should have zoomed in and concentrated on the face and upper arm, but I had started so I carried on.
Sketch comparisons, finding the centret to identify where I am going adrift
Secondly, I couldn’t get the face, in particular the eyes, quite right. I did a cross check between the original and my drawing by forming a simple square to enclose the head, then joined the diagonals to find the centre point of reference. I was pleased to see that the point landed in exactly the same spot on my drawing, but it showed immediately where the rest of the face had gone astray. The nose leant too far over and the eyebrows had fallen down.
Adjusting the features but there is still something not right – the eye on the right and the tilt of the head?
After a few days away from this drawing, I still couldn’t quite see where they were going adrift so I traced over the original eyes to clarify their shape and laid them over my drawing.
Tracing the profile of the original eyes to identify where I am going wrong
One slight move of of one feature has repercussions elsewhere so the brows, nose, mouth, cheek profile all got adjusted and brought into alignment. I suppose that speaks on another level too, to always go back to the source to bring something of ourselves that is out of step back into alignment.
The eyes on the left after being adjusted.
Sketch of Gabriel near completion
With all the rubbing out and rearranging I had made quite a mess of my paper. I thought hard about all that I had learnt and decided that I would take a bit of a leap and redo the whole image again but on larger paper. So, next time I will tell you about how I made a fresh crop of mistakes as I move onto A2 paper. Thanks for reading!