Icon Diploma Student

Learning to see with the eye of the heart

Posts tagged ‘Christianity’

For the love of colour

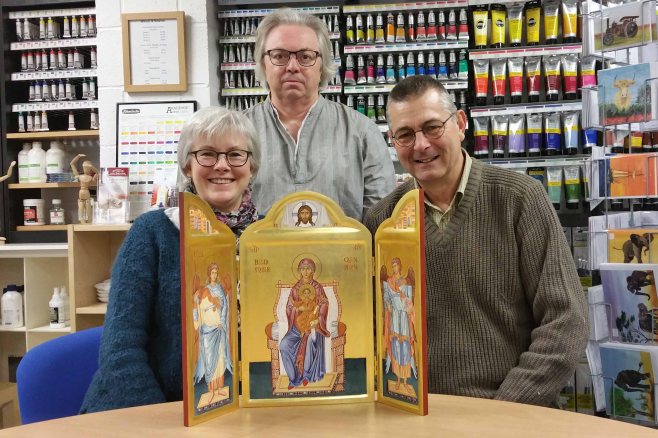
So how did the work of twelve icon diploma graduates end up in the window of L. Cornelissen this month?

man looking in window of Cornelissens

Pausing to read about the icons on display (photo courtesy John Cruwys)

It’s hard to pinpoint where this great moment began but my long held love of calligraphy  and illuminated manuscripts led me to learn how to gild with Patricia Lovett. We’ve kept in touch over the past 12 years and through mutual friends on social media, I have also to come to know and admire the work of another artist and calligrapher Lin Kerr. Both Patricia and Lin are natural teachers, love colour and their enthusiasm for their art is infectious.

One of the common threads linking us has been Cornelissen’s, home to pigments, gold, gesso and some of the most obscure ingredients for icon painters and artists alike.

Lin had spotted one of my Instagram posts ‘Eccleshall Gold’ on vellum and tipped me off that Patricia was setting up an exhibition ‘Gold on Parchment‘ on behalf of the Heritage Crafts Association, for London Craft Week 2016 at Cornelissen’s. This was to promote work on vellum/parchment following the results of the campaign to keep the acts of parliament recorded on vellum.

Eccleshall High street on vellum unframed

Eccleshall Gold

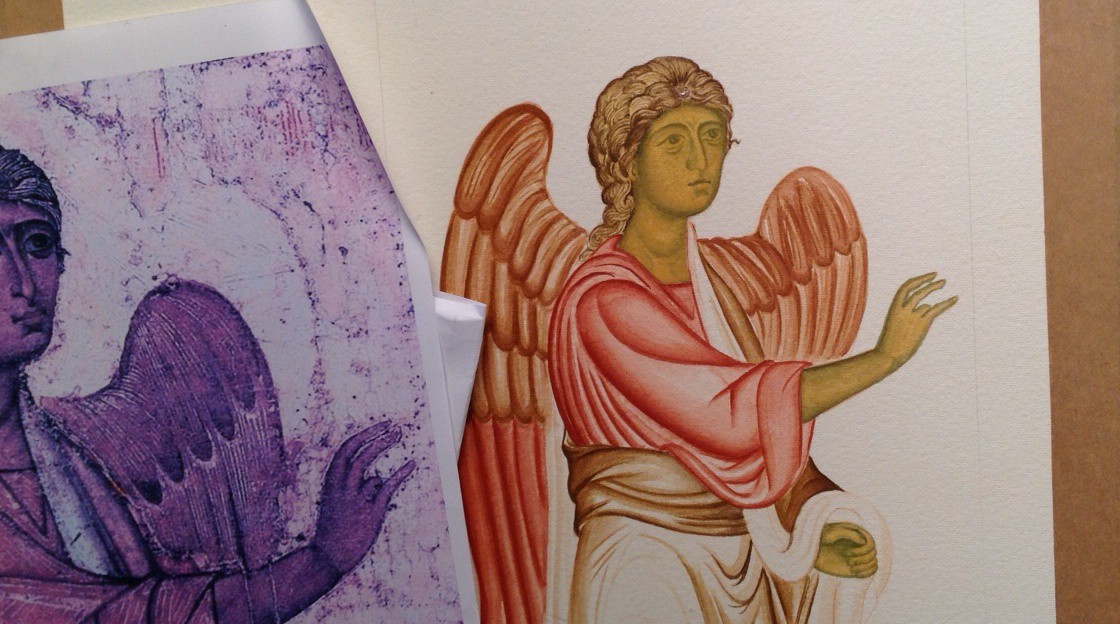
Patricia kindly agreed to include both this and ‘Armenian Nativity‘, a piece that I was working on for the icon diploma.  The range of work on display demonstrated many of the gilders’ tools and pigments sold inside Cornelissen’s and naturally drew people into the shop. This little icon on vellum seemed to attract quite a bit of interest – possibly the vibrant contrast of the vermillion agains the deep blues? Who knows, but this was the link that led to the current window exhibition by The PSTA‘s icon diploma graduates, only a few months later.


illuminated manusript armenina nativity

st-albans-psalter1-cruwys

I couldn’t resist following on with two more icons based on an illuminated manuscript – this time the St Albans Psalter, both pigment rich examples.

icons-cornelissens2-cruwys

Passer-by stops for a photo (photo JLC)

mary-magdalene-announces-res-to-disciples-cruwys

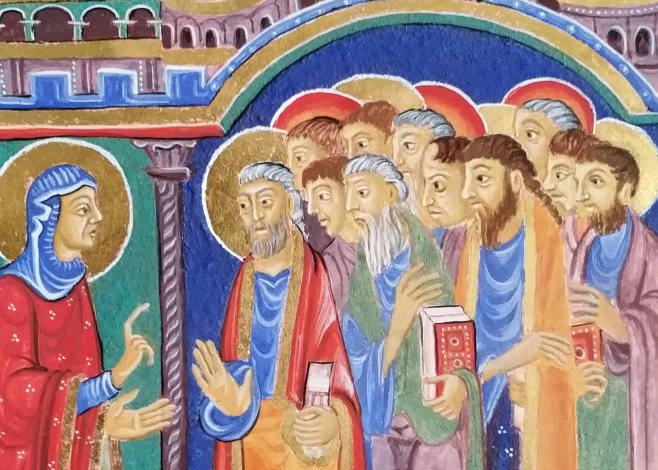
Mary Magdalene announces the resurrection of Christ to the Disciples

three-maries-at-the-tomb-ronniecruwys

Three Maries at the empty tomb of Christ

So this is our last week on show in the heart of London as the display comes down on Friday. It has been an honour and such a blast – thanks from all of us icon graduates to Nicholas Walt and the staff at Cornelissens for our moment of glory in your window and not forgetting Patricia and Lin who were instrumental in making all this happen.

Thanks for reading,

Ronnie

Just a little triptych please? No rush.

tryptich icon by ronnie cruwys

Tryptic of Blessed Virgin Enthroned with the Christ Child surrounded by Archangels Michael and Raphael

I’m ‘Number 5’ in a family of six and we straddle the globe from USA to Australia with me here in the UK. We all ask each other favours every now and then, but I think this has to be the slowest request ever to turn around for my dear sister Anne! It was nine years ago that she asked me to paint her a ‘little triptych’ – I was still a brunette back then!

Aidan has suggested that if you are asked to paint an icon that you know nothing about – just go ahead and do it, and learn as you go. This is what has happened here. Saying yes to this request has drawn me into the world of icons, leaving the day job behind. I was relieved when Aidan accepted that these could be part of my set diploma pieces of standing and seated figures, which has meant that I have been able to learn as I go with Aidan’s guidance.

Dylan Hartley, Simon Morris, Ronnie Cruwys with triptych

Right to left: Dylan Hartley, Simon Morris, Ronnie Cruwys

Today I went to collect the finished icon from the workshop where Dylan Hartley made the oak boards, hand-carved the kivotos and gessoed it for me and where Simon Morris of Smith York Fine Art Printers has photo-scanned it, spending hours getting the studio lighting just right so as to reduce the glare from the gilding. Simon has scanned all the icons on this website as well as the printing for my street drawings over at Drawing the Street.

I have written a little about this triptych before in an earlier post when I began work on it here  and as I began to paint here. Further notes on painting the garments here.

Virgin and Child

Blessed Mother and Christ Child

As always with a finished icon, you see so many places which could do with revisiting. Faces and hands are my  weak spots. Feet too, but the slippers help!

The icon will be up in the PSTA Diploma Show in London next week, then will be part of the ‘Spirit Matters’ exhibition in Cornelissen’s window from 25th October to 16th November. From there it will make its way to Australia  where it will be part of Anne’s prayer corner in her home. We all have a lot to be thankful for but especially me with such a loving and supportive family and this sister in particular – I’m so glad she asked!

Thanks for reading,

Ronnie

anne and Ron

Sisters!

‘I Saw Him!’

mary Magdalene tells the disciples Christ has risen

Mary Magdalene is first with the good news ‘I have seen the Lord!’

Good morning and Happy Easter!

Romanesque manuscripts are a rich resource for iconographers. I have often wondered how a manuscript image would work painted on to a gessoed board instead of vellum. I had a small maple board (approx 6″x 8″) already prepared so I set aside the homework on my nativity icon to work on this small experimental piece during Lent.

I chose this image of Mary Magdalene announcing her news to the discples. It’s from the St Alban’s Psalter, one of several known to have been created at or for St Albans Abbey in the 12th century. I love their expressions and the long thin draperies contrasted with oversized hands and feet.

Icon board first stage of work for St Albans Psalter

Outline of figures added and oil gilding applied.

I transferred the outlines from my line drawing in red ochre then applied several layers of acrylic gold size (with some red ochre added to provide a contrast against the gesso) to adhere the transfer gold.

I then applied the base colours, including the richly coloured Caput Mortum for the background.

Ground terre verte azurite on icon board

Building up the layers of garment colours

7 a Magdalene and disciples st Albans

Gritty pigment

Some of my pigments are quite gritty. I like this varied texture on backgrounds but it’s hopeless to work with on tiny faces and details so I ground them up with a slab and muller and a spoon of water until they were very smooth.

The blue I used was a gift from my son who has recently been to Japan. While he was there he went to the new shop ‘Pigment‘ especially to buy me some! Here’s a sample of Azurite which I ground up and by levigating the mix I ground out three beautiful blues.

grinding up pigment from Tokyo PIGMENT

Kyojyo Gosu 6 Azurite from ‘Pigment’ in Tokyo

As the terre verte was too gritty to underpaint the small features on the faces, I used black and yellow to make green instead.

Underpainting faces

Underpainting faces using Maimeri yellow and a touch of ivory black

applying membrane to face painting

Adding the membrane to faces using maimeri yellow and white, a dash of red added later

6 face highlights

Building up highlights on the faces and adding the hair

The faces still seemed too pale so I added a few washes of French Ochre Havanna (also called Warm Ochre). Looking at the faces and hair this close up I can see there is still some work needed.

7 final faces

Deepening the shadows, adding vermillion to the eyes and white highlights

I added several layers of malachite over the terre verte to give this rich green.

8 St ALbans Psalter Magdalene announces news

The almost finished article.

To see the original manuscript, please visit the St Albans’s Psalter here and this icon is now available to buy from my Etsy shop here.

Wishing you all a blessed and happy Easter and as Mary Magdalene first said: ‘He is Risen!’

Thanks for reading

Ronnie

P.S. Prints and cards are now available of this icon from Smith York Printer


Drawing Heavenly Bodies: Virgin and Child Enthroned with attendant Archangels Raphael and Michael

pencil drawing of icon of virgin and child enthroned

Cartoon of the Virgin and Child Enthroned

Hello icon friends,

The summer before I embarked on the icon diploma course, I asked Aidan if there were any practical steps I could take to help my ability as a student icon painter. His answer was immediate: ‘Learn to draw!’ So I signed up to a really good local drawing class with David Brammeld and a year later Drawing the Street was born, not long before I was accepted on the Diploma course.

Drawing is becoming a way of life for me and I am always exploring ways to develop. There are many online classes and one which I have found refreshing and energetic is Sketchbook Skook

In the meantime, there is so much to learn with icon painting that I thought that I could share my cartoons of the figures for the triptych I’m working on, which might help you get started with your own icon studies.

You should be able to save these drawn images to your computers and print them off on A4.

The four images of the Angels of Chora are all borrowed from Aidan’s library. I hope to be able to credit the photographer in an update to this post.

Meanwhile, happy drawing!

Ronnie

pencil drawing of angel of Chora

Archangel Michael after one of the Angels of Chora

pencil drawing of Archangel Raphael

Archangel Raphael line drawing after one of the angels of Chora

Now for the full size images:

Virgin and Child Enthroned line drawing low res

angel of chora pencil drawing

Full length drawing of Archangel Michael taken from an angel of Chora

pencil drawing of Archangel Raphael

Archangel raphael full length line drawing

Image of Angel of Chora

Angel of Chora image courtesy of Aidan Hart’s image library

image of Angel of Chora

Angel of Chora images all courtesy of Aidan Hart’s image library.

Angel of chora

Angel of Chora images all courtesy of Aidan Hart’s image library.

angle of Chora black and white

Angel of Chora – images all courtesy of Aidan Hart’s image library.

Sanding for St Hilda of Whitby

Icon board

Highlight surface scratches on a gessoed icon board by rubbing in red ochre pigment

St Hilda of Whitby

St Hilda (c614-680) showing adjustments I need to make to head and shoulders

My homework for the next diploma session, is an icon of St Hilda, referring to an image painted by Aidan Hart. The icon can be seen further below and also on his website Aidan Hart Icons. During my childhood, Whitby was a favourite seaside destination from our home in York. The sight of the ruined abbey looming over the cliffs was a vivid landmark against what was often a cloudswept sky. This dramatic photograph courtesy of Mark Davis Photography shows how the abbey forms such a striking silhouette against the east coast sky.

Whitby abbey

Photo of Whitby Abbey by  Mark Davis Photography  http://www.mark-davis-photography.com/yorkshire/whitby-and-the-east-coast/

To think that St Hilda founded an an abbey and community in this wild landscape is remarkable and gives an insight into the strength of her character.

Icon by Aidan Hart of St Hilda of Whitby

St Hilda of Whitby by Aidan Hart

For this icon, I am using a flat plywood board.  I will oil gild the halo so the sanding only needs to be taken as far as 600 grit sandpaper. If you over-sand the gesso, the paint won’t stick.  I’m using an icon board which I gessoed last summer which I also sanded up to 120 grit paper. With hindsisght, I should have sanded it right up to 600 grit, as it is much easier to work outside in the warm than indoors in a UK January! Sanding gessoed boards is a dusty process so be prepared. Put a few sheets of newspaper over your worksurface and have your vacuum cleaner and a dust mask to hand. You will also need a medium sized dry paintbrush to brush the gesso dust out of the sandpaper, a cork sanding block and all the different grades of sandpaper to hand. Looking back on Dylan Hartley‘s notes which he gave us at our gessoing session last year (click here for a pdf copy SANDING ICON BOARDS by Dylan Hartley), Dylan reminds us that you should choose a place to sand where there is raking light ideally with one main light source. This helps to show up anomalies and scratches. The first sanding is done with 80 grit paper, then work up through 120, 180, 220, 320, 400 and 600 grades. It is important to use these in sequence and ensure that any grooves left by the gesso brushing are smoothed away.

Sandpaper

Splitting sandpaper sheets and filing them by grade

In the UK, sandpaper is sold in sheets about A4 size. I hadn’t realised until Aidan showed us, that if you fold and tear the paper in half lengthwise, then tear these strips into three, you can get six pieces ready to wrap around your block. Given that you go through sandpaper very quickly, it is worth spending time folding, tearing and filing the different sized papers into envelopes which does helps the flow of work.

brusgh off clogged sandpaper

Keep brushing off clogged sandpaper

It is really important to brush the sandpaper often – as soon as you have sanded the board a few times, lift the block and brush. You can also vacuum up the clogged paper to save dust clouds forming. The whole process is a bit of a faff as my glasses steam up when I wear a dust mask and they get covered with dust! Rubbing in a pinch of red ochre with cotton wool is a really effective way of seeing where the scratches are hiding. Even with good raking light, it is easy to miss a scratch until you start painting – and they are difficult to disguise later.

red ochre pigment on gesso

Identifying scratches in gesso by using red ochre pigment

Looking closely at the photo above, you can also see the horizontal marks made from clogged up sandpaper.

finished icon board

Icon board finished to 600 grit paper ready for painting and oil gilding

That’s the board now ready for me to trace on the drawing. More on that next time. Thanks for reading!   Ronnie

PS To see a demonstration by Dylan Hartley gessoing icon boards – there is a clip on You Tube here

An Archangel for Christmas

Archangel Gabriel on Watercolour Paper.

egg tempera painting

Archangel Gabriel on watercolour paper

Christmas greetings icon friends!

A few lines to say thank you for your companionship during my first year of icon painting. It has been lovely to have your quiet support and interest encouraging me to keep on posting and writing up notes etc!

There are a few more video clips of Aidan Hart’s in-class demonstrations over on You Tube and I have written up some supporting notes to go with them. These are not direct transcripts, simply notes to help as you try out the various stages of painting.

https://www.youtube.com/watch?v=N3a6puiMDuQ Aidan Hart demonstrates underpainting for the Membrane Technique Click here for Notes

https://www.youtube.com/watch?v=XaSi-WVHGaY Aidan Hart demonstrates applying flesh membrane to icon bust Click here for Notes

https://www.youtube.com/watch?v=Hr4R8BzMpPc Shadows and highlights on garments using membrane technique Click here for Notes

https://www.youtube.com/watch?v=CiFkJrsDS1s Aidan Hart demonstrating halos

https://www.youtube.com/watch?v=mFG-XxPqiSI Aidan Hart demonstrates painting Mandilion hair

https://www.youtube.com/watch?v=QbwE0QY1aOw Aidan Hart demonstrates painting garments Click here for Notes

I have enjoyed the monochrome icon studies on watercolour paper and thought I would have another go at the Archangel Gabriel based on the Annunciation of Ustyug. I stretched some Fabriano Artistico paper and painted using the membrane technique. The colours are much softer on paper – lines are not quite as crisp unless you go over them several times. However, it is a great way of practicing if you haven’t got a board prepared.

1 Angel gabriel study

Underpainting: the face is in Terre Verte and a touch of Yellow Ochre Maimeri, garments and wings in a mix of English red ochre, French ochre Sahara and Avana.

Yellow ochre Maimeri eith titanium white and red ochre light

Membrane applied to flesh parts.

Building up the hair and facial highlights.

4 Angel Gabriel study

Highlights added to wings and sleeves

Preparing to gild

Preparing to gild using Roberson’s gilders size – applied over the halo which has undercoat in red ochre.

Gilding the halo

Gilding the halo. Applying final facial highlights

9 Complete Angel Gabriel study

Finished angel with halo, staff and lettering.

It is a better attempt than my last one but there is a long way to go before I become fluent and produce anything nearly as elegant as the original. All the same, it comes with my very best wishes for a happy, peaceful and blessed Christmas wherever you are in the world. Thanks for reading.

Happy Christmas, Ronnie

PS…Some years later and I did revisit some of the finer details on Archangel Gabriel’s face – around the upper lip. I am now happy with this and it is listed here in my Etsy shop

Gabriel at Large

Gabriels face appears

Gabriels face taking shape

Hello again icon friends,

The image above represents a quick sidestep past another effort which ended up in the experience bin. I had started this stage quite pleased with my decision to stretch myself by working on a larger image. I transferred the outline of my final drawing of Gabriel on to A2 sized paper which gave Gabriel the space to outstretched his arm in full.

Transferring the final drawing

Transferring the final drawing on to unstretched A2 Fabriano Artistico watercolour paper

On went the image using a sheet of paper which I had rubbed with Armenian red bole (a red pigment) to act as transfer paper. Then I painted lightly over these lines to fix them.

Painting on the outline

Painting the outline on to the paper

So far so good. However, as I washed over the larger areas, the paper began to cockle.

Image of Gabriel 1

Image of Gabriel 1

I then got caught up concentrating on the face rather than building up the image lightly and evenly as a whole. I looked at the face in comparison with the original and decided I had gone so far adrift that it was only paper and I should start again, and start properly. I am sparing you a larger image of my first Gabriel who looks rather stern!

Gabriel looking nothing like the original!

Gabriel looking nothing like the original!

So, down to the DIY shop to buy an MDF board cut a little bigger than A2, together with some water colour tape and this time soak the paper in the bath for a few minutes, tape it to the board and let it dry. By this stage I had had enough, so I left the board and wet taped paper flat on the floor overnight and by morning it was dry and had stretched beautifully!

Gabriel with a softer face

Gabriel with a softer face

This time, I tried to develop the whole figure and garments at the same time. There are numerous mistakes with the garment folds which I realised as soon as we got the handouts on our next Icon session but at least I can see where I have gone adrift.

I have attached Aidan’s handout notes on painting standing figures and garments if you would like to find out more on this subject. I am concentrating on our homework for the time being but will come back to Gabriel in a few more weeks.

Day 7 Aidan Hart’s handout on standing figures 24 Feb 14

Adding shading to define the forms

Adding shading to define the forms

Gabriel underway

Gabriel set on the A2 paper

Thanks for reading!

Holy Noses!

Hello new icon friends!

Thank you for signing up to the blog – you have no idea how much that has strengthened my resolve to pay attention to my lessons and report back to you, hopefully fairly regularly. I will try not to let the posts get too long winded and aim to title all my documents/notes so you can find things later.

This course is far too exciting for me not to share, so it is great that you want to sit alongside – my invisible friends in Aidan’s classroom! Do let me know if you have any questions that I can ask him on your behalf.

I should have mentioned in my last post that our day begins with a lit candle and a prayer of dedication. I will attach the prayer as a pdf.

Prayer before an icon

Prayer 2

It’s Monday 18th November and I am going to get into the rhythm with some brush strokes. Then, I am going to try the ‘Drawing on the Right Side of the Brain‘ tip and turn St John upside down and begin a study of his nose.

nose study one

One of my fellow students, who paints exquisitely, explained that she builds up in very light layers using the finest of lines and very little paint on the brush. She leaves the pure white of the paper as highlights. Once she has established the form, only then does she begin to apply the darker strokes.

There should always be plenty of scrap paper below your palette to test your brush lines after each dip in the paint.

Second attempt at the nose

Second attempt at the nose

Well, looking at the nose upside down certainly helped. It is an improvement on nose 1 a few days ago. However, I have not caught the true shape of the highlights of where the nose bowl widens.  I have also missed the movement of the nose which very gradually curves from his brow on the saint’s right side. All these things become much more evident when you take a step back and look from a bit of a distance.

I am going to try a pencil study next to try and get a grip of the structure. Some days I just don’t have a full hour to set aside for icon practice so what I will do is more ten minute pencil studies of various parts of the face.

Work out the highlights by tracing over the shapes to identify the key pools of light and dark

Work out the highlights by tracing over the shapes to identify the key pools of light and dark

Pencil study of the nose

Pencil study of the nose

That’s enough of my holy noses, it’s time for morning coffee!

Thanks for reading and thank you God that I can share this with you today. All the best with your own icon practice.

Love Ronnie

BOOK SUGGESTION

Aidan recommended a book for us.  It is an American book and if you haven’t already got it, it is a treat for your Christmas wish list. It is a chunky book, paperback and has lots of good quality colour plates. Here are the links:

http://www.amazon.co.uk/gp/offer-listing/1588391140/ref=sr_1_1_olp?s=books&ie=UTF8&qid=1383298414&sr=1-1&keywords=byzantium+faith+and+power&condition=new

http://www.amazon.com/Byzantium-Metropolitan-Museum-Art-York/dp/1588391140/ref=sr_1_2?ie=UTF8&qid=1384766362&sr=8-2&keywords=Byzantium%3A+Faith+and+Power+%281261-1557%29+%28Paperback%29

Book cover image.