Dylan Hartley’s Top Tips for Gessoing Icon Boards
Dylan and Christina Hartley (seated) with Icon Diploma Students. Left to right Fran, Joan, Ekatarina, Olga, Ronnie, Rosie, Lee, Susan H, Janina, Michael. Martin is absent on honey moon!
A quick shuffle up and this one includes Susan M!
We have been learning about the process of making and gessoing icon boards. I used to think that gessoing was simply a matter of applying a few layers of whiting to some linen on a board and Bob’s your uncle. I couldn’t have been more wrong!

Dylan Hartley demonstrating how to mix gesso to Icon Diploma students
Just as well our teacher Aidan Hart, had set up a three day session with Dylan Hartley, to demonstrate the technique in his Ironbridge workshop.

Tools of a Master
These were three full days – no slacking for a minute! Dylan was taught by Aidan and through years of experience, he has found Aidan’s method to be the most fail safe – as long as he follows the instructions to the letter. This method is described in full in Aidan’s book ‘The Techniques of Icon and Wall Painting‘.
My notes/photos from the workshop are attached here: Dylan Hartleys Gesso workshop May 2014 but there is no way around it, gessoing boards is a labour intensive process. However, if done correctly, the results are of a very high standard. The workshop has changed my view of icon boards and I now regard them as works of art of in their own right.
http://youtu.be/hPqtXk3bEcc Link to a short clip of Dylan demonstrating the application of the first coat of gesso.
Dylan is always looking for ways to simplify the process or to avoid common pitfalls and he shared many of his tips with us during the workshop, ten of which are listed below. Dylan runs gessoing workshops from time to time, and I can thoroughly recommend attending. Not only is Dylan a very clear and wise teacher, but the workshops are held in Ironbridge – full of architectural and engineering treasures.

Encaustic tile details on the Jackfield Tile Museum
I have picked out ten of the best tips for you below.
1. Buy a slow cooker. Get one with a lift out bowl in a heated container, such as this one sold by Tesco for about £10 to £15. It keeps the gesso/glue mix warm for ages and is a lot simpler to use than a bain marie.

Slow cooker and cooking thermometer. Scrim has just been ‘dunked’ into the size.
2. Choose the best wood. Given the amount of work that goes into the gessoing process, it is a false economy to skimp on the wood – only use the best quality.
3 Mix Plenty. Mix over and above the amount of glue/gesso mix required to allow for evaporation. You don’t want to run out just before you have finished!
4. Work in sequence. Write numbers on the back of your boards then keep record sheets of when you apply the gesso coats. This is really important. You just have to get one distraction and you can forget where you were and scupper the sequence.
5 Prepare well in advance. Get all the materials and tools together. Turn off your phone, ignore the door bell, pack sandwiches and have cold drink/flask beside you.
Sketch of the kit you need to gesso icon boards
6. Find the front of the (hardwood) icon board. Pick up the wood and look at the short edge. If the curve of the end grain corresponds with the curve of your eye brow, then the side of the board facing you is the front. If not, then turn the board!
Finding the front of the icon board – look at the curves of the growth rings.
7. Mind where you position joins. If you are ordering (or making) an icon board which needs a join, it doesn’t have to be placed in the middle. Think about the image and ensure the join does not cross through a critical place (ie through the face).
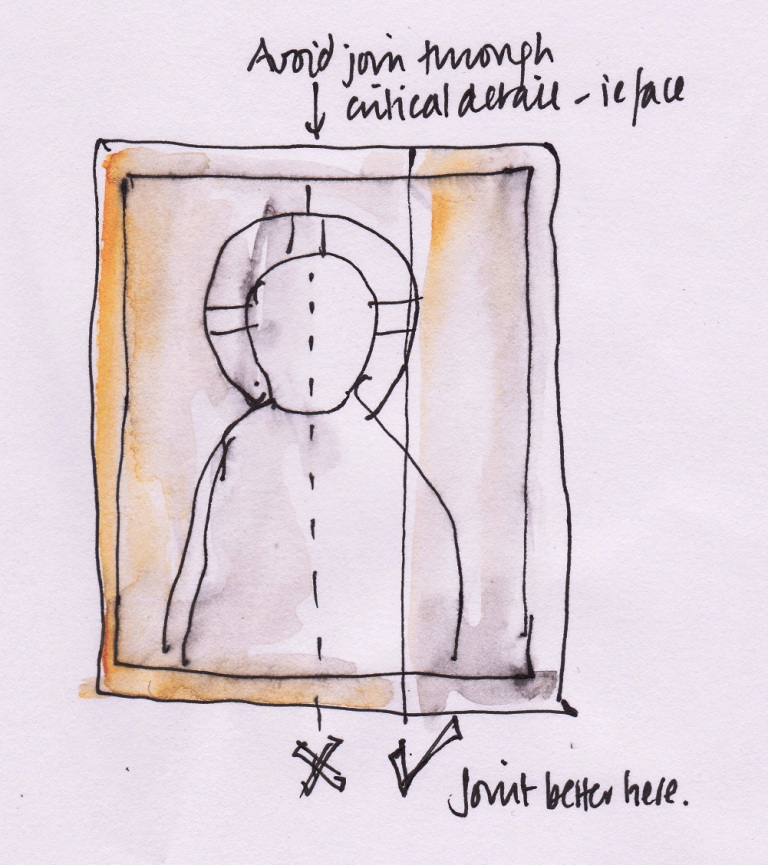
Sketch to show how it is better not to have a central join in an icon board
8. Support your board. A wooden plinth made out of battens helps to lift the icon board up from the surface and gesso drips/fallout building up below.
Timber plinth for gessoing icon boards plus some chisels and a gauge to measure depth of kovchek
9. Work with the weather. Gessoing is a job best saved until mild weather – too hot and the boards dry too fast, too cold and they take longer to dry. Ideal temperature is 18-24 degrees, so you can open and close the windows to help adjust the drying speed. Start early in the day. Get everything set up beforehand.
10. WARNING! Never let steel (or any metal objects for that matter apart from Stainless steel) touch the oak. The metal draws out the tannic acids a stain such as this below will gradually appear and you cannot get rid of it.

Thanks for reading!
